Mediterranean-Style Baked Grouper

a white, round baking dish filled with Mediterranean-Style Baked Grouper. Includes, grouper fish, olives, tomatoes, cannellini beans and lemon slices.

If you’re looking for a flavorful and healthy dinner recipe that’s easy to make, look no further than to this Mediterranean-Style Baked Grouper recipe. This baked fish dish is packed with fresh ingredients like cherry tomatoes, lemon slices, olives, cannellini beans, and garlic. The combination of these ingredients gives this quick and easy weeknight dinner a savory, tangy flavor that’s sure to please.

a white, round baking dish filled with Mediterranean-Style Baked Grouper. Includes, grouper fish, olives, tomatoes, cannellini beans and lemon slices.

LET’S TALK GROUPER

Grouper is a type of fish that belongs to the family Serranidae. They are commonly found in tropical and subtropical waters and are known for their mild, delicate flavor and firm, white flesh. Grouper can be prepared in a variety of ways, including grilling, baking, and frying.

Grouper is low in calories, and high in protein. This type of fish is an excellent choice for those who want to eat healthy. It’s also a good source of omega-3 fatty acids, which are essential for maintaining heart health.

Substitutes for Grouper

If grouper is hard to locate, any of the following types of fish are great substitutes:

  1. Snapper – Similar in texture and flavor to grouper, snapper is a good substitute when grouper is not available.
  2. Halibut – Halibut has a firm, flaky texture and a mild flavor that makes it a good substitute for grouper in many recipes.
  3. Cod – Cod is a white fish with a mild, slightly sweet flavor and a firm texture that makes it a versatile substitute for grouper.
  4. Sea Bass – Sea bass has a mild, sweet flavor and a firm, flaky texture that makes it a good substitute for grouper.
  5. Mahi-Mahi – Mahi-Mahi has a mild, sweet flavor and a firm, flaky texture that makes it a good substitute for grouper in many recipes.

Alternatively, prepare this Mediterranean-Style fish recipe using salmon. It’s a must try, and another great substitute for grouper.

INGREDIENTS FOR MEDITERRANEAN-STYLE GROUPER

Grouper – Use skinless grouper. Use a whole filet, or individual filets cut to about 5 to 6-ounces per person. Baking time will lessen when using individual fish filets.

Seasoning – Feel free to adjust the spices to your liking.

Olives – In Mediterranean cuisine, olives are often used as a topping for salads and pizzas, and as an ingredient in sauces, stews, and casseroles. They add a rich, salty flavor to dishes and pair well with other traditional Mediterranean ingredients such as tomatoes and herbs like oregano and thyme.

Cannellini Beans – Cannellini beans are a great addition to a baked fish recipe, as they add protein, fiber, and a creamy texture that compliments the flavors of the fish and other ingredients.

Tomatoes – Tomatoes are a common ingredient in healthy Mediterranean fish recipes and are used for their bright color, sweet flavor, and nutritional value.

Mediterranean-Style Grouper ready to be baked. A round, white baking dish is filled with a grouper filet, lemon slices, cherry tomatoes, olives and cannellini beans

HOW TO MAKE HEALTHY MEDITERRANEAN BAKED FISH

As mentioned above, this baked fish recipe is easy to prep and will take only 20 minutes to bake:

  1. Preheat the oven to 375°.
  2. Rinse the skinless grouper fillets and pat them dry with a paper towel. Place them in a large baking dish lined with olive oil.
  3. Season the grouper with the spice mixture. Add thinly sliced lemon to the top of the grouper.
  4. Surround the baking dish with the cherry tomatoes, cannellini beans, olives and garlic.
  5. Drizzle everything with a touch of olive oil. Season with salt and black pepper.
  6. Cover the baking dish with foil and bake for 20-25 minutes, or until the grouper is cooked through and flakes easily with a fork.
  7. Remove the foil and broil the fish for an additional 2-3 minutes, or until the top is golden brown.
  8. Serve the Mediterranean-Style Baked Grouper right out of the oven with your favorite side.

HOW TO SERVE AND STORE BAKED FISH

Overall, the key to serving a great side dish with Mediterranean-Style Baked Grouper is to keep it light, fresh, and flavorful. Choose a pairing that compliment the flavors of the fish without overpowering it. The incredible sauce formed from the tomatoes is a perfect pairing to the briny olives and rich, creamy cannellini beans.

Here are a few suggestions for what to serve alongside your healthy baked grouper:

  • Roasted vegetables: Roasted vegetables like zucchini, eggplant, bell peppers, and onions are a perfect compliment to the flavors of the baked grouper.
  • Rice, Couscous or quinoa: A light and fluffy grain like basmati rice, couscous or quinoa is a great way to balance out the richness of the baked grouper.
  • Green salad: A simple green salad with lettuce, cucumber, and cherry tomatoes is a refreshing and healthy side dish that pairs well with the Mediterranean-style flavors of the baked grouper. Dress the salad with a light vinaigrette made with olive oil, lemon juice, and Dijon mustard.
  • Tzatziki sauce: Tzatziki is a creamy Greek yogurt sauce that is flavored with garlic, cucumber, and dill. It’s a perfect compliment to the rich and flavorful baked grouper, and adds a refreshing and tangy element to the dish.

Leftovers

Leftover Mediterranean-Style Baked Grouper can last in the fridge for up to 3 days, if stored properly. To store leftover baked grouper, follow these steps:

  1. Allow the leftover baked grouper to cool down to room temperature.
  2. Place the leftovers in an airtight container or wrap them tightly with plastic wrap.
  3. When you’re ready to reheat the leftovers, remove them from the fridge and allow them to come to room temperature before reheating.
  4. Reheat the leftovers in a preheated oven at 350°F (175°C) for about 10 minutes, or until they are heated through.

It’s important to note that leftover baked grouper should be reheated to an internal temperature of 165°F (74°C) to ensure that it is safe to eat. Additionally, if the leftovers have been in the fridge for more than 3 days, or show any signs of spoilage such as an off smell or appearance, they should be discarded.

If you are a fan of grouper, try out a few of these recipes:

Print
clock clock iconcutlery cutlery iconflag flag iconfolder folder iconinstagram instagram iconpinterest pinterest iconfacebook facebook iconprint print iconsquares squares iconheart heart iconheart solid heart solid icon
a white, round baking dish filled with Mediterranean-Style Baked Grouper. Includes, grouper fish, olives, tomatoes, cannellini beans and lemon slices.

Mediterranean-Style Baked Grouper


5 Stars 4 Stars 3 Stars 2 Stars 1 Star

No reviews

Description

If you’re looking for a flavorful and healthy dinner recipe that’s easy to make, look no further than to this Mediterranean-Style Baked Grouper recipe. This fish dish is packed with fresh ingredients like cherry tomatoes, lemon slices, olives, cannellini beans, and garlic. The combination of these ingredients gives this quick and easy weeknight dinner a savory, tangy flavor that’s sure to please.


Ingredients

Scale
  • 1 lb. grouper filet, skinless and boneless
  • 1 tablespoon olive oil
  • 1/2 kosher salt, divided
  • 1 teaspoon black pepper, divided
  • 1/2 teaspoon garlic powder
  • 1/2 teaspoon onion powder
  • 1/2 teaspoon paprika
  • 1/2 teaspoon dried oregano
  • 1 lemon, sliced thin
  • 1 cup cherry tomatoes, halved
  • 1 can cannellini beans, rinsed and drained
  • 3/4 cup olives, pitted
  • 2 garlic cloves, sliced
  • 1 tablespoon fresh chopped parsley, for garnish

Instructions

  1. Preheat the oven to 375°.
  2. In a small bowl, mix together 1/4 salt, 1/2 teaspoon black pepper, the garlic and onion powder, paprika and oregano.
  3. Rinse the grouper filet(s) and pat them dry with a paper towel. Place them in a large baking dish lined with olive oil. 
  4. Season the grouper with the spice mixture. Top with thinly sliced lemon.
  5. Surround the baking dish with the cherry tomatoes, cannellini beans, olives and garlic.
  6. Drizzle everything with a touch of olive oil. Season with salt and black pepper. 
  7. Cover and bake for 20 to 25 minutes, or until the grouper is cooked through and flakes easily with a fork.
  8. Remove the cover and broil for 2 to 3 minutes, or until the top is golden brown.
  9. Serve immediately and ENJOY!

Notes

  • cut individual grouper filets into 5 to 6-ounce portions.
  • baking time will lessen when using individual filets
  • see post for additional tips and notes
  • Prep Time: 5 minutes
  • Cook Time: 25 minutes
  • Category: Dinner
  • Method: Easy
  • Cuisine: Seafood

Nutrition

  • Serving Size: 1 serving

GET TO KNOW ME!

A photo of me in a black floral dress cooking at the stovetop at Williams-Sonoma

I am more than just recipes. I love fashion and style too! Most importantly, I love my Family (my Hubby and my Fur Babies). My Husband (aka my “Kitchen Bitch”) means the world to me. He’s pretty damn cool too. Not only is he one of the nicest guys you will ever meet, he also has had a lengthy career in professional hockey. Not only winning two Stanley Cups with the Pittsburgh Penguins in the early ’90’s, but most recently winning the Calder Cup with the Charlotte Checkers, amongst many other accolades. If you live in Charlotte and play hockey, or have a family member who plays, be sure to contact him!

Our life has changed dramatically in the past few years with the passing of our two goldendoodles, Vegas and Viva. We were lucky enough to have Vegas for five years (totally wish it was longer). Most recently, losing our Viva to a brain tumor in July of 2020. We welcomed our mini goldendoodle 7, almost seven years ago. We just added the amazing Hazel! Of course, I am always posting tons and tons of photos! Be sure to check out my recipe for Pet Bone Broth! This broth is super rich in nutrients and will provide your pet with a multitude of health benefits!

Let’s Get Social!

Be sure to follow me on social media! I’m always talking food, fashion, and family! I also love sharing some of my favorite Amazon Finds too. Click here to check out my Amazon page! FacebookInstagramTikTokTwitter and Pinterest! THANK YOU!

Columbia’s Famous 1905 Salad

Columbia's Famous 1905 Salad in a wooden bowl with big wooden forks

Columbia’s Famous 1905 Salad is a classic dish that has been a staple of the Columbia Restaurant in Tampa, Florida, for over a century. This iconic salad was first created by the restaurant’s founder, Casimiro Hernandez Sr., in 1905, and has been a beloved menu item ever since. The salad is a delicious mix of lettuce, ripe tomatoes, baked ham, Swiss cheese, olives, and a secret blend of dressing. The flavor of Columbia’s 1905 Salad is unique and unforgettable.

Columbia's Famous 1905 Salad in a wooden bowl with big wooden forks

THE HISTORY OF COLUMBIA’S 1905 SALAD

The Columbia Restaurant was founded in 1905 by Casimiro Hernandez Sr., a Cuban immigrant who came to Tampa in search of a better life. He started his restaurant in the heart of Ybor City, a vibrant and bustling neighborhood that was home to many other immigrants from Cuba, Spain, and Italy.

Thanks to Hernandez’s innovative and delicious menu, the restaurant quickly became a favorite among locals and visitors alike. In 1905, he created the Famous 1905 Salad. Easily, this new dish would become one of the restaurant’s most popular and enduring offerings.

According to legend, Hernandez created the salad on a busy day when he needed to come up with a quick and satisfying meal for a group of hungry customers. Creatively, he took ingredients that he had on hand, including lettuce, tomatoes, ham, and Swiss cheese, and combined them with a dressing made from his own secret recipe.

Amazingly, the resulting salad was an instant hit. The 1905 Salad soon became a signature dish at the Columbia Restaurant. Over the years, the recipe has been passed down through the Hernandez family, and is still made today using the same basic ingredients and dressing.

HOW TO MAKE THE 1905 SALAD

Thankfully, making Columbia’s Famous 1905 Salad is relatively simple. However, the key to its success lies in the quality and freshness of the ingredients.

  • fresh, crisp lettuce
  • ripe tomatoes
  • baked ham
  • Swiss cheese
  • green olives

The secret to the salad’s unique flavor is the dressing. Luckily, it’s available for purchase. The exact recipe is a closely guarded secret, known only to the Hernandez family and a few trusted employees. However, after careful investigation, most believe the dressing is a blend of olive oil, vinegar, Worcestershire sauce, garlic and other spices.

To make the salad, the ingredients are tossed together in a large bowl, and then drizzled with the dressing. The result is a colorful and flavorful dish that is as delicious as it is visually appealing.

WHY IS COLUMBIA’S 1905 SALAD SO FAMOUS?

Over a century after its creation, Columbia’s 1905 Salad is still one of the most popular dishes on the restaurant’s menu. Here’s why:

  • the salad is simply delicious
  • fresh greens, savory ham, tangy Swiss cheese, and briny olives pair perfectly with the dressing
  • Columbia’s 1905 Salad has a strong sense of history and tradition
  • the restaurant is a beloved institution in Tampa, Florida and has been a gathering place for generations of family and friends
  • when ordering the Famous 1905 Salad, diners feel like they are participating in this rich history and sense of community

TIPS ON MAKING COLUMBIA’S FAMOUS 1905 SALAD

  • use fresh ingredients
  • spin the lettuce to remove excess water
  • dress using a high-quality olive oil
  • homemade croutons can be substituted with store-bought

SERVING AND STORING 1905 SALAD

Serve this Famous 1905 Salad as a meal, or with your favorite protein. This tasty salad would be great for a dinner party, or easy weeknight meal. Who doesn’t like a quick and easy salad for dinner recipe?

If you are preparing this amazing ham and Swiss salad for meal prep, store without dressing! Honestly, I tested placing the leftover dressed salad in the fridge, and it was really good. Albeit not as crunchy, but still incredible!

Store leftover salad in an airtight container for up to 3 days. Leftover 1905 Salad Dressing with last up to a week in the fridge.

MORE SALAD RECIPES!

If you love salads of any kind, take a look at these fabulous salad recipes:

Print
clock clock iconcutlery cutlery iconflag flag iconfolder folder iconinstagram instagram iconpinterest pinterest iconfacebook facebook iconprint print iconsquares squares iconheart heart iconheart solid heart solid icon
all of the ingredients for Columbia's famous 1905 salad in a big wooden salad bowl

Columbia’s Famous 1905 Salad


5 Stars 4 Stars 3 Stars 2 Stars 1 Star

No reviews

Description

Columbia’s Famous 1905 Salad is a classic dish that has been a staple of the Columbia Restaurant in Tampa, Florida, for over a century. This iconic salad was first created by the restaurant’s founder, Casimiro Hernandez Sr., in 1905, and has been a beloved menu item ever since.


Ingredients

Scale
  • 1 small head iceberg lettuce, chopped
  • 1/2 cup ham, julienned
  • 1/2 cup Swiss cheese, julienned
  • 2 large, ripe tomatoes or 1 cup cherry tomatoes
  • 1/4 Spanish or green olives
  • 1/4 red onion, thinly sliced
  • 1/2 cup Romano cheese, finely grated, plus for garnish
  • 1/2  to 3/4 cup croutons
  • cracked black pepper, for garnish

FOR THE DRESSING:

  • 1/2 cup olive oil
  • 1/3 cup white wine vinegar
  • 1 teaspoon Worcestershire sauce
  • 2 teaspoons lemon juice
  • 2 garlic cloves, minced
  • 1/8 teaspoon salt
  • 1/4 teaspoon black pepper
  • 1 teaspoon dried oregano

Instructions

  1. Mix all of the ingredients for the dressing in a bottle or bowl. Reserve.
  2. If making homemade croutons, cube bread and add to a bowl with a drizzle of olive oil and garlic salt. Lay on a baking sheet in a single layer. Bake in a 375° oven for 5 to 8 minutes. (toss a few times).
  3. Grab a large salad bowl. 
  4. Add in lettuce, red onion, cherry tomatoes, olives, ham, Swiss cheese, Romano cheese and croutons.
  5. Dress the salad to your liking (you will not need all of the dressing).
  6. Toss. Garnish with a touch more finely grated Romano cheese and freshly cracked black pepper.
  7. ENJOY!

Notes

  • spin the lettuce to remove added water
  • homemade croutons are best, but can be substituted with store-bought
  • use fresh ingredients
  • see post for additional notes and tips
  • Prep Time: 15 minutes
  • Category: Salad, Dinner
  • Method: Easy
  • Cuisine: American

Nutrition

  • Serving Size: 1 serving

GET TO KNOW ME!

I am more than just recipes. I love fashion and style too! Most importantly, I love my Family (my Hubby and my Fur Babies). My Husband (aka my “Kitchen Bitch”) means the world to me. He’s pretty damn cool too. Not only is he one of the nicest guys you will ever meet, he also has had a lengthy career in professional hockey. Not only winning two Stanley Cups with the Pittsburgh Penguins in the early ’90’s, but most recently winning the Calder Cup with the Charlotte Checkers, amongst many other accolades. If you live in Charlotte and play hockey, or have a family member who plays, be sure to contact him!

Our life has changed dramatically in the past few years with the passing of our two goldendoodles, Vegas and Viva. We were lucky enough to have Vegas for five years (totally wish it was longer). Most recently, losing our Viva to a brain tumor in July of 2020. We welcomed our mini goldendoodle 7, almost seven years ago. We just added the amazing Hazel! Of course, I am always posting tons and tons of photos! Be sure to check out my recipe for Pet Bone Broth! This broth is super rich in nutrients and will provide your pet with a multitude of health benefits!

Let’s Get Social!

Be sure to follow me on social media! I’m always talking food, fashion, and family! I also love sharing some of my favorite Amazon Finds too. Click here to check out my Amazon page! FacebookInstagramTikTokTwitter and Pinterest! THANK YOU!

Copycat Portillo’s Chopped Salad

The copycat version of Portillo's chopped salad in a big wooden bowl with wooden forks.

This hearty salad is a perfect meal for any time of day, whether you’re looking for a light lunch or a satisfying dinner. The good news is, you can easily recreate Portillo’s Chopped Salad at home using this recipe!

If you’ve ever visited a Portillo’s, you’re probably familiar with their famous chopped salad. It’s a refreshing and delicious mix of vegetables, meats, and cheese. All of the ingredients are chopped up into bite-sized pieces and tossed with a tangy, and slightly sweet, Creamy Italian Dressing.

Of course, I had to add my own spin on the famous salad. This salad recipe can be customized to your liking. You can add or subtract any ingredients you want, making it perfect for picky eaters, or those with dietary restrictions.

Ingredients

  • Lettuce: In my opinion, chopped mixed lettuce in a bag worked well. Feel free to substitute with chopped Romaine.
  • Bacon: The crispier, the better! Pre-cooked bacon can be used in a pinch!
  • Vegetables: Add or subtract to your liking.
  • Blue Cheese: Tangy blue cheese can be substituted with gorgonzola, feta, or your favorite cheese.
  • Dressing: This creamy Italian dressing was the perfect way to dress this salad. Simple olive oil and vinegar would be a great substitute.
  • Chicken: Leave out, or substitute with grilled shrimp.
  • Mayo: Yogurt would be a great substitute for the mayo.
  • Pepita: Roasted pepitas add another level of texture. Leave out, or substitute with your favorite toasted nuts!

How to Prepare Portillo’s Chopped Salad

  1. Start frying the diced bacon.
  2. As the bacon is frying, combine all of the ingredients for the dressing in a jar. Shake.
  3. Season the chicken breast with garlic powder, onion powder, paprika and black pepper on both sides.
  4. Cook the pasta to al dente, drain.
  5. Once the bacon is crisp, remove from the pan and allow the excess fat to drain on paper towels.
  6. Remove all but about two tablespoons of the bacon fat from the pan. Add the chicken breast.
  7. While the chicken is cooking, prep the remaining salad ingredients.
  8. Once the chicken is fully-cooked and browned on both sides, remove from the pan and chop into small pieces.
  9. Add the lettuce to a large bowl, along with the chicken, pasta and remaining ingredients.
  10. Dress the salad to your liking.
  11. Toss and serve in large bowls with crusty or garlic bread.

Tips on Making Copycat Portillo’s Chopped Salad

  • Feta or diced provolone can be substituted for the blue cheese.
  • To make this salad even healthier, eliminate the bacon and cheese. Add more vegetables like broccoli and/or cauliflower.
  • If you want to make this Copycat Portillo’s Chopped Salad ahead of time, you can prepare all of the ingredients and keep them separate until you’re ready to serve. Then just toss everything together with the dressing when you’re ready to eat.
  • This easy chopped salad can also be a great way to use up any leftover vegetables or meats you have in your fridge. Just chop them up and toss them in!
  • If preparing this crowd-pleasing salad for meal prep, leave out the avocado until ready to serve.
  • When chopping the ingredients, try to make the knife cuts as consistent, as you can. As for the red onion, I decided not to dice them. Oftentimes, a dice is just way too much of a bite. So, I sliced them very thin.
  • You WILL have leftover dressing! Store in the fridge for up to a week.
  • Serve with crusty bread or garlic toast!

How to Serve and Store Leftovers

This copycat Portillo’s Chopped Salad is hearty enough to serve on its own, but it also pairs well with:

  • Soup: A bowl of tomato basil soup or minestrone makes a comforting combo.
  • Bread: Serve with garlic bread, focaccia, or a warm baguette for a satisfying meal.
  • Serving: For the best texture, serve the salad immediately after adding the dressing. If you anticipate leftovers, keep the dressing separate and toss it in just before serving.
  • Storing: Store undressed salad in an airtight container in the refrigerator for up to 3 days. If already dressed, it’s best enjoyed within 24 hours to prevent sogginess.
  • Refreshing leftovers: If the lettuce softens, toss in a handful of fresh lettuce or cabbage to bring back some crunch before serving.

More Hearty Salad Recipes to Love

Print
clock clock iconcutlery cutlery iconflag flag iconfolder folder iconinstagram instagram iconpinterest pinterest iconfacebook facebook iconprint print iconsquares squares iconheart heart iconheart solid heart solid icon
The copycat version of Portillo's chopped salad in a big wooden bowl with wooden forks.

Copycat Portillo’s Chopped Salad


5 Stars 4 Stars 3 Stars 2 Stars 1 Star

No reviews

Description

This hearty salad is a perfect meal for any time of day, whether you’re looking for a light lunch or a satisfying dinner. The good news is, you can easily recreate Portillo’s Chopped Salad at home using this recipe!


Ingredients

Scale
  • 4 slices thick-cut bacon, diced
  • 1  5 to 6-ounce boneless chicken breast
  • 1/4 teaspoon garlic powder
  • 1/4 teaspoon onion powder
  • 1/4 teaspoon black pepper
  • 1/4 teaspoon paprika
  • 3/4 cup ditalini pasta
  • 4 cups mixed lettuce in a bag
  • 1/2 cup blue cheese crumbles
  • 3/4 cup cherry tomatoes, quartered
  • 3 mini cucumbers, halved and sliced thin
  • 1/4 red onion, thinly sliced
  • 1 avocado, diced
  • 2 tablespoons roasted pepitas
  • 1 teaspoon black pepper

FOR THE DRESSING:

  • 1/2 cup mayo
  • 1/3 cup olive oil
  • 1/3 cup white wine vinegar
  • 1 tablespoon lemon juice
  • 2 teaspoons Herb de Provence or Italian seasoning
  • 1 garlic clove, minced
  • 1/3 cup Parmesan cheese, finely grated
  • 1 teaspoon sugar

Instructions

  1. Start frying the diced bacon.
  2. As the bacon is frying, combine all of the ingredients for the dressing in a jar. Shake.
  3. Season the chicken breast with garlic powder, onion powder, paprika and black pepper on both sides.
  4. Cook the pasta to al dente, drain.
  5. Once the bacon is crisp, remove from the pan and allow the excess fat to drain on paper towels.
  6. Remove all but about two tablespoons of the bacon fat from the pan. Add the chicken breast.
  7. While the chicken is cooking, prep the remaining salad ingredients.
  8. Once the chicken is fully-cooked and browned on both sides, remove from the pan and chop into small pieces.
  9. Add the lettuce to a large bowl, along with the chicken, pasta and remaining ingredients.
  10. Dress the salad to your liking.
  11. Toss and serve in large bowls with crusty or garlic bread.

Notes

  • Don’t forget to salt the water for the pasta.
  • Chopped Romaine lettuce can be substituted for the bagged salad.
  • Add or Delete any of the salad ingredients based on your liking.
  • Salad yields 6 servings.
  • See post for more Tips and Notes!
  • Prep Time: 15 minutes
  • Cook Time: 15 minutes
  • Category: Lunch, Dinner, Meal Prep
  • Method: Easy
  • Cuisine: American

Nutrition

  • Serving Size: 1 serving

GET TO KNOW ME!

I am more than just recipes. I love fashion and style too! Most importantly, I love my Family (my Hubby and my Fur Babies). My Husband (aka my “Kitchen Bitch”) means the world to me. He’s pretty damn cool too. Not only is he one of the nicest guys you will ever meet, he also has had a lengthy career in professional hockey. Not only winning two Stanley Cups with the Pittsburgh Penguins in the early ’90’s, but most recently winning the Calder Cup with the Charlotte Checkers, amongst many other accolades. If you live in Charlotte and play hockey, or have a family member who plays, be sure to contact him!

Our life has changed dramatically in the past few years with the passing of our two goldendoodles, Vegas and Viva. We were lucky enough to have Vegas for five years (totally wish it was longer). Most recently, losing our Viva to a brain tumor in July of 2020. We welcomed our mini goldendoodle 7, almost seven years ago. We just added the amazing Hazel! Of course, I am always posting tons and tons of photos! Be sure to check out my recipe for Pet Bone Broth! This broth is super rich in nutrients and will provide your pet with a multitude of health benefits!

Let’s Get Social!

Be sure to follow me on social media! I’m always talking food, fashion, and family! I also love sharing some of my favorite Amazon Finds too. Click here to check out my Amazon page! FacebookInstagramTikTokTwitter and Pinterest! THANK YOU!

Crunchy Panko Crusted Fish Sandwich

Crispy Panko Crusted Fish Sanwich using a Brioche bun covered in sesame seeds with hand cut fries on the side and in the background

This Crunchy Panko Crusted Fish Sandwich is a delectable delight that will tantalize your taste buds! Serve this crunchy fish sandwich on a soft, toasted brioche bun and top with peppery arugula, and a tangy, homemade tartar sauce coleslaw. Add a side of Hand Cut Fries that are perfectly cooked to a crispy golden-brown and seasoned with just the right amount of salt.

For an special touch when serving this perfectly fried fish sandwich, display on this newspaper print parchment sheets.

Crispy Panko Crusted Fish Sanwich using a Brioche bun covered in sesame seeds with hand cut fries on the side and in the background

LET’S TALK FISH

Luckily, my local fishmonger had fresh corvina in stock on the day I made this Crunchy Fish Sandwich. Corvina fish is a type of marine fish that is highly valued for its mild and sweet flesh, making it a popular choice for seafood lovers.

This type of fish is quite versatile and can be cooked in various ways, including grilling, baking, and frying. Corvina is commonly found in Latin American, Caribbean, and Mediterranean cuisines. As a seafood delicacy, Corvina fish is a highly sought-after ingredient in gourmet dishes and is often served in high-end restaurants.

For a lighter and healthier preparation, try my Corvina with Tomatoes.

Substitutions for Corvina

Corvina is a firm, yet flaky fish that holds up well in a perfectly fried fish sandwich.

If you are unable to find Corvina fish in your area or simply want to try a different type of fish, there are several alternatives that can be used as substitutes. Here are some options:

  • Cod: Cod is a mild-tasting fish with a firm texture that can be substituted for Corvina in many dishes.
  • Red snapper: Red snapper has a similar texture and flavor to Corvina fish, making it a suitable replacement in many recipes.
  • Sea bass: Sea bass is another fish that can be substituted for Corvina. It has a mild, delicate flavor and firm flesh that works well in a variety of dishes.
  • Mahi-mahi: Mahi-mahi has a slightly stronger flavor than Corvina, but it has a similar texture and can be used in many of the same ways.
  • Halibut: Halibut is a firm and meaty fish that can be used as a substitute for Corvina in recipes where a mild flavor is desired.

Can I use frozen fish?

Fresh fish is preferred. However, if you do not have fresh, you can substitute with frozen. Thaw completely and pat dry to remove excess water.

INGREDIENTS TO MAKE A PANKO CRUSTED FISH SANDWICH

Fish – Fresh, skinless and boneless (center cut) filets weighing approximately 4 to 5 ounces.

Homemade Tartar sauce – Prepare homemade tartar sauce using my recipe, or use store-bought (my recipe will make more than enough to layer on the top bun and mix with the slaw.

Creamy Coleslaw – Mix green and red cabbage (or bagged coleslaw mix) with a touch of homemade tartar sauce instead of a traditional coleslaw dressing. As an alternative, top the Panko Crusted Fish with shredded lettuce.

Spices – The fish is simply seasoned with salt and pepper, whereas the flour dredge adds onion powder and garlic powder.

Panko – Coating the fish in panko breadcrumbs will create a deliciously crunchy texture. Alternatively, traditional breadcrumbs can be used.

Brioche Bun – Brioche buns have a rich, buttery flavor and chewy texture. Potato buns, ciabatta or Challah bread would be the closest substitutes.

Peppery Arugula – Arugula adds another flavor dimension. You can leave out, or substitute with shredded lettuce.

Oil – Both canola and peanut oil have a high smoke point and are great for perfectly frying fish.

HOW TO MAKE A CRISPY PANKO CRUSTED FISH SANDWICH

Follow my step-by-step instructions to create this Easy Fish Sandwich Recipe with Crispy Panko Breading. The fish will be perfectly fried and flavorful!

Homemade Tartar Sauce:

  • Combine all of the ingredients in a bowl for the homemade tartar sauce. Mix well. 
  • Add a few tablespoons of the homemade tartar sauce to the coleslaw mix. Coat well.
  • Place both the tartar sauce and coleslaw in the fridge while you prepare the fish.

Crispy Fish:

  • Heat the oil and melt the two tablespoons of butter in a deep frying pan (350° to 375°).
  • Prepare the dredging station by combining the flour, 1/4 teaspoon of salt, 1/4 teaspoon of black pepper, garlic powder and onion powder in a bowl. Whisk the eggs in a separate bowl. Add the panko breadcrumbs to another bowl.
  • Pat the fish dry and season on both sides with salt and pepper.
  • Lightly coat the fish in the flour. Shake off any excess.
  • Fully dip in the beaten egg, allowing any excess to drain off.
  • Add the fish to the panko breadcrumbs, making sure to coat on all sides and the edges.
  • Place the fish in the pan. Allow to fry until the fish is fully cooked, and crispy on all sides. Time will depend on the thickness of the fish (Approximately 6 minutes on one side and another 3 minutes on the other for a thicker cut of fish).

How to Assemble the Crunchy Panko Crusted Fish Sandwich:

  • While the fish is frying, brush the melted butter on the inside of the buns. Flip and brush the top of the buns with butter and sprinkle on sesame seeds. Toast in a toaster oven or oven.
  • Once the fish is fully-cooked and crunchy, allow to drain any excess oil on paper towels. Sprinkle with a touch of kosher salt.
  • Build the crunchy fish sandwich by adding a layer of homemade tartar sauce and a small handful of fresh arugula to the toasty bottom bun. Place the fish. Top with the coleslaw mix and top bun.
  • Serve with homemade french fries, or potato chips.

HOW TO SHALLOW FRY FISH

The oil has to be at the perfect temperature. If it’s too low, the coating will absorb too much grease. If it’s too hot, you not only run the risk of burning the panko crust, but the fish may not be fully-cooked.

This crunchy, panko-crusted fish recipe calls for a shallow fry, instead of a deep fry. Heat the oil and butter together in a deep frying pan to approximately 350° to 375°.

Deep Frying Fish

As an alternative to shallow frying the fish, feel free to deep fry. Anytime I deep fry, I always use this deep cast iron pot. Using a deep-fry thermometer is an easy way to test if the oil is hot enough.

Another simple method is to insert the tip of a wooden spoon into the oil. If bubbles surround the spoon, you are good to go. However, if the oil is bubbling against the spoon aggressively, the oil is too hot!

TIPS ON MAKING THE BEST CRUNCHY PANKO CRUSTED FISH SANDWICH

Here are some tips on how you can make this crispy, panko-crusted fish sandwich:

  • For best results, use fresh fish.
  • Coating the fish in seasoned flour first with help the crunchy panko breadcrumbs adhere to the fish when frying.
  • Make sure the oil is at the perfect temperature (between 350° and 375°)
  • If preparing homemade shoestring french fries, start deep frying them prior to frying the fish.
  • Fry the fish until it’s golden brown and crispy.
  • The homemade tartar sauce and coleslaw mix can be prepared ahead of time (recommended).
  • As an alternative to the tartar sauce coleslaw and arugula, add lettuce and tomato toppings.
  • Add cheese if you so desire.

MORE FISH AND CHIPS RECIPES

As an alternative to this easy to make crispy fish sandwich recipe, try some of my other fried and blackened fish recipes, along with fish and seafood ideas for lent:

Print
clock clock iconcutlery cutlery iconflag flag iconfolder folder iconinstagram instagram iconpinterest pinterest iconfacebook facebook iconprint print iconsquares squares iconheart heart iconheart solid heart solid icon
Crispy Panko Crusted Fish Sanwich using a Brioche bun covered in sesame seeds with hand cut fries on the side and in the background

Crunchy Panko Crusted Fish Sandwich


5 Stars 4 Stars 3 Stars 2 Stars 1 Star

No reviews

Description

This Crunchy Panko Crusted Fish Sandwich is a delectable delight that will tantalize your taste buds! This fish sandwich is served on a soft, toasted brioche bun and topped with peppery arugula, and a tangy tartar sauce coleslaw. But that’s not all! The dish is also accompanied by a side of Hand Cut Fries that are perfectly cooked to a crispy golden-brown and seasoned with just the right amount of salt.


Ingredients

Scale
  • 2, 4 to 5-ounce white fish filets, skin-off and boneless
  • 2 hamburger-style brioche buns
  • 1 teaspoon sesame seeds
  • 3/4 cup oil for frying
  • 2 tablespoons butter, plus enough melted for toasting the buns
  • 1/2 cup AP flour
  • 1/2 teaspoon salt, divided
  • 1/2 teaspoon black pepper, divided
  • 1/4 teaspoon garlic powder
  • 1/4 teaspoon onion powder
  • 2 eggs, beaten
  • 1 1/2 cups panko bread crumbs
  • 1 cup coleslaw mix (green and red cabbage)
  • 2 ounces fresh baby arugula

FOR THE TARTAR SAUCE:

  • 3/4 cup mayonnaise 
  • 1 tablespoon dill relish, plus a teaspoon of the liquid
  • 1 tablespoon sweet relish
  • 1 1/2 teaspoons stoneground mustard

Instructions

  1. Combine all of the ingredients in a bowl for the tartar sauce. Mix well. 
  2. Add a few tablespoons of the homemade tartar sauce to the coleslaw mix. Coat well.
  3. Place both the tartar sauce and coleslaw in the fridge while you prepare the fish.
  4. Heat the oil and melt the two tablespoons of butter in a deep frying pan (350° to 375°).
  5. Prepare the dredging station by combining the flour, 1/4 teaspoon of salt, 1/4 teaspoon of black pepper, garlic powder and onion powder in a bowl. Whisk the eggs in a separate bowl. Add the panko breadcrumbs to another bowl.
  6. Pat the fish dry and season on both sides with salt and pepper.
  7. Lightly coat the fish in the flour. Shake off any excess.
  8. Fully dip in the beaten egg, allowing any excess to drain off.
  9. Add the fish to the panko breadcrumbs, making sure to coat on all sides and the edges.
  10. Place the fish in the heated oil. Allow to fry until fish is fully cooked and crispy on all sides. Time will depend on the thickness of the fish (Approximately 6 minutes on one side and another 3 minutes on the other for a thicker cut of fish).
  11. While the fish is frying, brush the melted butter on the inside of the buns. Flip and brush the top of the buns with butter and sprinkle on sesame seeds. Toast in a toaster oven or oven.
  12. Once the fish is fully-cooked and crunchy, allow to drain any excess oil on paper towels. Sprinkle with a touch of kosher salt.
  13. Build the sandwich by adding a layer of homemade tartar sauce and a small handful of fresh arugula to the toasty bottom bun. Place the fish. Top with the coleslaw mix and top bun.
  14. Serve with homemade french fries or chips. 
  15. ENJOY!

Notes

    • For best results, use fresh fish.
    • Coating the fish in seasoned flour first with help the crunchy panko breadcrumbs adhere to the fish when frying.
    • Make sure the oil is at the perfect temperature (between 350° and 375°)
    • If preparing homemade shoestring french fries, start deep frying them prior to frying the fish.
    • Fry the fish until it’s golden brown and crispy.
    • The homemade tartar sauce and coleslaw mix can be prepared ahead of time (recommended).
    • As an alternative to the tartar sauce coleslaw and arugula, add lettuce and tomato toppings.

  •  

  •  

  •  

  •  

  •  

  •  

  • Prep Time: 10 minutes
  • Cook Time: 12 minutes
  • Category: Dinner
  • Method: Moderate
  • Cuisine: Seafood

Nutrition

  • Serving Size: 1 sandwich

GET TO KNOW ME!

I am more than just recipes. I love fashion and style too! Most importantly, I love my Family (my Hubby and my Fur Babies). My Husband (aka my “Kitchen Bitch”) means the world to me. He’s pretty damn cool too. Not only is he one of the nicest guys you will ever meet, he also has had a lengthy career in professional hockey. Not only winning two Stanley Cups with the Pittsburgh Penguins in the early ’90’s, but most recently winning the Calder Cup with the Charlotte Checkers, amongst many other accolades. If you live in Charlotte and play hockey, or have a family member who plays, be sure to contact him!

Our life has changed dramatically in the past few years with the passing of our two goldendoodles, Vegas and Viva. We were lucky enough to have Vegas for five years (totally wish it was longer). Most recently, losing our Viva to a brain tumor in July of 2020. We welcomed our mini goldendoodle 7, almost seven years ago. We just added the amazing Hazel! Of course, I am always posting tons and tons of photos! Be sure to check out my recipe for Pet Bone Broth! This broth is super rich in nutrients and will provide your pet with a multitude of health benefits!

Let’s Get Social!

Be sure to follow me on social media! I’m always talking food, fashion, and family! I also love sharing some of my favorite Amazon Finds too. Click here to check out my Amazon page! FacebookInstagramTikTokTwitter and Pinterest! THANK YOU!

Blackened Salmon Rice Bowl

a blackened salmon rice bowl with roasted Brussels Sprouts topped with a mayo sriracha sauce

Oftentimes, we correlate healthy food, with tasteless food. This does NOT have to be the case. You just need to know how to impart flavor when creating healthy meals. This protein-packed, Blackened Salmon Rice Bowl recipe is super healthy, delicious, and so quick and easy to prepare. The flavor from the homemade blackening seasoning will blow you away. Additionally, roasting the Brussels Sprouts adds another dimension of both texture, and smokiness. This rice bowl recipe can also be adapted using your favorite protein. Blackened chicken and/or shrimp are great alternatives to the salmon.

a blackened salmon rice bowl with roasted Brussels Sprouts topped with a mayo sriracha sauce

LET’S TALK SALMON

Typically, Faroe Island salmon is my go-to when creating salmon recipes. This type of salmon is farm-raised. However, it is raised in a contained area of the salmon’s natural habitat. The fat lines in this salmon make it difficult to overcook, and become dry.

If you are looking for a sustainable, wild-caught salmon alternative, King (Chinook) salmon is a great option. Sockeye has a rich flavor and texture and can also be used in this Salmon Bowl recipe.

Salmon Substitutes

  • Arctic char
  • Steelhead

Protein Alternatives

If you are not a fan of salmon, try this Blackened Rice Bowl using:

  • chicken
  • shrimp
  • tuna
  • white fish (ie. cod, flounder, mahi, grouper)
  • beef

WHAT IS BLACKENING SEASONING

If you are looking to amp up any meal with big and bold flavors, a blackening seasoning blend will do the trick! Do not let the name fool you, most blackened seasonings are not “hot.” Yes, it is spicy and it does bring a little heat, but not overpowering like other fiery seasoning blends. However, if you are looking to add a blast of heat to your dish, you can easily adjust the spice blend.

Although this cajun-type of seasoning is available for purchase, I highly recommend making your own. Honestly, you likely have everything to make this delicious homemade seasoning in your spice drawer. Leftover seasoning can be sealed in an airtight container and will last up to three months in your pantry.

Just to clarify, the term blackening actually refers to the cooking technique, using a cast iron pan with high heat. Cooking the protein in this manner will give it a charred crust on both sides.

WHAT ABOUT THE RICE

Rice is so very easy to prepare and relatively inexpensive. A few months ago, I purchased this easy to use rice cooker. Bibigo Rice is my go-to for a yummy, microwavable rice option.

In my opinion, the choice of rice in this Blackened Salmon Recipe is just a matter of preference. We can debate all day about the health benefits of brown rice vs. white rice. Go with what you enjoy!

I would however, avoid using sushi rice. Sushi rice will only add a heaviness to this light and healthy dish. The following are all great rice options:

  • basmati
  • jasmine
  • black rice
  • brown rice
  • wild rice

Why limit these healthy dinner bowls to just plain rice? Try any of these as the base to your Salmon Bowl:

LET’S TALK VEGGIES FOR BLACKENED SALMON RICE BOWLS

Roasted Brussels Sprouts added the perfect amount of smokiness and texture to this dish. Honestly, if you are looking for additional or alternative(s) vegetable options for this Blackened Salmon Rice Bowl, the sky is the limit. Again, a matter of preference. Here are a few options:

  • broccoli
  • cauliflower
  • mushrooms
  • carrots
  • zucchini
  • kimchi
  • cucumber
  • edamame

HOW TO MAKE THE BEST BLACKENED SALMON RICE BOWL

Here are a few tips to how to make this Blackened Salmon Rice Bowl recipe come out perfectly, every single time:

  • timing is everything (if cooking rice, as opposed to using a microwavable option, do this first)
  • use skinless salmon
  • cut salmon into equal, bite-sized pieces
  • roast the Brussels Sprouts while you are preparing the salmon, blackening seasoning and sauce.
  • adjust the spice level of the blackening seasoning to your liking
  • salmon bites can also be prepared in the air fryer or traditional cast iron pan

Air Fryer Salmon Bites

Using the air frying to prepare these spicy salmon bites can be a time saver, as they can air fry while the Brussels Sprouts are roasting.

Here’s how:

  • preheat the air fryer to 390°
  • spray the inside of the basket with non-stick spray
  • place the salmon bites (may have to prepare in batches depending on the size of the air-fryer)
  • air fry the salmon for about 8 to 10 minutes, flipping halfway (internal temperature should be 145° for salmon that is not sushi-grade

HOW TO MAKE THE SPICY SWEET MAYO SAUCE

The sauce is made by combining kewpie mayo (can use regular mayo) with sriracha and sweet chili sauce. Honestly, the taste of this sriracha mayo is out of this world. However, it will add a few more calories and fat to the dish. So, use just a touch. As an alternative, you can top this Salmon Bowl with:

  • chili crisp oil
  • sesame ginger vinaigrette
  • sesame oil
  • soy sauce
  • ponzu sauce

MEAL PREP AND LEFTOVER SALMON RICE BOWLS

Rice bowls are great for meal prep. This Blackened Salmon with Roasted Brussels Sprouts is a healthy and easy meal prep idea. Seal in airtight containers. Prepare meals for the entire week, or enjoy leftovers, for up to three days in the fridge.

Print
clock clock iconcutlery cutlery iconflag flag iconfolder folder iconinstagram instagram iconpinterest pinterest iconfacebook facebook iconprint print iconsquares squares iconheart heart iconheart solid heart solid icon
a blackened salmon rice bowl with roasted Brussels Sprouts topped with a mayo sriracha sauce

Blackened Salmon Rice Bowl


5 Stars 4 Stars 3 Stars 2 Stars 1 Star

No reviews

Description

This Blackened Salmon Rice Bowl recipe is super healthy, delicious, and so quick and easy to prepare. The flavor from the homemade blackening seasoning will blow you away. Additionally, roasting the Brussels Sprouts adds another dimension of both texture, and smokiness. This rice bowl recipe can also be adapted using your favorite protein. Blackened chicken and/or shrimp are great alternatives to the salmon.


Ingredients

Scale
  • 1 pound salmon, skinless
  • 2 teaspoons fresh lemon juice
  • 1 1/2 cups cooked rice
  • 3 tablespoons homemade blackening seasoning (see recipe below)
  • 1 pound Brussels sprouts, halved
  • 1 tablespoon olive oil
  • 1 teaspoon salt
  • 1 teaspoon black pepper
  • 1/4 cup mayo
  • 1 tablespoon sriracha
  • 1 to 2 tablespoons sweet chili sauce
  • 1 teaspoon sesame seeds (optional)

BLACKENING SEASONING

  • 1 tablespoon garlic powder
  • 1 tablespoon paprika
  • 1 tablespoon dried oregano
  • 2 teaspoons onion powder
  • 2 teaspoons dried thyme
  • 2 teaspoons black pepper
  • 2 teaspoons kosher salt
  • 1 to 2 teaspoons cayenne pepper

Instructions

  1. Prepare the rice. 
  2. Heat oven to 400°.
  3. Trim the ends of the Brussels sprouts and cut in half.
  4. Place on a sheet pan. Drizzle with olive oil.
  5. Season with salt and pepper. Toss to coat.
  6. Roast until browned. About 8 to 10 minutes, tossing a few times. 
  7. As the sprouts are roasting, combine all of the ingredients for the blackening season. Mix well.
  8. Cut the salmon into 1″ cubes.
  9. Place salmon in a bowl. Coat with the lemon juice.
  10. Sprinkle on the blackening season. Toss to coat. 
  11. Place salmon pieces on a parchment lined sheet pan.
  12. Once you remove the sprouts, reduce the oven temperature to 350°.
  13. Bake salmon bites for about 8 minutes. 
  14. Mix the ingredients for the sauce. 
  15. Add 1/2 cup rice to a serving bowl, with a third each of the salmon and sprouts.
  16. Drizzle on the spicy mayo.
  17. Sprinkle with sesame seeds (optional)
  18. ENJOY!

Notes

SEE POST FOR NOTES!

  • Prep Time: 10 minutes
  • Cook Time: 20 minutes
  • Category: Dinner
  • Method: Easy
  • Cuisine: Healthy

Nutrition

  • Serving Size: 1 serving

GET TO KNOW ME!

a photo of me leaning against a brick wall with my logo, "Charlotte Fashion Plate" to the left of me

I am more than just recipes. I love fashion and style too! Most importantly, I love my Family (my Hubby and my Fur Babies). My Husband (aka my “Kitchen Bitch”) means the world to me. He’s pretty damn cool too. Not only is he one of the nicest guys you will ever meet, he also has had a lengthy career in professional hockey. Not only winning two Stanley Cups with the Pittsburgh Penguins in the early ’90’s, but most recently winning the Calder Cup with the Charlotte Checkers, amongst many other accolades. If you live in Charlotte and play hockey, or have a family member who plays, be sure to contact him!

Our life has changed dramatically in the past few years with the passing of our two goldendoodles, Vegas and Viva. We were lucky enough to have Vegas for five years (totally wish it was longer). Most recently, losing our Viva to a brain tumor in July of 2020. We welcomed our mini goldendoodle 7, almost seven years ago. We just added the amazing Hazel! Of course, I am always posting tons and tons of photos! Be sure to check out my recipe for Pet Bone Broth! This broth is super rich in nutrients and will provide your pet with a multitude of health benefits!

Let’s Get Social!

Be sure to follow me on social media! I’m always talking food, fashion, and family! I also love sharing some of my favorite Amazon Finds too. Click here to check out my Amazon page! FacebookInstagramTikTokTwitter and Pinterest! THANK YOU!

Kofta Kabobs with Labne Tzatziki

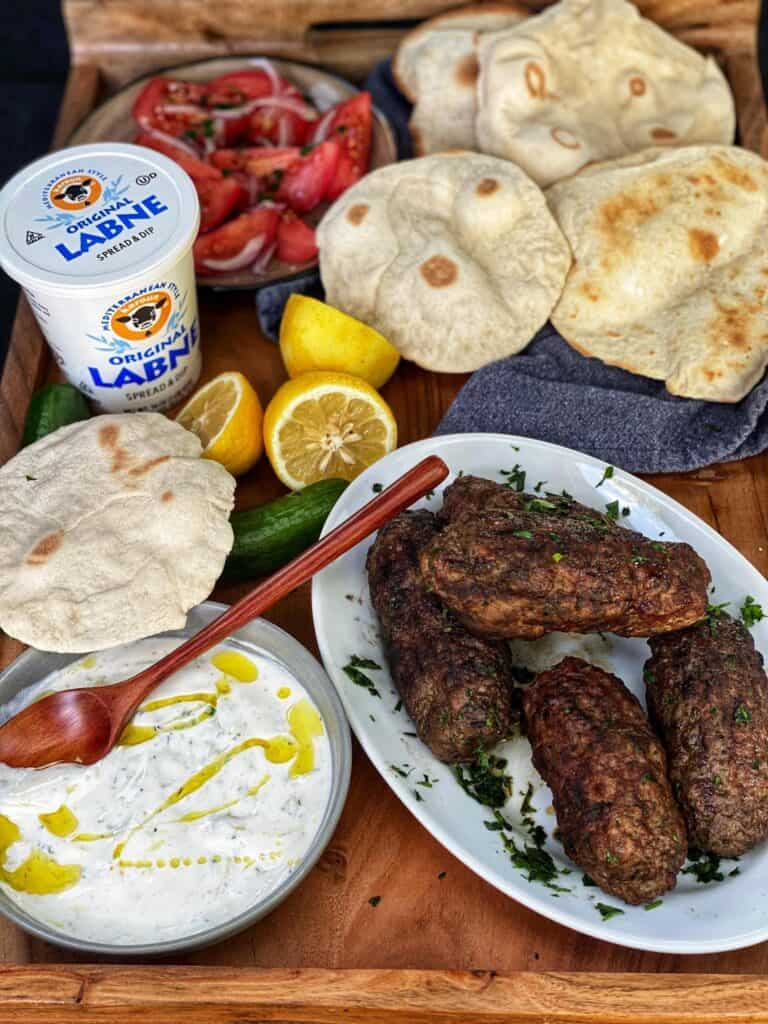
an overhead shot of a wooden platter with a plate of lamb koftka kabobs with labne tzatziki, fresh pitas, lemons and a container of Karoun labne

I’m super excited to have entered another recipe contest. This was a bit challenging for me as I have not had prior experience using the star of this show, Karoun Dairies’, Labne. My Serbian heritage automatically drew me to lamb, and my LOVE for cevapi. Kofta is quite similar. Flavors of the world unite with this unique recipe for Kofta Kabobs with Labne Tzatziki. Your tastebuds will be doing a dance. I absolutely enjoyed creating this phenomenal meal combining ingredients and techniques from global cuisines.

an overhead shot of a wooden platter with a plate of lamb koftka kabobs with labne tzatziki, fresh pitas, lemons and a container of Karoun labne

WHAT IS LABNE (LABNEH)?

Labne (labneh) is a tangy and thick, fermented dairy product. Not only is labne creamy and delicious, it is also packed with probiotics and key nutrients. Honestly, I just knew the incredible flavor profile of the labne would make for one amazing Labne Tzatziki Sauce.

In keeping with a “traditional, healthy Mediterranean diet, one that is rich in nutritious cheeses and yogurts,” Karoun Dairies’ food products are only made using “fresh, growth hormone-free, real California milk.”

For a list of Karoun’s product offerings, click here. To find these amazing products locally, click here!

Be sure to follow Karoun Dairies on Facebook, Instagram and Twitter!

me holding a container of Karoun labne

WHAT IS TZATZIKI SAUCE?

Tzatziki is a dip, sauce or soup found in Middle Eastern and Southern European cuisines. This tangy, smooth sauce typically contains a blend of strained yogurt, cucumbers, salt, olive oil, fresh dill and lemon juice. For this tzatziki sauce recipe, traditional Greek yogurt was substituted with Karoun’s labne. Oh, and if you know me, just a few of my own special touches.

As a delicious dip, this Labne Tzatziki recipe is a perfect accompaniment to gyros and souvlaki (kabobs).

TIPS ON MAKING THE BEST LABNE TZATZIKI

Labne Tzatziki should be smooth and creamy with just a bit of texture from the grated cucumber. Cucumbers have a high water content. So, it’s imperative to draw out as much water as possible.

Do you have to peel the cucumbers prior to preparing Labne Tzatziki? Absolutely not. It’s all a matter of preference!

Here are few tips to achieve the perfect consistency to this fabulous Labne sauce.

  • grate the cucumbers on a box grater (alternatively use a vegetable peeler and chop)
  • place cucumbers in a mesh strainer over a bowl for at least 15 minutes.
  • squeeze as much of the remaining water out of the cucumbers
  • use a food processor or an immersion blender to create a smooth labne tzatziki sauce
  • fold in the cucumbers after the sauce has processed
  • taste for salt
  • place in fridge while preparing the lamb kofta kabobs
a blue bowl of labne tzatziki garnished with olive oil and fresh rosemary with a container of Karoun labne and fresh pita bread in the background

Alternative methods to grilling kofta kabobs

If you do not have access to a grill, utilize the stovetop using a cast iron pan, grill pan or you can even an electric griddle. Additionally, if you are using one of these alternative cooking sources, you will want to forgo using the wooden skewers.

HOW TO MAKE KOFTA KABOBS

As mentioned above, I grew up Serbian. Cevapi is considered the national dish of Bosnia, and is quite similar to Koftka (Kofte) Kabobs. Imagine a skinless sausage made of minced meat (typically lamb and beef) married with spices and grilled to perfection.

So, I used a lot of what I know about making cevapi to make this version of Kofta Kabobs with Labne Tzatziki.

Here are a few tips:

  • use quality ingredients
  • lamb is a must
  • a combination of lamb and beef (85/15) will provide for the most flavor
  • grate the garlic and onion
  • use Middle Eastern spices to amp up the flavor profile (za’atar is a beautiful blend of herbs)
  • baking soda and warm water replace a beaten egg to bind
  • do NOT over mix the mix
  • allow the meat mixture to sit in the fridge for at least an hour
  • if using wooden skewers, be sure to soak them for about an hour in water
  • metal skewers can be used instead of wooden
  • once formed into sausages, place back in fridge to firm up prior to grilling
  • grill to only medium/medium-well (130° – 135°)

HOW TO SERVE KOFTA KABOBS with LABNE TZATZIKI

Honestly, one could just dip these fabulous lamb and beef sausages in this tasty Labne Tzatziki.

However, wrapping the kofta inside warm homemade pita bread and drizzled with this tangy labne sauce is the perfect way to enjoy this dish. Tuck in a spoonful of a fresh tomato and red onion salad for the perfect bite. Additionally, serve with lemon wedges.

Leftover tzatziki can be used as a dip with pita bread, or even as a dressing for your favorite garden salad.

HOW TO STORE LEFTOVER KOFTA KABOBS WITH LABNE TZATZIKI

The good news is that both the Lamb Kofta Kabobs and the Labne Tzatziki will last up to four days in the fridge. Place the tzatziki in an air-tight container prior to storing. Remove the skewers from the lamb kabobs. Wrap the kofta tightly in plastic wrap or tin foil and store in the fridge.

Fresh is best when serving tzatziki sauce. So, freezing is not recommended. Kofta Kabobs (uncooked) can easily be flash frozen and will last up to four months. Grilled kabobs can also be frozen if sealed and stored properly and will last up to two months.

Print
clock clock iconcutlery cutlery iconflag flag iconfolder folder iconinstagram instagram iconpinterest pinterest iconfacebook facebook iconprint print iconsquares squares iconheart heart iconheart solid heart solid icon
an overhead shot of a wooden platter with a plate of lamb koftka kabobs with labne tzatziki, fresh pitas, lemons and a container of Karoun labne

Kofta Kabobs with Labne Tzatziki


5 Stars 4 Stars 3 Stars 2 Stars 1 Star

No reviews

Description

Flavors of the world unite with this unique recipe for Kofta Kabobs with Labne Tzatziki. Your tastebuds will be doing a dance. 


Ingredients

Scale

FOR THE LABNE TZATZIKI:

  • 1 cup Karoun Labne
  • 2 mini cucumbers 
  • 1/3 cup Greek yogurt
  • 1 tablespoon sour cream
  • 1 glove garlic
  • 1/2 teaspoon salt
  • 1/2 teaspoon black pepper
  • 1 teaspoon fresh rosemary, chopped (plus more for garnish)
  • zest of one lemon
  • juice of 1/2 lemon
  • 2 teaspoons olive oil, divided

FOR THE KOFTA KABOBS:

  • 2 pounds ground lamb
  • 1 pound ground beef
  • 2 cloves garlic, grated
  • 1/2 white onion, grated
  • 1 teaspoon cinnamon
  • 1 teaspoon Za’atar
  • 1 teaspoon black pepper
  • 2 teaspoons kosher salt
  • 1 teaspoon paprika
  • 1 teaspoon baking soda
  • 1/4 cup hot water
  • 2 tablespoons fresh parsley, chopped
  • 10 to 12 wooden skewers

ADDITIONS:

  • fresh pita bread
  • lemon wedges

Instructions

  1. Add the ground lamb and beef to a large bowl.
  2. Add in the remaining ingredients (except the skewers).
  3. Mix until just uniform and combined (try not to over mix).
  4. Cover and place in fridge for at least an hour to overnight.
  5. Grate the cucumbers and allow to sit over a bowl in a mesh strainer for 15 minutes.
  6. Squeeze out any remaining water.
  7. In a food processor, combine the Karoun labne, Greek Yogurt, sour cream, garlic, salt, pepper, rosemary, lemon zest and lemon juice.
  8. Pulse to form a creamy mixture.
  9. Pulse in about 1 teaspoon of olive oil.
  10. Add mixture to a bowl and fold in the grated cucumber. 
  11. Cover and place in fridge to chill. 
  12. Remove kofta mixture from the fridge and form into sausages (about 3″ long).
  13. Place soaked wooden skewer through one end and place onto a platter (use two, if necessary)
  14. Once all sausages are formed, chill in fridge while warming up the grill. 
  15. Coat grill grate will non-stick spray.
  16. Place skewers. Rotate often until the internal temperature reaches 130°-135°.
  17. Remove from grill.
  18. Discard skewer and place kabobs onto a serving platter.
  19. Stir the labne tzatziki. Spoon into a serving bowl. Drizzle with olive oil and garnish with fresh rosemary.
  20. Place a kabob, or two inside a warmed pita with an optional fresh salad of tomatoes and red onion. 
  21. Spoon on plenty of labne tzatziki.
  22. Optionally serve with fresh lemon wedges.
  23. ENJOY!

Notes

SEE POST FOR NOTES AND TIPS!

  • Prep Time: 1 hour, 20 minutes
  • Cook Time: 10 minutes
  • Category: Dinner
  • Method: Moderate
  • Cuisine: Middle Eastern

Nutrition

  • Serving Size: 1 serving

GET TO KNOW ME!

a photo of me leaning against a brick wall with my logo, "Charlotte Fashion Plate" to the left of me

I am more than just recipes. I love fashion and style too! Most importantly, I love my Family (my Hubby and my Fur Babies). My Husband (aka my “Kitchen Bitch”) means the world to me. He’s pretty damn cool too. Not only is he one of the nicest guys you will ever meet, he also has had a lengthy career in professional hockey. Not only winning two Stanley Cups with the Pittsburgh Penguins in the early ’90’s, but most recently winning the Calder Cup with the Charlotte Checkers, amongst many other accolades. If you live in Charlotte and play hockey, or have a family member who plays, be sure to contact him!

Our life has changed dramatically in the past few years with the passing of our two goldendoodles, Vegas and Viva. We were lucky enough to have Vegas for five years (totally wish it was longer). Most recently, losing our Viva to a brain tumor in July of 2020. We welcomed our mini goldendoodle 7, almost seven years ago. We just added the amazing Hazel! Of course, I am always posting tons and tons of photos! Be sure to check out my recipe for Pet Bone Broth! This broth is super rich in nutrients and will provide your pet with a multitude of health benefits!

Let’s Get Social

Be sure to follow me on social media! I’m always talking food, fashion, and family! I also love sharing some of my favorite Amazon Finds too. Click here to check out my Amazon page! FacebookInstagramTikTokTwitter and Pinterest! THANK YOU!

Phyllo Wrapped Spinach Salmon

phyllo wrapped spinach salmon packet cut in half laying on a brown plate with green beans

Are you tired of another boring baked salmon recipe? Well then, this Phyllo Wrapped Spinach Salmon recipe is for YOU! As fancy as this salmon dinner sounds and looks, it’s quite simple and quick to prepare. Additionally, these packets of goodness can be assembled ahead of time, stored in the fridge and baked when you are ready. The combination of crunch from the baked, flaky phyllo dough round out the creaminess from the spinach mixture and the soft, delicate texture of the salmon.

As always, I love showing you all how to make my dishes, especially my fish and salmon recipes. So, be sure to watch the short video I created on TikTok making this fabulous baked salmon recipe in the recipe below. If you have not yet signed up for this social media platform, use my code 5SSIS800K0H06 to create an account.

a photo of me holding a piece of phyllo wrapped spinach salmon so that you can see the inside, the other half is lying on a brown plate with green beans

HOW TO CHOOSE THE PERFECT SALMON

Typically, Faroe Island salmon is my go-to when creating salmon recipes. This type of salmon is farm-raised. However, it is raised in a contained area of the salmon’s natural habitat. The fat lines in this salmon make it difficult to overcook, and become dry.

If you are looking for a sustainable, wild-caught salmon alternative, King (Chinook) salmon is a great substitute. Sockeye salmon, given its rich flavor and texture, would probably not work as well in this spinach stuffed salmon recipe.

Salmon Substitutes

  • Arctic char
  • Steelhead Salmon
  • Chicken

HOW BEST TO WORK WITH RAW PHYLLO DOUGH

Phyllo is a super thin pastry dough. Phyllo dough can be used in both sweet and savory dishes. If you are so inclined, feel free to make your own. However, this pastry dough is readily available in the frozen, or refrigerated section of most grocery stores.

Working with phyllo dough can be a B!t$h! Well, only if you let it!

  • Two things you MUST keep in mind when baking with this flaky dough, keep it cold and moist.
  • Remove from the fridge just prior to use.
  • As you are brushing each flaky sheet with melted butter, keep a damp paper towel covering the remaining sheets.
  • A buttery spray can be substituted for real butter.

ADDITIONAL TIPS TO MAKE THE BEST PHYLLO WRAPPED SPINACH SALMON

  • follow package instructions for thawing the phyllo dough
  • work on a flat surface
  • do not worry if the phyllo tears (we are using four sheets)
  • completely cover the entire surface of the dough with butter or butter alternative
  • be sure to remove the skin from the salmon
  • cut the salmon filets to equal portions for an even bake
  • season the salmon filets
  • fold ends of each salmon stuffed packet underneath to help seal (see video)
  • if you are preparing more than two salmon packets, brush packets with melted butter and place in fridge as you go along
  • line baking sheet with parchment paper

SALMON WELLINGTON

This Phyllo Wrapped Spinach Salmon recipe is very similar to what you may know as Salmon Wellington. However, there are two major differences:

  • Salmon Wellington is typically prepared using puff pastry instead of phyllo dough (if using puff pastry, be sure to make slits in the top of the pastry to vent
  • Dijon mustard is a key component to Salmon Wellington (not called for in this recipe)

WHAT TO SERVE WITH PHYLLO WRAPPED SPINACH SALMON

This flaky salmon packet is relatively hearty on its own. Serve with a side salad or steamed vegetable of your choice.

LEFTOVER SALMON PACKETS

  • Leftover Phyllo Wrapped Salmon can be stored in the fridge for up to three days. To reheat, place in a 350° oven for about 6 to 8 minutes.
  • As mentioned above, these phyllo salmon packets can be prepared ahead of time and baked before serving. The spinach mixture should be cooled, prior to placing on top of the fish. Store in the fridge.
  • Alternatively, seal properly and freeze immediately, for later use. The salmon packets will last up to two months in the freezer.
Print
clock clock iconcutlery cutlery iconflag flag iconfolder folder iconinstagram instagram iconpinterest pinterest iconfacebook facebook iconprint print iconsquares squares iconheart heart iconheart solid heart solid icon
phyllo wrapped spinach salmon packet cut in half laying on a brown plate with green beans

Phyllo Wrapped Spinach Salmon


5 Stars 4 Stars 3 Stars 2 Stars 1 Star

No reviews

Description

As fancy as Phyllo Wrapped Spinach Salmon may seem, it’s a quite simple and quick recipe to prepare. Additionally, these packets of goodness can be assembled ahead of time, stored in the fridge and baked when you are ready. The combination of crunch from the baked, flaky phyllo dough round out the creaminess from the spinach mixture and the soft, delicate texture of the salmon.


Ingredients

Scale
  • 2 6-ounce salmon filets, skin removed
  • 8 sheets phyllo, thawed
  • 4 tablespoon butter, melted
  • 1/2 teaspoon kosher salt
  • 1/2 teaspoon black pepper
  • 4 cups fresh baby spinach
  • 1 teaspoon olive oil
  • 1 clove garlic, minced
  • 1 small shallot, minced
  • 1/2 teaspoon kosher salt
  • 1 teaspoon black pepper
  • 4 ounces whipped cream cheese, room temperature
  • 1 teaspoon lemon zest
  • 1/2 cup Parmesan cheese, freshly grated

Instructions

  1. Thaw 8 sheets of phyllo dough, according to package instructions. (Keep chilled)
  2. Heat oven to 400°.
  3. Sauté the spinach, garlic and shallots in the olive oil until just wilted.
  4. Transfer the spinach mixture to a bowl.
  5. Season with kosher salt and black pepper. 
  6. Add the cream cheese, lemon zest and Parmesan cheese. Mix well.
  7. Season the salmon filets with salt and pepper.
  8. Top each salmon filet with equal parts of the spinach mixture.
  9. Lay one sheet of phyllo dough on a flat surface. Brush with the melted butter.
  10. Place another sheet on top. Brush with more melted butter. Continue with two more sheets.
  11. Place one salmon filet in the middle. Wrap up super tight, like a package (SEE VIDEO).
  12. Place on a parchment lined baking sheet. Repeat with the remaining phyllo sheets and salmon filet.
  13. Brush the packets with melted butter (all over).
  14. Bake for 20 to 25 minutes. The packets should be browned and crispy.
  15. Serve and ENJOY!

Notes

SEE POST FOR NOTES AND TIPS!

  • Prep Time: 15 minutes
  • Cook Time: 25 minutes
  • Category: Dinner
  • Method: Moderate
  • Cuisine: Seafood

LET’S GET SOCIAL!

I am more than just recipes. I love fashion and style too! Most importantly, I love my Family (my Hubby and my Fur Babies). My Husband (aka my “Kitchen Bitch”) means the world to me. He’s pretty damn cool too. Not only is he one of the nicest guys you will ever meet, he also has had a lengthy career in professional hockey. Not only winning two Stanley Cups with the Pittsburgh Penguins in the early ’90’s, but most recently winning the Calder Cup with the Charlotte Checkers, amongst many other accolades. If you live in Charlotte and play hockey, or have a family member who plays, be sure to contact him!

Our life has changed dramatically in the past few years with the passing of our two goldendoodles, Vegas and Viva. We were lucky enough to have Vegas for five years (totally wish it was longer). Most recently, losing our Viva to a brain tumor in July of 2020. We welcomed our mini goldendoodle 7, almost seven years ago. We just added the amazing Hazel! Of course, I am always posting tons and tons of photos! Be sure to check out my recipe for Pet Bone Broth! This broth is super rich in nutrients and will provide your pet with a multitude of health benefits!

FOLLOW ME!

Be sure to follow me on social media! I’m always talking food, fashion, and family! I also love sharing some of my favorite Amazon Finds too. Click here to check out my Amazon page! FacebookInstagramTikTokTwitter and Pinterest! THANK YOU!

Creamy Spinach Orzo Pasta

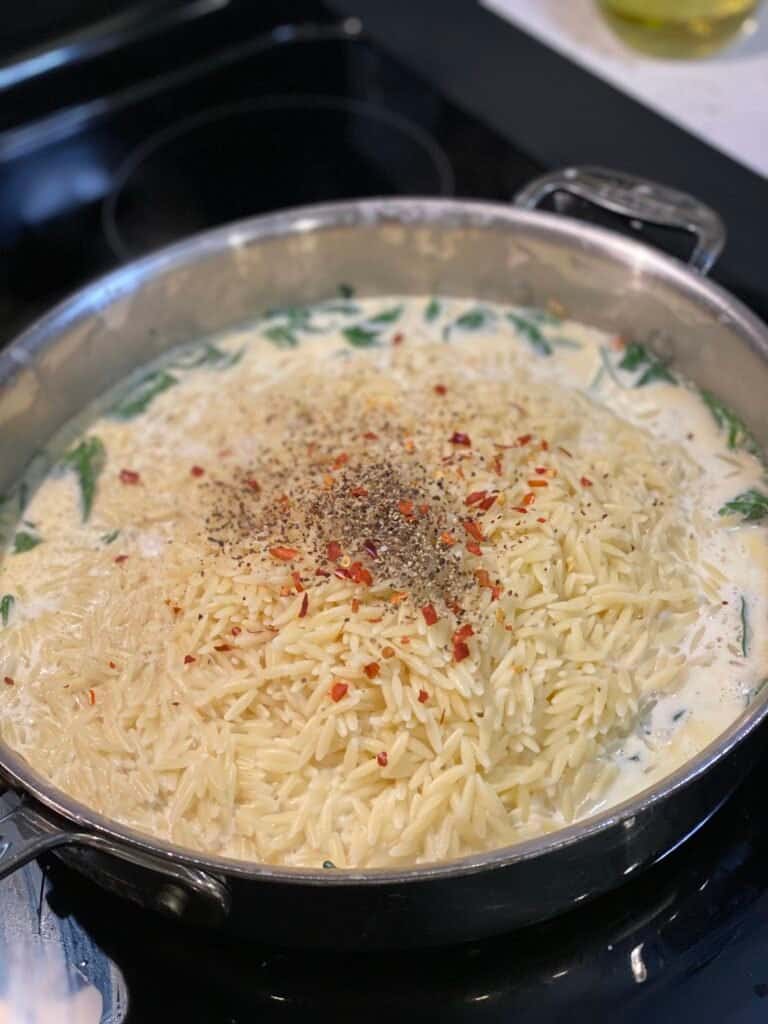
a pan of creamy spinach orzo pasta

I’m guessing, some of you will find all of the ingredients needed to make this Creamy Spinach Orzo Pasta, in your kitchen! Reminds me, I need to create a blog listing my must-have fridge and pantry staples . Basically, I had zero desire to run to the market the other evening. So, I foraged through my fridge and found spinach I needed to use. In my opinion, there was no better option than to create this fabulous creamy pasta dish. Serve this super quick and easy orzo pasta as a side dish, or as a main course paired with your favorite protein.

You have no idea how much fun I had filming a TikTok video creating this fabulous spinach pasta dish. Be sure to check out the video below. If you have not yet signed up for this social media platform, use my code 5SSIS800K0H06 to create an account.

a pan of creamy spinach orzo pasta

SUBSTITUTES FOR ORZO PASTA

No orzo pasta in the pantry? No problem! This Creamy Spinach Pasta recipe will also work well with any of the following:

  • acini de pepe
  • couscous
  • ditalini
  • cauliflower rice
  • spaghetti or linguine to serve as a main course

Spinach

Frozen spinach can be substituted for fresh. Be sure to thaw and squeeze out most of the water content. Kale may also be a great alternative as long as you cut into thin strips.

TIPS ON MAKING THE BEST CREAMY SPINACH ORZO PASTA

In order to achieve that rich, silky texture of this creamy pasta, you MUST use pasta water! In fact, I would suggest using pasta water in all of your pasta sauce recipes. This starchy liquid brings an entire new element of flavor and thickness to any sauce.

Additionally, consider the following useful tips:

  • drop the pasta at the same time you start preparing the sauce (timing is everything)
  • use my recipe ingredient amounts as a guide (this quick pasta recipe is more about technique)
  • Pecorino Romano is a great substitute for Parmesan (always use freshly grated)
  • add the grated cheese in small quantities (you will achieve a smoother sauce with no clumps)
  • use baby spinach (it’s more tender and the stems are not as woody)
  • crushed red pepper flakes are optional, yet highly encouraged
  • keep the added salt level to a minimum (the pasta water and cheese add enough saltiness)
  • transfer the pasta directly from the pot with a slotted spoon (the added pasta water will only enhance the sauce)
ingredients waiting to be mixed together in a pan for creamy spinach orzo pasta

SERVING SUGGESTIONS

Serve this Spinach Orzo Pasta as a side dish, or main course. I think we can all agree that this makes for a great vegetarian pasta option. Additionally, this creamy pasta will pair perfectly with salmon, chicken, and/or pork.

LEFTOVER ORZO PASTA

Leftover spinach orzo pasta should be stored in an airtight container. The pasta will last up to four days in the fridge, making this Creamy Spinach Orzo Pasta a great addition to your meal prep menu.

Placing leftovers in the freezer is not recommended due to the content of cream and cheese.

Print
clock clock iconcutlery cutlery iconflag flag iconfolder folder iconinstagram instagram iconpinterest pinterest iconfacebook facebook iconprint print iconsquares squares iconheart heart iconheart solid heart solid icon
a pan of creamy spinach orzo pasta

Creamy Spinach Orzo Pasta


5 Stars 4 Stars 3 Stars 2 Stars 1 Star

No reviews

Description

A Creamy Spinach Orzo Pasta recipe is a great way to use up fridge and pantry items. Serve this orzo pasta as a side dish, or to compliment your favorite protein. It’s a super quick and easy pasta recipe! 


Ingredients

Scale
  • 12 to 16 ounces orzo pasta
  • 1 tablespoon salt
  • 2 tablespoons olive oil
  • 2 to 3 garlic cloves, thinly sliced
  • 1/2 teaspoon crushed red pepper flakes
  • 1 to 2 ladles pasta water, divided
  • 1 cup heavy whipping cream
  • 1 teaspoon black pepper
  • 3/4 Parmesan cheese, freshly grated, divided
  • 12 ounces fresh baby spinach

Instructions

  1. Boil water for the pasta. Do not forget to salt the water.
  2. Drop the pasta.
  3. In a separate pan on medium heat, add the olive oil, garlic and crushed red pepper. 
  4. Allow to cook for a minute or two before adding a ladle of the pasta water. Cook for another minute.
  5. Add the heavy whipping cream. Cook for another minute to start thickening.
  6. Season with black pepper.
  7. Whisk in about 1/3 cup of the cheese.
  8. Add the spinach to wilt.
  9. Add a touch more pasta water and another 1/3 cup of cheese. Cook another minute.
  10. Add the pasta directly from the pot with a slotted spoon.
  11. Season again with a touch more black pepper and crushed red pepper (optional)
  12. Mix.
  13. Check the sauce. Too thick? Add a touch more pasta water, and/or cream. Too thin, add small amount of cheese.
  14. Garnish with the remaining cheese.
  15. SERVE immediately and ENJOY!

Notes

SEE POST FOR TIPS AND NOTES!

  • Prep Time: 2 minutes
  • Cook Time: 8 minutes
  • Category: Side dish
  • Method: Easy
  • Cuisine: American

Nutrition

  • Serving Size: 1 serving

LET’S GET SOCIAL!

I am more than just recipes. I love fashion and style too! Most importantly, I love my Family (my Hubby and my Fur Babies). My Husband (aka my “Kitchen Bitch”) means the world to me. He’s pretty damn cool too. Not only is he one of the nicest guys you will ever meet, he also has had a lengthy career in professional hockey. Not only winning two Stanley Cups with the Pittsburgh Penguins in the early ’90’s, but most recently winning the Calder Cup with the Charlotte Checkers, amongst many other accolades. If you live in Charlotte and play hockey, or have a family member who plays, be sure to contact him!

Our life has changed dramatically in the past few years with the passing of our two goldendoodles, Vegas and Viva. We were lucky enough to have Vegas for five years (totally wish it was longer). Most recently, losing our Viva to a brain tumor in July of 2020. We welcomed our mini goldendoodle 7, almost seven years ago. We just added the amazing Hazel! Of course, I am always posting tons and tons of photos! Be sure to check out my recipe for Pet Bone Broth! This broth is super rich in nutrients and will provide your pet with a multitude of health benefits!

FOLLOW ME!

Be sure to follow me on social media! I’m always talking food, fashion, and family! I also love sharing some of my favorite Amazon Finds too. Click here to check out my Amazon page! FacebookInstagramTikTokTwitter and Pinterest! THANK YOU!

Poached Chilean Sea Bass

two poached Chilean sea bass filets in a pan with wilted spinach, poaching liquid and cannellini beans

This fish recipe is everything! Trust me, you will be making this Poached Chilean Sea Bass over, and over again! Poaching the fish creates this light, flaky and super moist texture. The combination of flavors in the poaching liquid will make you want to savor every last drop. Fresh jalapeños give this fish dish just a hint of heat, without being overbearing. Super fresh ingredients make this one superb dish with zero guilt.

Naturally, I created a short video on TikTok showing you how to prepare this fabulous sea bass dish. Be sure to check it out in the recipe down below. If you have not yet signed up for this social media platform, use my code 5SSIS800K0H06 to create an account.

two poached Chilean sea bass filets in a pan with wilted spinach, poaching liquid and cannellini beans

WHAT IS CHILEAN SEA BASS?

Did you know that the real name of Chilean sea bass is Patagonian toothfish? In addition, it’s not really a sea bass. Chilean sea bass is caught in the deep waters near Antarctica.

WHAT DOES CHILEAN SEA BASS TASTE LIKE?

Sea bass is a white fish with a mild, delicate flavor with just a hint of sweetness. The flesh of Chilean sea bass is buttery and tender. Once cooked, the flesh becomes moist and flakes off in medium-sized pieces. Sea bass is an excellent choice for those who do not prefer a strong, “fishy” tasting fish.

SUBSTITUTES FOR SEA BASS

Chilean sea bass can be quite expensive. Additionally, it may be difficult to locate. In either case, grouper, cod, Alaskan Pollock, orange roughy and/or sablefish would be great substitutes for Chilean sea bass.

WHAT DOES IT MEAN TO POACH FISH

Poaching fish is easier than you may think. Basically, the fish is allowed to simmer in liquid. Poaching is a simple, quick and delicious cooking technique that can be used on filets or whole fish. I can assure you, this Poached Chilean Sea Bass recipe will be on repeat. The following are perfect examples of fish that are best for poaching:

  • Sea bass
  • Mahi Mahi
  • Barramundi
  • Arctic char
  • Dover sole
  • Salmon
  • Halibut

TIPS ON POACHING CHILEAN SEA BASS

So, you have scored the most perfect sea bass filets. As mentioned above, they were probably quite expensive. Given this, you will want to follow these simple tips for poaching Chilean sea bass to perfection:

  • use my combination of liquid, herbs, acid and vegetables to create a tasty poaching liquid
  • taste the poaching liquid prior to adding the fish (taste for salt, acid, etc) adjust taste to your liking
  • once the tomatoes have cooked down, add more stock, if needed
  • base the poaching time on the thickness of the fish (8 to 10 minutes for a 1 1/2″ to 2″ thickness)
  • try not to overcook
  • do NOT boil the fish in the liquid…just a simmer!

HOW TO SERVE POACHED CHILEAN SEA BASS

This recipe for Poached Chilean Sea Bass can be served on its on own, or with steamed rice and/or crusty bread. Believe me, you will want to enjoy all of that incredible poaching liquid.

Poached fish would be an excellent addition to your Feast of the Seven Fishes menu on Christmas Eve! Also, if you are a fan of halibut, check out this similar recipe for Pan Seared Halibut in a Spicy Tomato Broth!

WHAT TO DO WITH LEFTOVER POACHED FISH

Poached fish will last up to two to three days in the fridge stored in an airtight container.

Freezing this Poached Chilean Sea Bass can be done. Store in an airtight container and place in the bottom of the freezer to allow the fish to freeze quickly. The frozen poached fish will last up to three months in the freezer.

Print
clock clock iconcutlery cutlery iconflag flag iconfolder folder iconinstagram instagram iconpinterest pinterest iconfacebook facebook iconprint print iconsquares squares iconheart heart iconheart solid heart solid icon
two poached Chilean sea bass filets in a pan with wilted spinach, poaching liquid and cannellini beans

Poached Chilean Sea Bass


5 Stars 4 Stars 3 Stars 2 Stars 1 Star

No reviews

Description

You will be making this Poached Chilean Sea Bass over, and over again! Poaching the fish creates this light, flaky and super moist texture. The combination of flavors in the poaching liquid will make you want to savor every last drop. Fresh jalapeños give this fish dish just a hint of heat, without being overbearing. Super fresh ingredients make this one superb dish with zero guilt.


Ingredients

Scale
  • 26 to 7 ounce Chilean sea bass filets, skinless
  • 1/2 teaspoon kosher salt
  • 1/2 teaspoon black pepper
  • 1 tablespoon olive oil
  • 1 small shallot, minced
  • 2 garlic cloves, minced
  • 1 cup cherry tomatoes, halved
  • 1 jalapeño, thinly sliced
  • 1/2 teaspoon kosher salt
  • 1/2 teaspoon black pepper
  • 1/2 cup white wine
  • 1 cup chicken stock, plus
  • juice of one orange
  • juice of 1/2 lemon
  • 1 can cannellini beans, rinsed and drained
  • 4 ounces fresh baby spinach

Instructions

  1. Give the fish filets a gently rinse. 
  2. Pat dry and season with kosher salt and black pepper. 
  3. Reserve in fridge until ready to use.
  4. Sauté the shallots and garlic in olive oil in a deep pan for about a minute.
  5. Add the tomatoes and jalapeño slices.
  6. Season with kosher salt and black pepper.
  7. Cook for a few minutes.
  8. Pour in the white wine, chicken stock, orange juice and lemon juice.
  9. Cover and allow to simmer for about 8 minutes. Breaking down the tomatoes, often.
  10. Add additional stock or wine to the poaching liquid, if needed.
  11. Place the fish filets in the poaching liquid. Spoon over some of the liquid.
  12. Cover and allow the fish to poach until the fish is no longer translucent. About 8 to 10 minutes for 1 1/2″ to 2″ thickness.
  13. Once a fork can easily pierce through the flesh, the fish is done. Try not to overcook. 
  14. Add in the cannellini beans and spinach. Allow the spinach to wilt just a minute, or so. 
  15. Serve with steamed rice and crusty bread.
  16. ENJOY!

Notes

SEE POST FOR NOTES!

  • Prep Time: 5 minutes
  • Cook Time: 18 minutes

Nutrition

  • Serving Size: 1 serving

LET’S GET SOCIAL!

I am more than just recipes. I love fashion and style too! Most importantly, I love my Family (my Hubby and my Fur Babies). My Husband (aka my “Kitchen Bitch”) means the world to me. He’s pretty damn cool too. Not only is he one of the nicest guys you will ever meet, he also has had a lengthy career in professional hockey. Not only winning two Stanley Cups with the Pittsburgh Penguins in the early ’90’s, but most recently winning the Calder Cup with the Charlotte Checkers, amongst many other accolades. If you live in Charlotte and play hockey, or have a family member who plays, be sure to contact him. He is known as one of the best skate sharpeners in the world!

Our life has changed dramatically in the past few years with the passing of our two goldendoodles, Vegas and Viva. We were lucky enough to have Vegas for five years (totally wish it was longer). Most recently, losing our Viva to a brain tumor in July of 2020. We welcomed our mini goldendoodle 7, almost seven years ago. We just added the amazing Hazel! Of course, I am always posting tons and tons of photos! Be sure to check out my recipe for Pet Bone Broth! This broth is super rich in nutrients and will provide your pet with a multitude of health benefits!

SOCIAL MEDIA

Be sure to follow me on social media! I’m always talking food, fashion, and family! I also love sharing some of my favorite Amazon Finds too. Click here to check out my Amazon page! FacebookInstagramTikTokTwitter and Pinterest!