Stuffed Roasted Turkey Breast (Turkey Roulade)

a french plate filled with slices of stuffed roasted turkey breast and mashed potatoes covered in turkey gravy

Elevate your Thanksgiving dinner with this Stuffed Roasted Turkey Breast, over the traditional whole turkey. This recipe offers a unique twist on the holiday classic, delivering a flavorful and moist turkey roulade that is generously filled with homemade sausage stuffing. This rolled turkey is both visually impressive, and incredibly delicious.

So, I did a thing! My first e-book, also in paperback, is all about Mastering Thanksgiving Dinner! It’s an easy read filled with timelines, checklists, all of your turkey questions, a handful of my favorite recipes, and so much more! Please check it out!

You will need the following kitchen tools to successfully create a moist, tender and fully-cooked turkey breast:

TURKEY BREAST VS WHOLE TURKEY

Roasted turkey, whole or just the breast, is a holiday favorite, especially at Thanksgiving. If you are just not feeling the whole bird, a roasted turkey breast is a great alternative. Honestly, a turkey breast is a lot easier to prep, and cook. So, maybe you are not entertaining a big crowd this holiday, or you just want to change up with tradition, this Stuffed Roasted Turkey Breast recipe is a great idea.

Here are a few more reasons to consider roasting a turkey breast this Thanksgiving, as opposed to a whole bird:

  • Defrosts quicker.
  • Easier to prepare.
  • Cooks faster.
  • Takes up less space in the oven.
  • Feeds a smaller crowd.

RAW POULTRY FOOD SAFETY

Before diving into this turkey roulade recipe, or any poultry recipe, consider food handling safety. Always start the turkey preparation with clean; hands, surface, knife and prep area. Touching a surface after touching the raw turkey can cause cross contamination. Consider these additional tips to have a safe turkey day:

  • Wash your hands, OFTEN!
  • Portion out the salt and pepper prior, so as to not contaminate the jars.
  • Have the kitchen twine already cut into pieces, or have someone who is not handling the turkey do so for you.
  • Measure out the stuffing to fill the breast into a separate bowl
  • Disinfect any and all areas used to prep the turkey, including the sink with bleach.

TYPES OF TURKEY BREAST

Did you know that you can purchase different types of turkey breast? This Stuffed Roasted Turkey Breast recipe started with a full double-breast turkey. In fact, when you spot one in the market, you may think it’s just a small whole turkey.

A bone-in half breast turkey has no rib cage, or cavity. If you do not want to debone the turkey breast, purchase a fresh boneless turkey breast, or turkey roast.

HOW TO DEFROST A TURKEY BREAST

So, if you cannot find a fresh turkey breast, you will need to thaw from a frozen state:

  • Include the defrost time to your Thanksgiving dinner prep.
  • For a three to five pound turkey breast, allow at least three full days in the fridge.
  • Place the frozen turkey in a bowl of cool water. Place in the fridge. Dump and replace the water a few times a day.

DEBONING A TURKEY BREAST

Deboning a turkey breast might seem like a daunting task, but with a little patience and the right technique, it can be accomplished successfully, allowing you to create a perfect canvas for your stuffed roasted turkey breast (roulade). Here’s a step-by-step guide on how to debone a turkey breast:

1. Gather Your Tools: Prepare a sharp boning knife, a pair of kitchen shears, and a cutting board. Make sure your tools are clean and in good condition.

2. Remove the Skin: Removing the skin is optional. If leaving the skin-on, flatten on the flesh side. If removing the skin, consider wrapping the roulade in the skin prior to trussing.

3. Locate the Breastbone: Run your fingers along the center of the breast to locate the breastbone (keel bone). Make a shallow incision along one side of the breastbone to expose the bone.

4. Cut Along the Breastbone: Using the boning knife, cut alongside the breastbone, following the contours closely. Use gentle, smooth strokes to separate the meat from the bone. Continue cutting until the breast meat is fully detached from the bone.

5. Work Around the Ribcage: Once the breast is separated from the breastbone, work your way around the ribcage. Use the boning knife to cut along the ribs, gently pulling the meat away as you go. Be careful not to tear the meat. Save the bones for homemade turkey gravy!

6. Trim Excess Fat and Cartilage: Trim any excess fat and cartilage from the inner side of the turkey breast. This step ensures that your roulade will have a uniform texture and appearance.

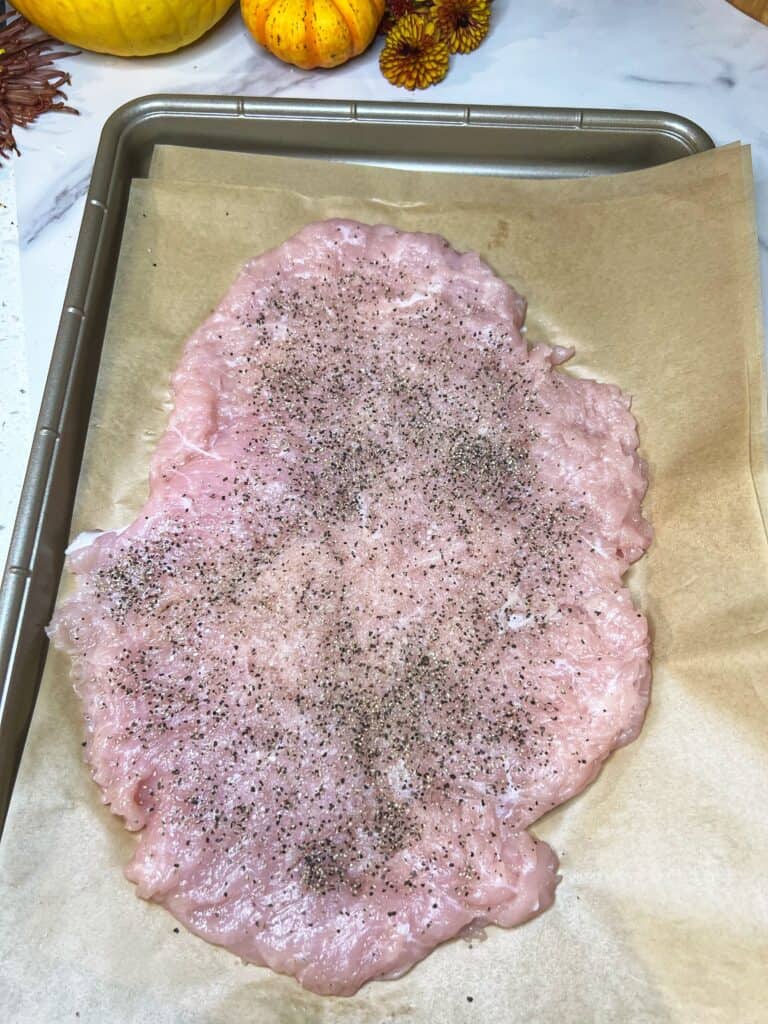
7. Flatten the Breast: With the breast fully deboned, you can now flatten it by gently pounding it with a meat mallet. This step helps even out the thickness of the meat, making it easier to roll and stuff.

8. Proceed with Stuffing and Rolling: Follow your stuffed roasted turkey breast recipe, layering the stuffing evenly over the flattened, seasoned turkey breast and rolling it tightly to create the roulade.

STUFFING THE BONELESS TURKEY BREAST

Where I come from, it is always referred to as stuffing, regardless of whether it’s inside the turkey, or not. Surprisingly to me, when I moved south, I found that most people here call it turkey dressing. Regardless of what you call it, or how you prepare it, stuffing is a Thanksgiving dinner staple.

Get as creative as you want with the filling. Here are a few ideas:

  • Homemade Sausage Stuffing
  • Boxed Stuffing
  • Mushroom and Herb Stuffing
  • Rice and Vegetables Stuffing

HOW TO PREPARE A TURKEY ROULADE

1. Prepare the Turkey Breast:

  • Preheat your oven to 450°F (230°C).
  • Lay the deboned turkey breast flat on a clean surface.
  • Pat the turkey breast dry with paper towels to remove excess moisture.

2. Season the Turkey Breast:

  • Season with kosher salt, pepper, and garlic powder.

3. Add the Stuffing:

  • Spread a layer of homemade sausage stuffing evenly over the seasoned turkey breast, leaving a small border around the edges.

4. Roll and Secure:

  • Carefully roll the turkey breast into a tight cylinder, starting from one end.
  • Secure the rolled turkey breast with kitchen twine at 1 to 2-inch intervals, ensuring it holds its shape during roasting.

5. Season the Outside:

  • Sprinkle the outside of the turkey roulade with kosher salt and black pepper.

6. Roasting:

  • Place the turkey roulade in a roasting pan.
  • Roast in the preheated oven at 450°F (230°C) for 30 minutes. This initial high heat will help brown the skin and seal in the juices.

7. Reduce Heat and Add Moisture:

  • After 30 minutes, reduce the oven temperature to 350°F (175°C).
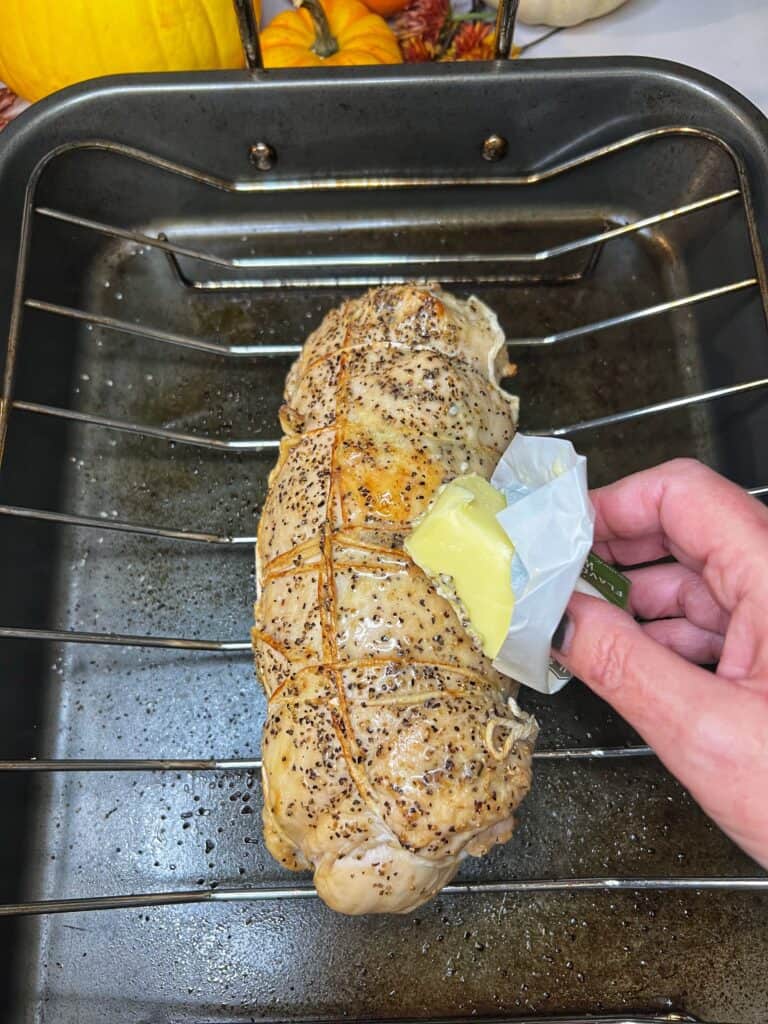
  • Rub the surface of the turkey roulade with the butter to enhance flavor and crispness.
  • Pour the chicken or turkey stock into the pan around the turkey roulade to keep it moist during roasting.

8. Continue Roasting:

  • Return the pan to the oven and continue roasting until the internal temperature of the turkey roulade reaches 165°F (74°C). This may take about 1 to 1.5 hours, depending on the size of the turkey breast.
  • Add additional stock as the turkey is roasting as the stock tends to cook off.

9. Resting and Serving:

  • Once the turkey roulade reaches the desired temperature, carefully remove it from the oven.
  • Cut off the kitchen twine and let the turkey roulade rest, tented with foil, for at least 15 minutes. This allows the juices to redistribute, ensuring a moist and flavorful turkey.

10. Carving and Enjoying:

  • After resting, slice the turkey roulade into rounds.
  • Serve the stuffed roasted turkey breast slices with your favorite side dishes and plenty of homemade turkey gravy!
TIPS TO MAKING THIS TURKEY RECIPE

  • Always base a fully-cooked turkey on temperature, not time, for food safety.
  • Follow proper food safety guidelines throughout the entire process.
  • Opt for a boneless turkey breast if you do not wish to debone yourself. Alternatively, ask your butcher to debone for you.
  • When pounding the deboned turkey breast, aim for an even thickness.
  • Season the inside and outside of the turkey breast liberally with salt, pepper, and any other desired seasonings.
  • When adding the stuffing, distribute it evenly over the turkey breast, leaving a small border around the edges. Avoid overstuffing, as it can make rolling and securing the roulade challenging.
  • After adding the stuffing, roll the turkey breast tightly and secure it with kitchen twine. Tie the twine at regular intervals to prevent the stuffing from falling out during cooking. A tightly secured roulade maintains its shape beautifully.
  • Invest in a reliable meat thermometer to ensure your turkey roulade is cooked to perfection. Insert the thermometer into the thickest part of the roulade, avoiding the stuffing, and cook until it reaches an internal temperature of 165°F (74°C) for safe consumption.
  • To keep the roulade moist, baste it with butter during the roasting process.
  • Check the level of chicken or turkey stock, often. Add more, as needed to not only enhance the flavor, but to prevent the roulade from drying out.
  • After roasting, resist the temptation to slice the roulade immediately. Let it rest tented with foil for at least 15 minutes.
  • This turkey recipe will easily serve four adults, considering two roulade slices, each.

THANKSGIVING DINNER LEFTOVERS AND SHARING!

We all know this day is about sharing and being THANKFUL! A few years ago, I came up with this incredible idea on what to do with Thanksgiving dinner leftovers. Make TV dinners using these trays! This is a great way to share a meal with an elderly neighbor, or someone who may be in need of a meal. Please check your local ordinance if you plan on sharing with the homeless.

Store the in the fridge, or freeze to enjoy later. Leftover roasted turkey roulade will last in the fridge up to four days, or up to three months in the freezer.

Two Turkey TV dinners in aluminum trays

MORE THANKSGIVING RECIPES TO LOVE

Print
clock clock iconcutlery cutlery iconflag flag iconfolder folder iconinstagram instagram iconpinterest pinterest iconfacebook facebook iconprint print iconsquares squares iconheart heart iconheart solid heart solid icon
a french plate filled with slices of stuffed roasted turkey breast and mashed potatoes covered in turkey gravy

Stuffed Roasted Turkey Breast (Turkey Roulade)


5 Stars 4 Stars 3 Stars 2 Stars 1 Star

No reviews

Description

Break with tradition this Thanksgiving and serve up this fabulous Stuffed Roasted Turkey Breast. This turkey roulade is super easy to prepare, so moist and out-of-this-world delicious!


Ingredients

Units Scale
  • 3 to 5 pound turkey breast
  • 2 teaspoons kosher salt, divided
  • 2 teaspoons black pepper, divided
  • 1 1/2 cups prepared sausage stuffing
  • 1/2 stick butter
  • 2 to 3 cups chicken or turkey stock
  • kitchen twine

Instructions

  1. Prepare the sausage stuffing (see link to recipe in post), or prepare using your own recipe.
  2. Preheat oven to 450°.
  3. Debone the turkey breast using the technique here, or have your butcher do for you
  4. Place the turkey breast on flat, clean surface with the point facing away from you. Skin side down.
  5. With a sharp knife, cut out the neck (if still attached). Reserve.
  6. Apply pressure to the middle bone to crack. 
  7. Using a sharp knife, cut around the keel bone (this is the big bone). Be patient and cut as clean as you can until the bone is free from the flesh. Reserve.
  8. Cut out any remaining tiny bones and or cartilage. 
  9. The tenderloins will probably free themselves from the turkey. Save for gravy.
  10. Give the boneless turkey breast a quick rinse. Pat dry.
  11. Place the breast (flesh side down) on a clean cutting board.
  12. Lay a piece of plastic wrap on top of the skin.
  13. Using a flat meat tenderizer, pound the breast very gently to even out.
  14. Flip.
  15. Season the inside with a tablespoon each of kosher salt and black pepper.
  16. Fill the turkey breast with an even layer of prepared stuffing. 
  17. Roll super tight.
  18. Secure the roulade tightly with kitchen twine. See notes in posts. 
  19. Season the outside with the remaining kosher salt and black pepper.
  20. Place in a roasting pan, seam side down.
  21. Roast at 450° for 30 minutes. 
  22. Baste with a few pats of butter.
  23. Add the chicken stock to the bottom of the roasting pan.
  24. Reduce heat to 350°.
  25. Continue roasting and basting with butter until the internal temperature (taken at the thickest part) is at least 160°.
  26. Remove from oven. 
  27. Give it a final overall baste with butter.
  28. Allow to rest for at least 5 minutes before slicing.
  29. Remove all of the kitchen twine.
  30. Slice into equal rounds. 
  31. Serve topped with homemade turkey gravy and your favorite side dishes.
  32. ENJOY!

Notes

  • Always base a fully-cooked turkey on temperature, not time, for food safety.
  • Invest in a good meat thermometer
  • Follow proper food safety when handling raw turkey.
  • Debone the turkey breast yourself, have your butcher do it for you, or opt for a boneless turkey breast.
  • Pound the turkey breast to an even thickness. 
  • Season the pounded breast with salt, pepper, garlic powder and any other seasonings you desire.
  • Distribute the stuffing evenly over the breast, leaving a small border.
  • After rolling, tightly secure with kitchen twine. 
  • Roast for 30 minutes at a high temperature to brown the skin.
  • Baste with butter during the cooking process.
  • Add additional stock as needed while roasting.
  • Don’t forget to remove the kitchen twine prior to serving.
  • Tent or wrap the roasted turkey roulade in tin foil for at least 15 minutes.
  • Store leftovers in the fridge for up to 4 days. 
  • Prep Time: 3 days, 30 minutes
  • Cook Time: 2 1/2 hours
  • Category: Dinner, Thanksgiving Turkey
  • Method: Moderate
  • Cuisine: American

Nutrition

  • Serving Size: 2 slices

GET TO KNOW ME!

A photo of me in a black floral dress cooking at the stovetop at Williams-Sonoma

WELCOME! My name is Melissa Latin aka. Charlotte Fashion Plate. Happy to meet you! I am more than just recipes. I love fashion and style too! Most importantly, I love my Family (my Hubby and my Fur Babies). My Husband (aka my “Kitchen Bitch”) means the world to me. He’s pretty damn cool too. Not only is he one of the nicest guys you will ever meet, he also has had a lengthy career in professional hockey. Not only winning two Stanley Cups with the Pittsburgh Penguins in the early ’90’s, but most recently winning the Calder Cup with the Charlotte Checkers, amongst many other accolades. If you live in Charlotte and play hockey, or have a family member who plays, be sure to contact him!

Our life has changed dramatically in the past few years with the passing of our two goldendoodles, Vegas and Viva. We were lucky enough to have Vegas for five years (totally wish it was longer). Most recently, losing our Viva to a brain tumor in July of 2020. We welcomed our mini goldendoodle 7, almost seven years ago. We just added the amazing Hazel! Of course, I am always posting tons and tons of photos! Be sure to check out my recipe for Pet Bone Broth! This broth is super rich in nutrients and will provide your pet with a multitude of health benefits!

Let’s Get Social!

Be sure to follow me on social media! I’m always talking food, fashion, and family! I also love sharing some of my favorite Amazon Finds too. Click here to check out my Amazon page! FacebookInstagramTikTokTwitter and Pinterest! THANK YOU!!


SMASHED BRUSSELS SPROUTS

a white flat bowl filled with crispy smashed Brussels sprouts

Did you know that “smashing” your vegetables is a thing? It’s a great way to turn an ordinary roasted vegetable into a super crispy, and flavorful bite of goodness. A while back, I created a recipe for Crispy Roasted Smashed Red Potatoes. Believe me, they too, are incredible. However, since the Hubby is still following the keto plan, I needed a recipe for something other than potatoes. Of course, I have seen so many variations of Smashed Brussels Sprouts, on social media. This is my version. So, if you love Brussels sprouts, and even if you do not, give this a go.

Naturally, I created a short video on TikTok making these beauties. Click here to view. If you have not yet signed up for this social media platform, use my code 5SSIS800K0H06 to create an account.

a white flat bowl filled with crispy smashed Brussels sprouts

HOW TO MAKE THE BEST CRISPY SMASHED BRUSSELS SPROUTS

Just to be clear, this recipe is more about technique, rather than ingredient amounts. In addition, it’s going to require a bit of patience. Once the Brussels sprouts have been steamed, the smashing begins. You will notice that a few of them want to kind of scatter on the pan and not hold together. No worries. Just tidy them up a bit to form a unified piece. Once the cheese starts to melt, all will come together, just beautifully.

How do you smash? The bottom of a glass will work fine. I actually gave the Brussels sprouts a good whack with the flat end of a meat tenderizer.

As for steaming, I placed mine in a pot of salted boiling water and gently boiled until the Brussels sprouts were tender. Steam in bag will also work. Honestly, I am not sure about using frozen. I suppose they would work. However, I would be a bit concerned about the moisture level. If you try this recipe with frozen Brussels sprouts, let me know.

Be sure to cut the ends off of the Brussels sprouts prior to steaming. Just be careful not to cut too much. Yes, a few of the outer leaves will fall off naturally. Throw these in the pot. You can gather up a bunch of the loose leaves to form another round on the baking pan.

Also, feel free to use whatever kind of cheese you want. Freshly shredded Parmesan cheese brought a bit of saltiness and nuttiness to this dish. Asiago and/or Romano are great alternatives. Or, use a combination of cheeses. Honestly, I may even try shredded mozzarella next go round. They longer they cool, the crispier these Smashed Brussels Sprouts will become!

a pan of smashed Brussels sprouts topped with shredded Parmesan cheese

WHAT TO SERVE WITH CRISPY SMASHED BRUSSELS SPROUTS

Crispy Smashed Brussels Sprouts will really compliment any meal. Alternatively, you can enjoy them as an appetizer or meal with a lovely dipping sauce. I am certain a side of homemade ranch or Sriracha mayo would be perfect. If you are looking to keep the meal low-carb and keto friendly, serve these beauties up with my Easy Chicken and Mushrooms, Cheesy Broccoli Stuffed Chicken, or my Citrus Honey Glazed Salmon. ENJOY!

Print
clock clock iconcutlery cutlery iconflag flag iconfolder folder iconinstagram instagram iconpinterest pinterest iconfacebook facebook iconprint print iconsquares squares iconheart heart iconheart solid heart solid icon
a white flat bowl filled with crispy smashed Brussels sprouts

SMASHED BRUSSELS SPROUTS


5 Stars 4 Stars 3 Stars 2 Stars 1 Star

No reviews

Description

Looking for a new way to enjoy Brussels sprouts. My recipe for Crispy Smashed Brussels Sprouts will satisfy. Super easy to prepare and they make the perfect snack, or side dish.


Ingredients

Scale
  • 1 pound fresh Brussels sprouts, ends trimmed
  • kosher salt for water
  • 3 Tablespoons olive oil
  • 1 teaspoon kosher salt
  • 1 teaspoon black pepper
  • 1 teaspoon garlic powder
  • 2 teaspoons paprika
  • 1/2 teaspoon crushed red pepper (optional)
  • 1 Cup freshly shredded Parmesan cheese
  • 4 to 5 pats of butter

Instructions

  1. Bring a pot of water to a boil. Salt.
  2. Heat oven to 425°.
  3. Cut the ends off of the sprouts and place in the boiling water until they are fork tender. Drain.
  4. In a bowl, combine the olive oil, kosher salt, black pepper, garlic powder, paprika and crushed red pepper. Toss in the sprouts and fully coat.
  5. Line a baking pan with parchment paper.
  6. Place the steam sprouts onto the pan. Smash each with the bottom of a glass or flat surface.
  7. Drizzle each with any of the remaining oil mixture.
  8. Bake for 15 minutes.
  9. Flip. Top each with a bit of the Parmesan cheese. Place the butter pats around the pan.
  10. Back into the oven for about 10 minutes, or until the sprouts are crispy.

Notes

SEE POST

  • Prep Time: 10 minutes
  • Cook Time: 40 minutes

LET’S GET SOCIAL!

I am more than just recipes. I love fashion and style too! Most importantly, I love my Family (my Hubby and my Fur Babies). My Husband (aka my “Kitchen Bitch”) means the world to me. He’s pretty damn cool too. Not only is he one of the nicest guys you will ever meet, he also has had a lengthy career in professional hockey. Not only winning two Stanley Cups with the Pittsburgh Penguins in the early ’90’s, but most recently winning the Calder Cup with the Charlotte Checkers, amongst many other accolades. If you live in Charlotte and play hockey, or have a family member who plays, be sure to contact him. He is known as one of the best skate sharpeners in the world!

Our life has changed dramatically in the past few years with the passing of our two goldendoodles, Vegas and Viva. We were lucky enough to have Vegas for five years (totally wish it was longer). Most recently, losing our Viva to a brain tumor in July of 2020. We welcomed our mini goldendoodle 7, almost seven years ago. We just added the amazing Hazel! Of course, I am always posting tons and tons of photos! Be sure to check out my recipe for Pet Bone Broth! This broth is super rich in nutrients and will provide your pet with a multitude of health benefits!

Be sure to follow me on social media! I’m always talking food, fashion, and family! I also love sharing some of my favorite Amazon Finds too. Click here to check out my Amazon page! FacebookInstagramTikTokTwitter and Pinterest!

Homemade Green Bean Casserole

two casserole dishes filled with homemade green bean casserole

For years, and years I have been making Green Bean Casserole using canned cream of mushroom soup and the typical fried onions you can buy at your local grocery store. Not today, my friends. Yes, there are a few more steps involved. However, when I tell you this is the best Homemade Green Bean Casserole you ever tasted, believe me! It is so worth all of the effort involved.

While most people only enjoy this amazing casserole during Thanksgiving, or other holiday feasts, this favored side dish can be prepared any time of the year!

So, I did a thing! My first e-book, also in paperback, is all about Mastering Thanksgiving Dinner! It’s an easy read filled with timelines, checklists, all of your turkey questions, a handful of my favorite recipes, and so much more! Please check it out!

two casserole dishes filled with homemade green bean casserole

CRISPY FRIED SHALLOTS FOR HOMEMADE GREEN BEAN CASSEROLE

So, not only are these crispy fried shallots the perfect touch for this Homemade Green Bean Casserole, you can also use them as a topping for salads, mashed potatoes, or to dress up any casserole.

Here are a few tips to ensure the shallots fry up super crispy:

  • Slice thin with uniform cuts.
  • Separate the shallots as they soak in the heavy whipping cream.
  • Use a bit of rice flour with AP flour for added crunch (cornstarch is a good substitute).
  • Shake off excess flour prior to frying (you can use a mesh strainer for this).
  • Be sure the oil is hot.
  • Do NOT overcrowd the fry pan (fry in batches).
  • Keep an eye on the shallots as they are frying, they fry rather quickly and can easily burn.
  • Place the fried shallots onto paper towels to soak up any excess grease.

HOW TO MAKE THE BEST HOMEMADE CREAM OF MUSHROOM SOUP

Creating homemade cream of mushroom soup is a bit more about technique, as opposed to actual ingredient amounts. So, you will need to use your own judgment when it comes to the perfect consistency.

To start, add the mushrooms to a dry pan without seasoning. This will allow the mushrooms to release all of their moisture.

Incorporate heavy whipping cream just a little at a time. Keep doing this until your have reached that “cream of mushroom soup” consistency.

TIPS FOR MAKING THE BEST HOMEMADE GREEN BEAN CASSEROLE

As mentioned earlier, this fabulous Thanksgiving side dish recipe is really about technique. The consistency of the cream of mushroom mixture should be that of the soup. You may, or may not use all of the heavy whipping cream called for in this recipe, or you may need a touch more.

Alternatively, bake the Homemade Green Bean Casserole before adding the crispy shallot topping. After the casserole is baked, garnish with the shallots, place under the broiler for just about a minute, or two.

LEFTOVER HOMEMADE GREEN BEAN CASSEROLE

Leftovers will last in the fridge for up to three days. Freezing leftover Green Bean Casserole can be done. However, you may run the risk of the crispy fried shallots getting soggy. Just be sure to cool the casserole prior to placing in a sealed, freezer-tight container. It should last up to 2 months in freezer.

MORE THANKSGIVING RECIPES TO LOVE

Print
clock clock iconcutlery cutlery iconflag flag iconfolder folder iconinstagram instagram iconpinterest pinterest iconfacebook facebook iconprint print iconsquares squares iconheart heart iconheart solid heart solid icon
two casserole dishes filled with homemade green bean casserole

Homemade Green Bean Casserole


5 Stars 4 Stars 3 Stars 2 Stars 1 Star

No reviews

Description

For years, and years I have been making Green Bean Casserole using canned cream of mushroom soup and the typical fried onions you can buy at your local grocery store. Not today, my friends. Yes, there are a few more steps involved. However, when I tell you this is the best Homemade Green Bean Casserole you ever tasted, believe me! It is so worth all of the effort involved.


Ingredients

Scale
  • 24-ounces fresh cut green beans, or equivalent in frozen 
  • 10 shallots, sliced thin
  • 1/2 cup heavy whipping cream or buttermilk (to soak the shallots)
  • 1/2 cup flour
  • 2 tablespoons rice flour
  • 1 1/2 teaspoon kosher salt, divided
  • 1 teaspoon black pepper, divided
  • peanut or canola oil, for frying
  • 8 ounces button mushrooms, diced
  • 1/2 teaspoon garlic powder
  • 3 tablespoons butter
  • 3 tablespoons flour
  • 1 1/2 to 2 cups heavy whipping cream
  • 1 tablespoon butter

Instructions

  1. Preheat oven to 350°.
  2. Heat oil in a non-stick pan (just enough for a shallow fry).
  3. Thinly slice the shallots.
  4. Separate the slices.
  5. Add the shallots to a bowl with the heavy whipping cream or buttermilk. 
  6. In a separate bowl, combine the flours. Season with kosher salt and black pepper.
  7. Add the shallots to the flour mixture, shaking off any excess cream.
  8. Dredge the shallots in the flour.
  9. Shake off any excess flour, or use a mesh strainer to do so.
  10. Add the shallots to the hot oil and fry in batches to ensure crispiness.
  11. Remove onto paper towels to soak up any excess oil. Reserve.
  12. Heat up a separate sauté pan to medium.
  13. Toss in the diced mushrooms and allow to cook in the dry pan until all of the moisture has cooked off.
  14. Season with kosher salt and black pepper.
  15. Add in the butter and allow to melt.
  16. Whisk in the flour.
  17. Cook for a few minutes to cook off the raw flour taste.
  18. Whisk in the heavy whipping cream in small amounts until you have reached the desired consistency of cream of mushroom soup. (you may not use all two cups, or you may need a touch more)
  19. Taste for salt.
  20. Add the fresh cut green beans to a bowl. Toss in a handful of the crispy shallots.
  21. Fold in the homemade cream of mushroom soup.
  22. Check again for consistency. You may need to add a touch more cream or milk. 
  23. Butter a casserole dish. 
  24. Pour contents of bowl into the prepared baking dish.
  25. Cover and bake for 15 to 20 minutes.
  26. Uncover and top with the remaining crispy shallots.
  27. Place under the broiler for just a minute, or two (be very careful not to burn them).
  28. Serve immediately.
  29. ENJOY!
@charlottefashionplate

The Best Homemade Green Bean Casserole Recipe! Green Bean Casserole is one of those favored Thanksgiving Dinner side dishes. Believe me, it is so worth all of the effort involved to make it from scratch, down to the cream of mushroom soup! You can even make a day in advance and bake just before dinner. #greenbeancasserole #greenbeans #viralfood #thanksgivingsides #thanksgivingrecipes #thanksgivingdinner #thanksgivingfood

♬ November Rain (Acoustic) – My Music 87

Notes

  • Fresh cut green beans are best. However, you can substitute with the equivalent in frozen, or use 3 cans of drained green beans. 
  • Shake off excess flour from the shallots with a mesh strainer before frying.
  • Use a neutral oil for frying the shallots.
  • Try not to move the shallots around as they are frying. Just once to separate them is enough.
  • Keep close watch on the shallots as they are frying. They can burn easily.
  • Drain the shallots on paper towels to remove excess grease. 
  • Allow the diced mushrooms to sauté in a hot, dry pan to release excess moisture.
  • Incorporate the heavy cream into the mushroom mixture gradually, until you reach the desired consistency. You can always add more, but it’s hard to take away.
  • Don’t forget to add a handful of the crispy shallots to the green bean mixture.
  • Cover to bake. Remove the cover in the last few minutes to brown up the crispy shallot topping.
  • If serving on Thanksgiving, easily prepare a day in advance and bake just prior to serving dinner.
  • Prep Time: 15 minutes
  • Cook Time: 30 minutes
  • Category: Side dish
  • Method: Moderate
  • Cuisine: American

Nutrition

  • Serving Size: 6 ounces

GET TO KNOW ME!

A photo of me in a black floral dress cooking at the stovetop at Williams-Sonoma

WELCOME! My name is Melissa Latin aka. Charlotte Fashion Plate. Happy to meet you! I am more than just recipes. I love fashion and style too! Most importantly, I love my Family (my Hubby and my Fur Babies). My Husband (aka my “Kitchen Bitch”) means the world to me. He’s pretty damn cool too. Not only is he one of the nicest guys you will ever meet, he also has had a lengthy career in professional hockey. Not only winning two Stanley Cups with the Pittsburgh Penguins in the early ’90’s, but most recently winning the Calder Cup with the Charlotte Checkers, amongst many other accolades. If you live in Charlotte and play hockey, or have a family member who plays, be sure to contact him!

Our life has changed dramatically in the past few years with the passing of our two goldendoodles, Vegas and Viva. We were lucky enough to have Vegas for five years (totally wish it was longer). Most recently, losing our Viva to a brain tumor in July of 2020. We welcomed our mini goldendoodle 7, almost seven years ago. We just added the amazing Hazel! Of course, I am always posting tons and tons of photos! Be sure to check out my recipe for Pet Bone Broth! This broth is super rich in nutrients and will provide your pet with a multitude of health benefits!

Let’s Get Social!

Be sure to follow me on social media! I’m always talking food, fashion, and family! I also love sharing some of my favorite Amazon Finds too. Click here to check out my Amazon page! FacebookInstagramTikTokTwitter and Pinterest! THANK YOU!!

GRUYÈRE AND BLACK PEPPER POPOVERS

three plates filled each with two Gruyère and black pepper popovers with butter

A few years ago, I was dying to make popovers. They are one of my favorite welcoming table gifts while dining at BLT Steakhouse in Charlotte. However, I had zero clue how to make them. As you know by now, I can cook very well. Baking is not really my jam. So, I ventured onto Pinterest and found this recipe for Gruyère and Black Pepper Popovers from a restaurant in Austin, Texas called Foreign & Domestic. They looked amazing. Of course, I immediately ran to Amazon’s website and ordered these popover pans. Yes, you can use muffin tins. However, I wanted the full experience and highly suggest investing in one of these. You will definitely be making these popovers again, and again!

For certain, you need to add these to your holiday dinner table. These Gruyère and Black Pepper Popovers will be a perfect compliment to your Thanksgiving Dinner or your even Feast of the Seven Fishes meal on Christmas Eve.

To be clear, this was my third time making these. After doing a bit more research, I found a recipe the other day that was similar to the one linked above, and used it. However, I believe the original worked so much better. You can view the video of this recipe by clicking here. Although it is a bit easier, I do not think the popovers puffed up as much as the original. So, follow the recipe below and only use the video as guidance.

Feel free to play around with the ingredients. Substitute the Gruyère with another cheese. A sharp white cheddar would be amazing. You could also eliminate the cheese and black pepper altogether, and serve the popovers with jam. Have fun, and get creative.

three plates filled each with two Gruyère and black pepper popovers with butter

A FEW THINGS TO NOTE:

  • invest in a popover pan (they are relatively inexpensive)
  • the popover pan needs to be warmed in the oven prior to filling with the batter and baking
  • eggs should be at room temperature
  • do NOT open the oven while the popovers are baking
  • remove the popovers from the pan immediately after baking
  • the popovers are best enjoyed while they are warm and crispy

HOW TO PREPARE GRUYÈRE AND BLACK PEPPER POPOVERS

Preheat oven to 450 degrees. Place popover pan in oven to warm while you are preparing the batter. Warm the milk in a saucepan. You want the milk hot, but not boiling. Remove from heat. In a bowl whisk together the eggs, kosher salt and black pepper. Slowly whisk in the warmed milk. Add the flour to the mixture. Mix.

Remove the warmed popover pan from the oven. Reduce heat to 375 degrees. Generously spray each well with non-stick spray (including the sides). Fill the wells about three-quarters of the way full. Gently, place two to three cubes of the Gruyère cheese on top of the batter. Bake until the popovers have puffed up, and are a deep golden brown. This should take about forty minutes. Just be sure to check, with the oven light, at about the thirty minute mark. As mentioned above, do NOT open the oven door while the popovers are baking. If you do, you may run the risk that the popovers will collapse and not puff up.

Once fully baked, immediately remove the popovers from the pan. Garnish with additional freshly shredded cheese. Serve these amazing Gruyère and Black Pepper Popovers while they are warm. You should have enough batter left to bake up another batch.

LET’S GET SOCIAL!

I am more than just recipes. I love fashion and style too! Most importantly, I love my Family. My Husband (aka my “Kitchen Bitch”) means the world to me. He’s pretty damn cool too. Not only is he one of the nicest guys you will ever meet, he also has had a lengthy career in professional hockey. Not only winning two Stanley Cups with the Pittsburgh Penguins in the early ’90’s, but most recently winning the Calder Cup with the Charlotte Checkers, amongst many other accolades. If you live in Charlotte and play hockey, or have a family member who plays, be sure to contact him. He is known as one of the best skate sharpeners in the world!

Our life has changed dramatically in the past few years with the passing of our two goldendoodles, Vegas and Viva. We were lucky enough to have Vegas for five years (totally wish it was longer). Most recently, losing our Viva to a brain tumor in July of 2020. We welcomed our mini goldendoodle 7, almost seven years ago. We just added the amazing Hazel! Be sure to check out my recipe for Pet Bone Broth! This broth is super rich in nutrients and will provide your pet with a multitude of health benefits!

FOLLOW ME!

Be sure to follow me on social media! I’m always talking food, fashion, and family! I also love sharing some of my favorite Amazon Finds too. Click here to check out my Amazon page! FacebookInstagramTikTokTwitter and Pinterest!

SCALLOPED POTATOES

two pots of scalloped potatoes

This is one of those most perfect side dishes I remember my Mom making when we were children. It’s super old school, and brings back many fond memories of watching my Mom in the kitchen. Comfort food at it’s best. The rich and creamy sauce, combined with flour, butter, and onions is so very simple, with a subtle elegance. Even though we cook quite differently today, she taught me so much about the importance of family meals. Hope you enjoy this recipe for Scalloped Potatoes. It has been in my Family for generations.

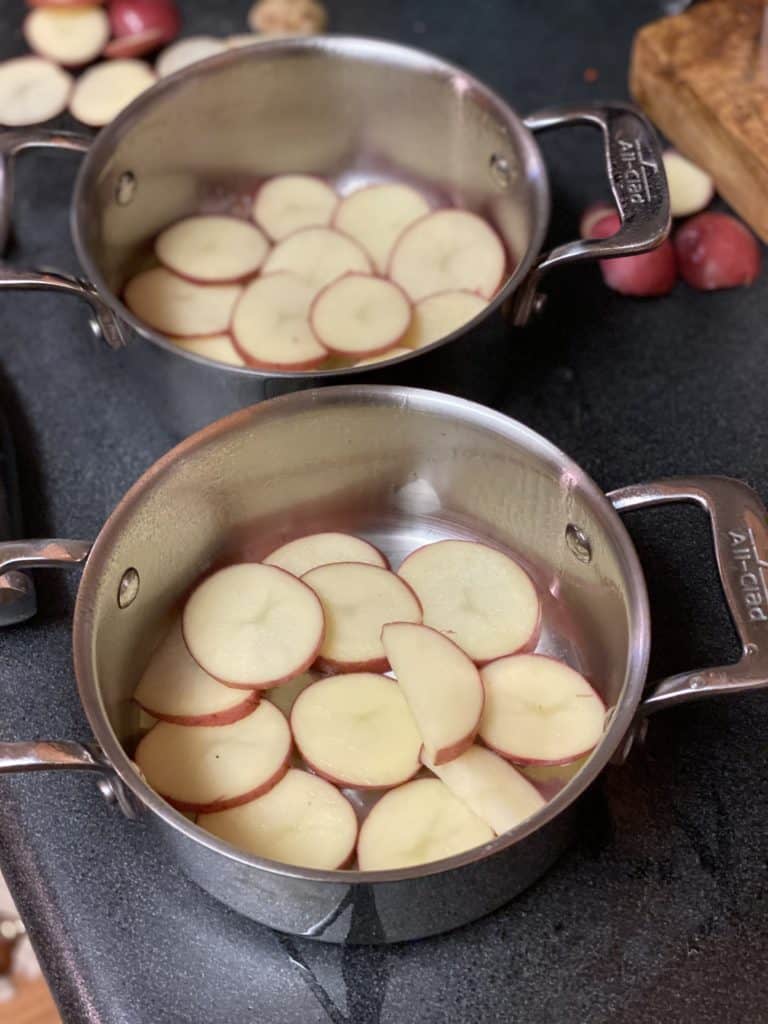
Typically, these Scalloped Potatoes would be made in a casserole or baking dish. I just wanted to have a little bit of fun and use red and white creamer potatoes I found at Unity Farms with these All-Clad cocottes. Want to try a more “upscale” version of Scalloped Potatoes? Check out my recipe for Dauphinoise Potatoes.

Bare with me as this recipe is not really about measurements, but more about building the layers. Lumps versus no lumps? Some recipes call for mixing the flour and milk/cream so as not to have lumps. It is my belief that if there was ever a time for lumps in your potatoes, it’s for this recipe! Team lumps all the way!

Cheese or no cheese? Ok, so if you add cheese then they tend to be more of an au gratin. Who cares! Add the cheese, or not. Totally up to you. I wouldn’t normally, but I had Gruyere on hand, so I threw a touch on at the end and broiled for a few minutes to brown.

two pots of scalloped potatoes

HOW TO LAYER FOR SCALLOPED POTATOES

As mentioned earlier, this recipe is all about building layers of goodness and flavor. There is really no right or wrong way, as long as each layer contains the building ingredients.

First things first. Thinly slice the potatoes. Peel or don’t peel? Again, totally up to you. You can slice by hand or with a mandoline. If you are using a mandoline, be sure to use the guard. Take my word for this after having suffered from many, many cuts because I thought I could get by without it.

slicing a potato on a mandoline

Preheat oven to 375 degrees. Line a casserole or baking dish with a thin layer of butter. Be sure to butter the sides. Place sliced potatoes on bottom of baking dish in one layer. It’s quite ok if they overlap just a bit. Season with kosher salt and pepper. Take a spoon and dust the tops of the seasoned potatoes with flour. Again, it’s ok if the flour clumps in certain spots. The flour will bake long enough, so you will not have to worry about a raw flour taste. Dot the first layer with butter. Add a layer of the sliced onions. Pour about one-third of the milk or heavy cream over the layer.

Keep repeating these steps until you have used up all of the potatoes. You should be able to build three nice layers. Keep in mind that you may need a touch more flour or milk/cream as you are building the layers than what the recipe calls for. Most of us have these ingredients in our pantry, so use more if you need to.

Cover the casserole or baking dish with foil. Place in oven and allow to bake for at least an hour. Test the potatoes after an hour for doneness. Once potatoes are tender and falling apart, if you so desire, add a thin layer of shredded Gruyere cheese. Turn on the broiler, and allow the cheese to brown.

TO SERVE THE SCALLOPED POTATOES

Remove from broiler. Garnish with fresh chopped parsley. Serve up these magnificent Scalloped Potatoes with your favorite protein. ENJOY! Take a look how I served mine below!

These potatoes are even better the next day. So, if you have leftovers, which may be highly unlikely, serve them up for dinner tomorrow!

two pots of scalloped potatoes

BRASSTOWN BEEF

I was lucky enough to grab a few local, grass-fed ribeye and strips steaks from my Friends at Brasstown Beef. They are a ranch located in the Northwestern part of North Carolina. Steve Whitmire, owner, touts himself as more of a grass farmer, than a rancher. This means a lot to me, as his cattle are very well fed, and drink the same water his Family drinks. Read their entire story, and history on their website!

You can easily order from Brasstown Beef online. Shipping is quick. You can tell the packaging has been well thought out to ensure your order stays frozen during shipping. All of your items are packed in a thermal logo bag which is then placed in a styrofoam box lined with dry ice. Use my code CFP15 for discount!

a black thermal bag from Brasstown Beef

Now, let’s talk how phenomenal these steaks were. Each steak is individually, vacuumed sealed and frozen. Thaw gently in the fridge. Bring to room temperature prior to cooking. I grilled mine to a perfect medium-rare. The steaks were super tender, juicy and oh the FLAVOR! Try them out. Support local ranchers and farmers during these times. Remember that not only are restaurants having difficulties, but so are the small business that they source their products from. Be sure to grab a few packages of ground meat, burgers and do NOT forget the hot dogs! You will thank me later. I have more recipes coming soon using more of Brasstown Beef’s amazing meats! Do NOT forget to use CFP15 at checkout!

LET’S GET SOCIAL!

I am more than just recipes. I love fashion and style too! Most importantly, I love my Family (my Hubby and my Fur Babies). My Husband (aka my “Kitchen Bitch”) means the world to me. He’s pretty damn cool too. Not only is he one of the nicest guys you will ever meet, he also has had a lengthy career in professional hockey. Not only winning two Stanley Cups with the Pittsburgh Penguins in the early ’90’s, but most recently winning the Calder Cup with the Charlotte Checkers, amongst many other accolades. If you live in Charlotte and play hockey, or have a family member who plays, be sure to contact him. He is known as one of the best skate sharpeners in the world!

Our life has changed dramatically in the past few years with the passing of our two goldendoodles, Vegas and Viva. We were lucky enough to have Vegas for five years (totally wish it was longer). Most recently, losing our Viva to a brain tumor in July of 2020. We welcomed our mini goldendoodle 7, almost seven years ago. We just added the amazing Hazel! Of course, I am always posting tons and tons of photos! Be sure to check out my recipe for Pet Bone Broth! This broth is super rich in nutrients and will provide your pet with a multitude of health benefits!

Be sure to follow me on social media! I’m always talking food, fashion, and family! I also love sharing some of my favorite Amazon Finds too. Click here to check out my Amazon page! FacebookInstagramTikTokTwitter and Pinterest!

BAKED BRIE WITH CRANBERRY JAM

a wheel of baked brie with cranberry jam

Baked Brie with Cranberry Jam is definitely a crowd pleaser and a “must” appetizer for all of your holiday, or party gatherings. It’s relatively simple to prepare. I actually used my own cranberry sauce recipe for the jam, but if you are a bit low on time, you can substitute with jarred apricot or even red raspberry jam (preserves). Click here to view my cranberry sauce recipe. One thing I really like about this recipe is that it can be served warm, or at room temperature.

a piece of baked brie with cranberry jam and rosemary

Phyllo dough comes frozen, but you can easily thaw in the fridge overnight, or lay on counter for about an hour. The dough can be difficult to work with, but if you keep it hydrated (brushed with melted butter) as you are working with it, all will be fine. I used this one from Athens Brands. Or, you can make your own!

a box of Athens phyllo dough

HOW TO MAKE BAKED BRIE WITH CRANBERRY JAM

Heat oven to 350 degrees. Prepare your brie first. You do not have to, but I like to remove as much of the rind as possible. Gently, and with a very sharp knife, cut as much off as you can without cutting off too much of the cheese. It’s ok if just a little is left on the cheese.

Lay down four to five sheets of phyllo dough on a flat surface. Overlap those with another another four or five sheets. You need to create a large base, because you will be wrapping the cheese (see pics below). Brush the dough generously with the melted butter.

Place the wheel of brie in the middle of the buttered phyllo sheets. Top with the jam of your choice. If you are substituting with red raspberry jam, I like to sprinkle in a few red pepper flakes. There are two options I use for wrapping the cheese. For this recipe, I just made folds in the dough as I was covering the cheese. I wanted to see the cranberry jam. Alternatively, you can cover the entire wheel with the phyllo. It’s entirely up to you. Once you have the brie wrapped, brush all edges with a bit more of the melted butter.

Place in a non-stick pan or pie plate and allow to bake until the dough becomes nice and golden brown. This will take about 12 to 15 minutes. Try not to over bake as the brie may start melting from the bottom. You can broil for a minute at the end to brown the top.

Remove the Baked Brie with Cranberry Jam from the oven. Allow to rest in the pan for a few minutes. Place in serving dish. Or, do as I did, and make it the star of a charcuterie/cheese board. Click here for my Charcuterie and Formage ideas. Garnish with fresh rosemary sprigs. ENJOY!!!

LET’S GET SOCIAL!

I am more than just recipes. I love fashion and style too! Most importantly, I love my Family (my Hubby and my Fur Babies). My Husband (aka my “Kitchen Bitch”) means the world to me. He’s pretty damn cool too. Not only is he one of the nicest guys you will ever meet, he also has had a lengthy career in professional hockey. Not only winning two Stanley Cups with the Pittsburgh Penguins in the early ’90’s, but most recently winning the Calder Cup with the Charlotte Checkers, amongst many other accolades. If you live in Charlotte and play hockey, or have a family member who plays, be sure to contact him. He is known as one of the best skate sharpeners in the world!

Our life has changed dramatically in the past few years with the passing of our two goldendoodles, Vegas and Viva. We were lucky enough to have Vegas for five years (totally wish it was longer). Most recently, losing our Viva to a brain tumor in July of 2020. We welcomed our mini goldendoodle 7, almost seven years ago. We just added the amazing Hazel! Of course, I am always posting tons and tons of photos! Be sure to check out my recipe for Pet Bone Broth! This broth is super rich in nutrients and will provide your pet with a multitude of health benefits!

Be sure to follow me on social media! I’m always talking food, fashion, and family! I also love sharing some of my favorite Amazon Finds too. Click here to check out my Amazon page! FacebookInstagramTikTokTwitter and Pinterest!

ROASTED BRUSSELS SPROUTS WITH BACON AND ALMONDS

A fajita pan full of roasted Brussels sprouts with bacon and almonds

Searching for the perfect side dish for your holiday meal, or any meal, for that matter? Maybe you just want a tastier, and more inventive way to enjoy Brussels Sprouts. I’ve got your answer. After preparing Brussels sprouts using various techniques, roasting them can’t be beat. Especially, roasting them with thick-cut bacon and almond slivers. This recipe for Roasted Brussels Sprouts with Bacon and Almonds is super easy, and so delicious!

What I love most about this recipe is that you can prep in advance and roast later. This comes in super handy when planning your holiday meals. The flavor, that incredible flavor from the bacon, with the added texture from the crispiness of the Brussels sprouts, and crunch from the almond slivers will have you wanting more. Make a big batch, as you will be taste testing right from the pan for sure!

This is one of those side dishes I highly recommend as part of your holiday gatherings. Be sure to check out my Thanksgiving Dinner blog. There are so many great side dish ideas, as well as important tips on how to thaw and cook a turkey.

a pan of roasted Brussels sprouts with bacon and almonds

HOW TO PREPARE ROASTED BRUSSELS SPROUTS WITH BACON AND ALMONDS

Heat oven to 400 degrees. Rinse and cut the Brussels sprouts in half. Place in a large bowl (I also like to cut the end of each sprout off). Add the diced bacon. Season with just a touch of kosher salt and black pepper. Drizzle on the olive oil. I am a huge fan of this light olive oil from Harris Teeter. I use it almost every single day for cooking. Toss to coat.

Pour contents of the bowl onto baking sheet. Spread evenly, in a single layer. Pop in the oven for at least 30 minutes. Tossing often. In the last five minutes or so, turn up the oven temperature to 425 degrees. Gently fold in the slivered almonds. Be sure not to add the almonds at the beginning, as they will surely burn. You just want them nice and toasty. This can be achieved in the last few minutes of baking. Keep a watchful eye.

Place the Roasted Brussels Sprouts with Bacon and Almonds in a bowl to serve, or do what I did and eat right off of the pan. They are that crazy good! Serve as one amazing side dish, or as a meal. ENJOY!

a cast iron pan of roasted Brussels sprouts with bacon and almonds

Craving more recipes using Brussels sprouts? Check out my recipes, Orecchiette with Roasted Brussels Sprouts, Fried Brussels Sprouts, and one of my all-time favorites, Spicy Honey Shrimp with Brussels Sprouts!

LET’S GET SOCIAL!

I am more than just recipes. I love fashion and style too! Most importantly, I love my Family (my Hubby and my Fur Babies). My Husband (aka my “Kitchen Bitch”) means the world to me. He’s pretty damn cool too. Not only is he one of the nicest guys you will ever meet, he also has had a lengthy career in professional hockey. Not only winning two Stanley Cups with the Pittsburgh Penguins in the early ’90’s, but most recently winning the Calder Cup with the Charlotte Checkers, amongst many other accolades. If you live in Charlotte and play hockey, or have a family member who plays, be sure to contact him. He is known as one of the best skate sharpeners in the world!

Our life has changed dramatically in the past few years with the passing of our two goldendoodles, Vegas and Viva. We were lucky enough to have Vegas for five years (totally wish it was longer). Most recently, losing our Viva to a brain tumor in July of 2020. We welcomed our mini goldendoodle 7, almost seven years ago. We just added the amazing Hazel! Of course, I am always posting tons and tons of photos! Be sure to check out my recipe for Pet Bone Broth! This broth is super rich in nutrients and will provide your pet with a multitude of health benefits!

Be sure to follow me on social media! I’m always talking food, fashion, and family! I also love sharing some of my favorite Amazon Finds too. Click here to check out my Amazon page! FacebookInstagramTikTokTwitter and Pinterest!

Easy Thanksgiving Dinner Menu

A plate of Thanksgiving dinner with turkey roulade, mashed potatoes, orange cranberry relish, stuffing and roasted carrots

Step into a stress-free Thanksgiving celebration with my Easy Thanksgiving Dinner Menu. This menu is a collection of simple, yet sensational side dish recipes that will compliment your table perfectly. Wait, there’s more! Check out an innovative Turkey Roulade recipe. This turkey recipe is a new and hassle-free way to prepare the centerpiece of your feast that’ll have everyone asking for seconds. If you are wondering what to do with leftovers. Check out this fantastic idea to transform those remnants into delightful TV Dinners. Get ready to make this Thanksgiving a breeze without sacrificing an ounce of flavor or festivity!

So, I did a thing! My first e-book, also in paperback, is all about Mastering Thanksgiving Dinner! It’s an easy read filled with timelines, checklists, all of your turkey questions, a handful of my favorite recipes, and so much more! Please check it out!

I hope you all enjoy a wonderful Thanksgiving Dinner with Family and Friends. I would love for my recipes to make it on to your Thanksgiving Dinner Table. As always, I am forever filled with gratitude and thankfulness from all of you!

Thanksgiving Turkey

For my Family, we are all about the white meat. So, for the past several years, I’ve decided to skip preparing a Whole Roasted Turkey and instead, opt for a roasting a Turkey Breast, or making this fabulous Turkey Roulade.

  • Whole Roasted Turkey Breast: Simply, rub seasoned butter under the skin. Season the outside with salt and pepper. Place in a roasting pan with turkey stock in the bottom pan. Roast until the internal temperature, measured at the thickest part, reaches 165°F.
  • For a more non-traditional approach to a Thanksgiving turkey, my Turkey Roulade is made by flattening a boneless turkey breast and filling with my Grandfather’s Homemade Sausage Stuffing Recipe!

How to Safely Thaw a Turkey

For a complete guide on how to safely thaw a whole turkey or turkey breast, refer to my guide, “Mastering Thanksgiving,” which is available on Amazon! This Thanksgiving Dinner guide is also complete with a timeline, checklist, roasting times specific for the size and weight of a turkey, a few of my favorite Thanksgiving dinner recipes, leftover ideas and so much more!

Thanksgiving Dinner Appetizer Ideas

Thanksgiving dinner appetizers set the stage for a feast filled with warmth and anticipation. Inevitably, most of us never start the Thanksgiving meal on time. So, serving guests a few appetizers is a great way to relieve a little bit of the pressure on the host.

These prelude bites not only tantalize the taste buds, but also encourage conversations and bring together loved ones. From classic starters like savory cheese platters adorned with assorted nuts and fruits to stuffed mushrooms, or cranberry and brie, appetizers play a crucial role in setting the festive tone for the main meal.

Thanksgiving Side Dishes

Side dishes, often the unsung heroes of a Thanksgiving dinner, hold a significant role in elevating this Easy Thanksgiving Dinner Menu. While the turkey rightfully claims the spotlight, side dishes play a crucial supporting role, enhancing flavors, textures, and diversity on the table.

These dishes, ranging from creamy mashed potatoes and buttery dinner rolls to roasted vegetables and homemade cranberry sauce, not only add depth to the meal, but also bring nostalgic familiarity and comfort to the gathering.

Turkey Gravy

How can you enjoy Thanksgiving Dinner without Homemade Turkey Gravy? The key to any gravy is to develop the flavors over a period of time using bones. However, it is that initial browning of the turkey parts that really makes all of the difference.

If you can find bone-in turkey parts, use them. If not, chicken will do just fine. Turkey thighs are a great choice. If you are feeding a larger crowd, toss in a few extra.

Homemade Sausage Stuffing

This Homemade Sausage Stuffing recipe has been in my Family for generations. My mother still has the handwritten recipe from my Grandfather. Admittedly, this incredible stuffing is my favorite part of this Easy Thanksgiving Dinner Menu!

This stuffing recipe is incredibly versatile. Use the stuffing to make a casserole, stuffing balls or to stuff a whole turkey. If stuffing a whole turkey, refer to my guide on food safety.

Additionally, this stuffing is also great for making a Turkey Roulade!

Oyster Dressing

Living in the South, I have noticed over the years, how many people refer to “stuffing” as “dressing.” I suppose no one would stuff their bird with Oyster Dressing, like we northerners do with our sausage stuffing. Nonetheless, Oyster Dressing is a wonderful Thanksgiving side dish, and I recommend giving it a try!

oyster dressing baked in a cast iron pan

Homemade Green Bean Casserole

Seriously, is a Thanksgiving Dinner even complete without Green Bean Casserole? If you want to steer away from the preservatives, try this homemade version. You may never make green bean casserole any other way!

two casserole dishes filled with homemade green bean casserole

Simple Roasted Carrots

The most beautiful, and pleasing part to the eyes (pun intended), are these delicious roasted rainbow carrots. Honestly, ditch the honey glazed and skip the herbs. You do not need any more sweetness, or competition with flavors for your Thanksgiving Dinner. A simple roast will do just fine.

Heat oven to 400°F. Layer the carrots on a pan. Drizzle with olive oil. Simply season with salt and black pepper. Roast for about 15-20 minutes, until tender and slightly caramelized. Toss a few times while roasting. Plate with a sprinkle of flake salt.

Roasted Brussels Sprouts with Crisp Bacon and Almonds

Although on the fancy side, you and your guests will love this Roasted Brussels Sprouts recipe. Easily, prep in advance and roast while the turkey is resting.

Fluffy Homemade Mashed Potatoes

Is Thanksgiving dinner complete without Creamy Homemade Mashed Potatoes? Creating tasty mashed potatoes from scratch offers an unparalleled taste and texture, as opposed to store-bought. For a low-carb version, try Mashed Cauliflower, instead.

Fondant Sweet Potatoes

Impress your guests this holiday season with this unique twist on a classic sweet potato casserole. This easy-to-follow, Fondant Sweet Potatoes with Toasted Marshmallows and Maple Butter Walnuts recipe transforms humble sweet potatoes into a mouthwatering dish that balances the sweetness of marshmallows with the savory richness of a maple butter walnut glaze.

Homemade Orange Cranberry Sauce

Homemade Cranberry Sauce is not only easy to prepare, but also incredibly rewarding. This homemade Orange Cranberry Relish combines the tartness of fresh cranberries with the sweetness of oranges and zest from lemon, creating a relish that will tantalize your taste buds. Plus, it’s a fantastic alternative to store-bought, canned cranberry sauce.

Yorkshire Pudding or Popovers

Jazz up your Thanksgiving Dinner menu with these incredible Popovers, or a British favorite, Yorkshire Pudding. They are both incredibly easy to prepare, and your guests will love them! Use a muffin tin or popover pan.

Thanksgiving Dinner Leftovers

Need an innovative idea for saving those Thanksgiving Dinner leftovers? My favorite Thanksgiving leftover idea is to prepare these TV Dinners. They are great for providing a meal to an elderly neighbor, or someone in need of a hot meal. Alternatively, toss them into the freezer and enjoy on a weeknight, when you just do not feel like cooking! Homemade TV Dinners will last up to 2 months in the freezer.

Of course, you are going to need these aluminum compartment trays. Grab them now, so that you will be good to go on Thanksgiving Day!

Additionally, try this innovative turkey sandwich with the sausage stuffing as your bread, leftover turkey, cranberry sauce, brie and arugula, or even an open-faced turkey sandwich sounds yummy!

GET TO KNOW ME!

A photo of me in a black floral dress cooking at the stovetop at Williams-Sonoma

WELCOME! My name is Melissa Latin aka. Charlotte Fashion Plate. Happy to meet you! I am more than just recipes. I love fashion and style too! Most importantly, I love my Family (my Hubby and my Fur Babies). My Husband (aka my “Kitchen Bitch”) means the world to me. He’s pretty damn cool too. Not only is he one of the nicest guys you will ever meet, he also has had a lengthy career in professional hockey. Not only winning two Stanley Cups with the Pittsburgh Penguins in the early ’90’s, but most recently winning the Calder Cup with the Charlotte Checkers, amongst many other accolades. If you live in Charlotte and play hockey, or have a family member who plays, be sure to contact him!

Our life has changed dramatically in the past few years with the passing of our two goldendoodles, Vegas and Viva. We were lucky enough to have Vegas for five years (totally wish it was longer). Most recently, losing our Viva to a brain tumor in July of 2020. We welcomed our mini goldendoodle 7, almost seven years ago. We just added the amazing Hazel! Of course, I am always posting tons and tons of photos! Be sure to check out my recipe for Pet Bone Broth! This broth is super rich in nutrients and will provide your pet with a multitude of health benefits!

Let’s Get Social!

Be sure to follow me on social media! I’m always talking food, fashion, and family! I also love sharing some of my favorite Amazon Finds too. Click here to check out my Amazon page! FacebookInstagramTikTokTwitter and Pinterest! THANK YOU!!

Sausage Stuffing

Sausage stuffing in a bowl with sausage stuffing balls surrounding the plate.

Stuffing or Dressing? Whatever you grew up calling it, everyone has a favorite recipe. This is mine. Thanksgiving for me is typically the only time of year that I make this amazing Sausage Stuffing recipe.

This recipe was handed down to me from my Mother who still has the handwritten recipe from my Grandfather. Even though I never had the chance to physically meet him, when I make this, it makes me feel nostalgic and close to him. I hope you enjoy it as much as I do.  It is definitely an old school preparation and takes time, but it is so worth it in the end.

Stuffing vs. Dressing

Growing up, my Mom always stuffed our Thanksgiving turkey. In addition, she would make cute stuffing balls out of what was left over after stuffing the turkey, and bake them to a golden brown.

It was not until I moved south about ten years ago did I realize that some people actually refer to stuffing as dressing. Dressing is always served on the side and not stuffed into the bird. Regardless of what you call this fabulous bread mixture, it is AMAZING and truly a Thanksgiving staple.

Bread for Stuffing

My Sausage Stuffing recipe calls for traditional white bread. However, it’s what you do with the bread that is most important. The bread for stuffing needs to be toasted. Toasting the bread will allow it to better absorb all of the goodness.

As an alternative to white bread, cornbread is a great substitute. Very southern, I might add. Bagged croutons for stuffing will also work. However, I cannot guarantee this Sausage Stuffing recipe will be as good using bagged croutons.

Toast the bread using a toaster, toaster oven, or oven. Once toasted, break apart into pieces.

What Type of Sausage to Use for Stuffing

In sticking with my Grandfather’s original Sausage Stuffing recipe, we always use sage sausage. Country sausage would be a great alternative combined with ground sage.

Grinding the sausage once it is browned, is a MUST! Just a few pulses will create a consistent sausage mixture.

Is it Safe to Stuff a Turkey?

Most professional chefs would say that cooking the stuffing inside the turkey is not very safe. However, you will still find a vast amount of homecooks continue to carry on the tradition of stuffing the Thanksgiving turkey.

The dangers of stuffing a turkey come from the turkey juices that are absorbed into the stuffing. So, when checking the internal temperature of the turkey for doneness, some neglect to check the temperature of the stuffing. Keep in mind, you are looking for your bird AND stuffing to read between 160° to 165°. The stuffing must be at the same temperature as the poultry to ensure that any bacteria are killed during the cooking process.

How to Safely Stuff and Cook a Turkey

If your Thanksgiving feast includes a stuffed turkey, the following tips should be followed to do this in a safe manner:

  • all ingredients in the stuffing should be cooked prior to stuffing
  • separate the stuffing to fill the turkey in a separate bowl to avoid cross contamination
  • stuff the turkey with the stuffing just prior to roasting the turkey (do NOT stuff the night before)
  • a good rule of thumb is 3/4 cup of stuffing for every pound of turkey
  • do not pack too tightly
  • check both the temperature of the turkey and the stuffing
  • a stuffed turkey will generally need to cook an hour or so longer than an unstuffed turkey
  • prior to storing leftovers, separate the turkey meat from the stuffing and store in individual sealed containers

How to Serve Sausage Stuffing

This amazing Thanksgiving side dish recipe will make a lot. If you plan on stuffing the turkey, you may want to double the recipe and use in a variety of ways.

What I love most about this Sausage Stuffing recipe is that it has multiple uses. As mentioned above, stuffing the Thanksgiving turkey is a game changer, as long as you do so in a food safe manner.

Additionally, this favored Thanksgiving dinner side dish can be made into stuffing balls with crispy edges, or served as a casserole.

What to do with Leftover Sausage Stuffing

Leftover stuffing or dressing will keep well in the fridge for at least three to four days. So, use this incredible Sausage Stuffing to make a turkey sandwich, as part of a turkey TV dinner, or enjoy alone right out of the fridge.

Additionally, this Sausage Stuffing recipe freezes very well. So, be sure to make extra, freeze and enjoy during your Christmas feast. Sausage Stuffing or Sausage Dressing will last about three months in the freezer.

Thanksgiving Dinner Ideas

For everything you need for your Thanksgiving feast, and more amazing turkey day recipe ideas, be sure to check out my Thanksgiving Dinner blog! Oh, and if you love Oyster Dressing, my recipe is a MUST TRY!

Print
clock clock iconcutlery cutlery iconflag flag iconfolder folder iconinstagram instagram iconpinterest pinterest iconfacebook facebook iconprint print iconsquares squares iconheart heart iconheart solid heart solid icon
Sausage stuffing in a bowl with sausage stuffing balls surrounding the plate.

Sausage Stuffing


5 Stars 4 Stars 3 Stars 2 Stars 1 Star

No reviews

Description

Stuffing or Dressing? Whatever you grew up calling it, everyone has a favorite recipe. This Sausage Stuffing is mine. Well…it’s actually a recipe handed down from my Grandfather. It’s super easy to prepare and will give you all the feels of a traditional Thanksgiving Dinner. This recipe is so versatile and can be enjoyed in so many ways!


Ingredients

Scale
  • 2 loaves white sandwich bread
  • 1 package Jimmy Dean sage sausage
  • 3 celery stalks, finely chopped
  • 1/2 white onion, finely chopped
  • 1 stick salted butter
  • 1 box chicken or turkey stock
  • 2 to 3 tablespoons fresh parsley, chopped
  • 1 egg, beaten
  • 1 to 2 teaspoons kosher salt
  • 1 teaspoon black pepper

Instructions

  • Start by browning the sausage in a pan.
  • Toast the bread and break apart into a large bowl.
  • Once the sausage has browned, remove from pan and drain any excess fat.
  • Place in a food processor and pulse a few times. May have to do this in batches. Reserve.
  • In the same pan you cooked the sausage, melt the butter.
  • Add the onions and celery. Cook to soften a few minutes. Do NOT brown.
  • Add 2/3 of the boxed stock to the vegetables. Cook for a few minutes.
  • Add the ground sausage to the pan. Cook for a few more minutes.
  • Sprinkle the fresh parsley over the pulled apart toast.
  • Season with kosher salt and black pepper.
  • Pour the stock mixture over the toasted bread.
  • Incorporate the sausage mixture with your hands into the toast.
  • The mixture should not be too wet, or too dry at this point. Add more stock directly to the bowl, if needed.
  • Allow the mixture to cool slightly before adding in the beaten egg. 
  • Taste for salt.
  • Use the stuffing to stuff the turkey (see notes in post), form into sausage balls or place in a casserole dish and bake at 375° for about 15 minutes. 
  • ENJOY!

Notes

SEE POST FOR NOTES!

  • Prep Time: 15 minutes
  • Cook Time: 10 minutes
  • Category: Side Dish, Dinner
  • Method: Easy
  • Cuisine: American

Nutrition

  • Serving Size: 8 to 10 cups

LET’S GET SOCIAL!

I am more than just recipes. I love fashion and style too! Most importantly, I love my Family. My Husband (aka my “Kitchen Bitch”) means the world to me. He’s pretty damn cool too. Not only is he one of the nicest guys you will ever meet, he also has had a lengthy career in professional hockey. Not only winning two Stanley Cups with the Pittsburgh Penguins in the early ’90’s, but most recently winning the Calder Cup with the Charlotte Checkers, amongst many other accolades. If you live in Charlotte and play hockey, or have a family member who plays, be sure to contact him. He is known as one of the best skate sharpeners in the world!

Our life has changed dramatically in the past few years with the passing of our two goldendoodles, Vegas and Viva. We were lucky enough to have Vegas for five years (totally wish it was longer). Most recently, losing our Viva to a brain tumor in July of 2020. We welcomed our mini goldendoodle 7, almost seven years ago. We just added the amazing Hazel! Be sure to check out my recipe for Pet Bone Broth! This broth is super rich in nutrients and will provide your pet with a multitude of health benefits!

FOLLOW ME!

Be sure to follow me on social media! I’m always talking food, fashion, and family! I also love sharing some of my favorite Amazon Finds too. Click here to check out my Amazon page! FacebookInstagramTikTokTwitter and Pinterest!