Fresh Salsa Chorizo Meatloaf

Fresh salsa meatloaf roasted in a cast iron pan with carrots and onions and a container of salsa in the background

Take your Classic Meatloaf recipe for a spin! Fresh Salsa Chorizo Meatloaf is a flavorful, hearty dinner full of ground beef, pork, chorizo, and studded with fresh vegetables. The right amount of spice from the chorizo sausage combines perfectly with Sam’s Fresh Medium Salsa for a wonderful explosion of flavor. What a time saver using the fresh salsa. No need to chop vegetables. The Pico de Gallo style salsa is full of tomatoes, onions, bell peppers, jalapeños, and fresh cilantro.

SAM’S FRESH SALSA

So, let’s talk about Sam’s Fresh Salsa. Their mission and priority has always been to “ensure consistent quality in their produce.” Sam’s award-winning fresh salsas are created using the freshest of produce.

Find Sam’s Fresh Salsa products at ShopRite, Acme and Safeway. For a complete list of retailers, click here! If not available in your local market, ask them to carry Sam’s Fresh Salsa products. Follow Sam’s Fresh Salsa on Facebook and Instagram!

me holding a container of Sam's Fresh Medium Salsa

MEATLOAF

Did you know meatloaf originated in Germany? Meatloaf become popular in America as German immigrants made their way to America.

Consequently, meatloaf became a favored dish during the Great Depression. As meat became scarce, grains and leftover ingredients were added to whatever meat was on hand to “bulk” up the recipe. Tomatoes and/or tomato sauce was then poured on top to not only provide additional flavor, but to also keep the meatloaf moist and tender.

Chorizo Meatloaf

Honestly, some of us can agree that traditional meatloaf can be quite boring, right? Not anymore, now that we have this recipe for Fresh Salsa Chorizo Meatloaf! Chorizo is a well seasoned pork sausage that is very popular in Spanish and Mexican cuisine.

I used Mexican chorizo in this dish. This type of fatty sausage has a very distinct red tint from the various spices used to make it.

NOTE: Spanish chorizo and Mexican chorizo are very different. Mexican chorizo is raw and fresh. Unlike most sausages, the casing is inedible. Thankfully, you will find most Mexican chorizo is sold in a tube, sans the casing.

TIPS ON MAKING THE BEST FRESH SALSA CHORIZO MEATLOAF

As mentioned earlier, the use of fresh salsa as a main ingredient to prepare the meatloaf will be a huge time saver, and flavor builder. The fresh salsa contains the ingredients you would normally spend time chopping.

Additionally, the juices from the salsa help to keep this flavor-packed meatloaf moist and tender as it bakes. Also, this tangy meatloaf recipe does not call for eggs. You do not need them. The salsa and cream soaked bread are the perfect binders.

Here are a few more tips:

  • meatloaf mix (find in the meat section) can be substituted for ground beef and pork
  • use 80/20 beef (the more fat, the more flavor)
  • do NOT skip the bread soaking step (I even do this for Meatballs)
  • a crusty bread works better than sandwich bread
  • milk can be substituted for the heavy whipping cream
  • do NOT overwork the meat
  • as the meatloaf bakes, you will need to drain off some of the fat
  • cook meatloaf to an internal temperature of 165° using an instant-read thermometer placed in the center of the loaf
  • add vegetables to the baking pan (potatoes, carrots, onions, garlic)
  • form two loaves for faster a faster bake

HOW TO SERVE AND STORE LEFTOVER SALSA MEATLOAF

Traditionally, serve this tasty, spicy meatloaf on top of creamy mashed potatoes with a side of roasted vegetables, or consider these other options as perfect pairings:

  • macaroni and cheese
  • rice
  • mashed cauliflower
  • green beans or peas
  • scalloped potatoes
  • fried potatoes
  • roasted potatoes

Thankfully, leftover Fresh Salsa Chorizo Meatloaf will last up to three days in the fridge. Leftovers will make for great meatloaf sandwiches the next day. Additionally, cut up the chorizo meatloaf and serve as a topping for nachos, with extra Sam’s Fresh Salsa, of course!

If stored properly, leftover meatloaf can last up to three months in the freezer.

Print
clock clock iconcutlery cutlery iconflag flag iconfolder folder iconinstagram instagram iconpinterest pinterest iconfacebook facebook iconprint print iconsquares squares iconheart heart iconheart solid heart solid icon
Fresh salsa meatloaf roasted in a cast iron pan with carrots and onions and a container of salsa in the background

Fresh Salsa Chorizo Meatloaf


5 Stars 4 Stars 3 Stars 2 Stars 1 Star

No reviews

Description

Take your classic meatloaf recipe for a spin! Fresh Salsa Chorizo Meatloaf is a flavorful, hearty dinner full of ground beef, pork, chorizo, and studded with fresh vegetables. The right amount of spice from the sausage combines perfectly with Sam’s Fresh Medium Salsa for a wonderful explosion of flavor. What a time saver using the fresh salsa. No need to chop vegetables. The Pico de Gallo style salsa is full of tomatoes, onions, bell peppers, jalapeños, and fresh cilantro.


Ingredients

Scale
  • 1 pound ground beef (80/20)
  • 1/2 pound ground pork
  • 6 ounces Mexican chorizo, out of casing
  • 2 slices bread, torn into bite-sized pieces
  • 1/3 cup heavy whipping cream or milk
  • 1 teaspoon salt
  • 1 teaspoon black pepper
  • 1/2 teaspoon garlic powder
  • 1/2 teaspoon onion powder
  • 3 tablespoons Sam’s Fresh Salsa (Medium or Mild)
  • 2 tablespoons fresh cilantro, chopped
  • 8 to 10 baby carrots
  • 1/2 red onion, quartered
  • 2 garlic cloves, halved
  • 2 teaspoons olive oil

Instructions

  1. Preheat oven to 350°.
  2. Tear the bread into a large bowl and allow to soak in the heavy cream for a few minutes (the mixture should be paste-like)
  3. To the same bowl, add the ground meats, chorizo, fresh cilantro, and salsa. 
  4. Season with salt, pepper, garlic and onion powder.
  5. Use your hands to evenly incorporate the ingredients.
  6. Do NOT over mix.
  7. Form into a loaf. Place in a cast iron, or baking pan.
  8. Add the carrots, onions and garlic around the meatloaf. 
  9. Sprinkle the vegetables with a touch of olive oil and season with salt and pepper.
  10. Cover, or tent with tin foil.
  11. Bake for about 45 minutes, or until the internal temperature reaches 165° using an instant-read thermometer
  12. Remove from oven and allow to rest at least five minutes prior to cutting.
  13. Cut into generous, thick slices.
  14. Suggested serving on top of creamy mashed potatoes with a spoonful of the roasted vegetables.
  15. Garnish with a few spoonfuls of fresh salsa and chopped cilantro.
  16. ENJOY!

Notes

  • Depending on the fat content of the meat, you may have to remove a bit of fat while the meatloaf is baking (check at the 25 minute marker).
  • SEE POST FOR ADDITIONAL NOTES AND TIPS!
  • Prep Time: 10 minutes
  • Cook Time: 1 hour
  • Category: Dinner
  • Method: Easy
  • Cuisine: American

Nutrition

  • Serving Size: 2 slices

GET TO KNOW ME!

a photo of me leaning against a brick wall with my logo, "Charlotte Fashion Plate" to the left of me

I am more than just recipes. I love fashion and style too! Most importantly, I love my Family (my Hubby and my Fur Babies). My Husband (aka my “Kitchen Bitch”) means the world to me. He’s pretty damn cool too. Not only is he one of the nicest guys you will ever meet, he also has had a lengthy career in professional hockey. Not only winning two Stanley Cups with the Pittsburgh Penguins in the early ’90’s, but most recently winning the Calder Cup with the Charlotte Checkers, amongst many other accolades. If you live in Charlotte and play hockey, or have a family member who plays, be sure to contact him!

Our life has changed dramatically in the past few years with the passing of our two goldendoodles, Vegas and Viva. We were lucky enough to have Vegas for five years (totally wish it was longer). Most recently, losing our Viva to a brain tumor in July of 2020. We welcomed our mini goldendoodle 7, almost seven years ago. We just added the amazing Hazel! Of course, I am always posting tons and tons of photos! Be sure to check out my recipe for Pet Bone Broth! This broth is super rich in nutrients and will provide your pet with a multitude of health benefits!

Let’s Get Social!

Be sure to follow me on social media! I’m always talking food, fashion, and family! I also love sharing some of my favorite Amazon Finds too. Click here to check out my Amazon page! FacebookInstagramTikTokTwitter and Pinterest! THANK YOU!

CINNAMON OATMEAL PANCAKES

a plate of two cinnamon oatmeal pancakes with bacon

A few weeks ago on a getaway to the mountains, I meticulously planned out all of our breakfasts and dinners. Of course, our gorgeous rental (App A-Frame) tucked in the snowy woods (see below for more details…the hosts are fabulous) called for a morning of hot, creamy oatmeal. We are back home now and that bag of oatmeal has been screaming at me. So, I decided to try my hand at making Cinnamon Oatmeal Pancakes. However, I did not want this recipe to be typical. Basically, I created pancakes, or maybe I should even call them patties, out of the rich oatmeal. For this recipe, I used Bob’s Red Mill Organic, Extra Thick, Rolled Oats and Homestyle Pancake Mix.

One thing I love most about these pancakes was the texture. Also, they are super hearty. In my opinion, a pat of butter, a simple sprinkle of light brown sugar and cinnamon, finished with a warmed, organic maple syrup from Runamok Maple was pure perfection.

You will need to refrigerate the oatmeal once it’s cooked. This will thicken the oatmeal and make it much easier to form into pancakes. Also, keep in mind that in order for the pancakes to stay together while you are cooking, try not to touch them until they are ready to flip. Yes, I learned this with the first batch. Be gentle.

Per usual, I created a short video on TikTok of the making of these fabulous Cinnamon Oatmeal Pancakes. Click here to view. If you have not yet signed up for this social media platform, use my code 5SSIS800K0H06 to create an account.

a plate of two cinnamon oatmeal pancakes with bacon

HOW TO MAKE CINNAMON OATMEAL PANCAKES

In a saucepan, bring the water and salt to a boil. Stir in the oats. Add the cinnamon and allow to cook for about eight minutes. Sprinkle in the pancake mix. Combine well. Pour in the heavy whipping cream. Warm through. Transfer the oatmeal to a bowl and refrigerate for twenty minutes. As mentioned earlier, as the oatmeal cools, it will thicken. The thickened oatmeal will form a better pancake.

Heat two tablespoons of butter in a non-stick pan. Form pancakes (patties) out of the oatmeal mixture to your desired thickness. Place in pan and allow to brown nicely on one side. You may have to form the shape a touch with your spatula once the pancakes are added to the pan. Let them brown without bothering too much. Flip and brown the other side.

This recipe will yield about six to seven pancakes. I would suggest preparing in batches, as you need room to flip. Plate and top with butter, ground cinnamon, brown sugar and maple syrup. Serve with a side of crisp bacon or sausage. You may be wondering how I get my bacon super crispy without curling up. Lay the bacon on a non-stick pan. Place in oven as it warms to 350 degrees. Flip halfway through.

ENJOY these fabulous Cinnamon Oatmeal Pancakes! Make them extra special with a topping of fresh fruit and whipped cream.

APP-A FRAME

As mentioned earlier, the beautiful North Carolina Mountain getaway is a must-stay. Click here to learn all about this amazing space and to book directly through AirBnB. Hospitality at its finest. We loved the updated decor, new hot tub, and grill. Another bonus, they are very pet-friendly. The hosts kept in contact before and during our stay. They were always accessible. If you want to explore the area, they have all of this taken care of too. For me, the kitchen and dining area made me extra excitable. The lighting was just perfect for food photography. Go here…you will thank me later. If you are not yet signed up for AirBnB, use my link to create an account and get a discount up to $65.

Be sure to check out my recipes for The Best Breakfast Skillet and Braised Short Ribs.

LET’S GET SOCIAL!

I am more than just recipes. I love fashion and style too! Most importantly, I love my Family (my Hubby and my Fur Babies). My Husband (aka my “Kitchen Bitch”) means the world to me. He’s pretty damn cool too. Not only is he one of the nicest guys you will ever meet, he also has had a lengthy career in professional hockey. Not only winning two Stanley Cups with the Pittsburgh Penguins in the early ’90’s, but most recently winning the Calder Cup with the Charlotte Checkers, amongst many other accolades. If you live in Charlotte and play hockey, or have a family member who plays, be sure to contact him!

Our life has changed dramatically in the past few years with the passing of our two goldendoodles, Vegas and Viva. We were lucky enough to have Vegas for five years (totally wish it was longer). Most recently, losing our Viva to a brain tumor in July of 2020. We welcomed our mini goldendoodle 7, almost seven years ago. We just added the amazing Hazel! Of course, I am always posting tons and tons of photos! Be sure to check out my recipe for Pet Bone Broth! This broth is super rich in nutrients and will provide your pet with a multitude of health benefits!

FOLLOW ME!

Be sure to follow me on social media! I’m always talking food, fashion, and family! I also love sharing some of my favorite Amazon Finds too. Click here to check out my Amazon page! FacebookInstagramTikTokTwitter and Pinterest! THANK YOU!

ARTISAN SOURDOUGH BREAD

a loaf of artisan sourdough bread sitting on a cast iron pan

As I have said, over and over again, I do not consider myself much of a baker. My Mother and Brother hold that title in our Family. You must see the loaves of French bread my Brother creates in his kitchen. They are perfect! So, when I created an account on TikTok last summer, I came across this fabulous girl, Hannah. She was baking up the most incredible loaves of Artisan Sourdough Bread. Finally, I decided to try and make my own. Believe me, I have tried baking bread in the past. I am not ashamed to say, more often than not, it was a major fail.

Given all of this, I had no idea where to begin starting my sourdough starter. So, to Pinterest I ran for expert guidance. Luckily, I found Amanda’s ( I am Homesteader blog) recipe for Sourdough Starter. It looked easy enough. Not only did she provide the starter recipe, but also ideas on how to use the discard and so many other valuable links. Time management and patience are key to sourdough bread making. WE all got you! Oh, and yes, I did name my sourdough starter. Her name is Vegas. An ode to the name of our first goldendoodle and for luck!

This recipe will yield two beautiful loaves of Artisan Sourdough Bread. As I am writing this, I am experimenting with Sourdough Bread Bowls for my Broccoli Cheddar Cheese Soup. Using this same recipe, will yield five bread bowls.

a loaf of artisan sourdough bread sitting on a cast iron pan

TOOLS FOR MAKING SOURDOUGH BREAD

Keep in mind, making sourdough bread requires a huge investment of your time and the proper tools. Before you even begin, I suggest grabbing these items to ease the process. Some of these bread making tools you may have already on hand. For a complete kit, click here.

Lastly, you definitely need the proper bakeware. If you have an enameled cast iron pot like this one from Lodge, that will work perfectly. However, I decided to make the investment in The Challenger. Not only can you use this cast iron pan for bread making, but it’s also perfect for creating many other fabulous recipes (tons of recommendations on their website). Totally worth the price. As an added bonus, you will be supporting a U.S. based, family-owned business.

HOW TO MAKE A SOURDOUGH STARTER

As mentioned earlier, I followed Amanda’s recipe to create the sourdough starter, step-by-step. However, instead of making one starter, I actually made two at the same time. I did this for two reasons. One, I was filming the process for videos. So, I needed one for just the daily starter post and one for the final post of the overall process. Secondly, I wanted to give a starter to my Brother. It’s actually on its way to him as I am writing. Also, the starter will not be ready to create bread until the seventh day!

Keep in mind that you not be discarding until Day Three! After EVERY discard, you will be feeding in that same ratio of one-half cup flour and one-third cup filtered water. Please note, when I refer to water at anytime in the remainder of this recipe, I will always be referring to filtered water. My choice of flour for the starter was Unbleached King Arthur All-Purpose Flour. To make the Artisan Sourdough Bread, I used King Arthur’s Unbleached Bread Flour and Whole Wheat Flour. Refer to this article from Serious Eats for more information on what types of flours are best, and can be used for sourdough starters.

DAY ONE AND TWO

On Day One, in a glass jar (I used a 16-ounce ball jar), combine one-half cup flour with one-third cup of water. Mix with a wooden spoon. Cover loosely with a paper towel and seal with a rubber band. Store in the warmest part of your home. Check back in 24 hours.

On Day Two, feed the mixture by adding another one-third cup of water and one-half cup of flour to the same jar. Someone was so kind to mention to add the water first for ease of mixing. Mix and cover for another 24 hours.

Click to watch short videos I created on TikTok of Day One and Day Two. If you have not yet signed up for this social media platform, use my code 5SSIS800K0H06 to create an account.

DAY THREE

By Day Three, the mixture should be grabbing up the bacteria from the environment and creating a science experiment. You should notice bubbles. If you notice bubbles, discard half of the starter. As mentioned earlier, Amanda gives several suggestions on what to do with the discard. My discard was used to make Sourdough Crackers, Sourdough Muffins and Sourdough Bagels. Also, you can just throw it away, or use the discard as a starter, and gift it to someone. Feed again using the same measurements (1/3 C water and 1/2 C flour). Cover loosely and check back in another 24 hours. Be sure to watch my short video of Day Three.

DAYS FOUR, FIVE AND SIX

Over the next few days, you will be discarding AND feeding twice a day. Do this at least eight hours apart. After discarding and feeding on Day Four, I would suggest transferring the starter to a larger jar. Honestly, I even changed the jar on Day Six. Discarding and feeding twice a day, over these three days, can really make the jar kind of crudy on the sides. Also, I combined all of the discards in jars and placed them in the fridge to make the crackers and muffins. All told, I had almost three jars of discard.

DAY SEVEN

It’s Day Seven!!! You should have a very healthy, and active sourdough starter. Guess what? You can finally make Artisan Sourdough Bread! The sourdough starter should start to smell “yeasty” around day three. If at any point, your starter has a really bad, almost “rotten-like” smell, you should probably start the entire process over. Amanda has some really great advice in her comment section regarding what to do if this happens. Also, she can answer any questions about what to do if you miss a discard/feed.

If you are not ready to make sourdough bread on Day Seven, you can either store the starter in the fridge and discard/feed once a week. Or, place the starter on the counter and discard/feed twice daily. You will NOT be using all of the starter for making sourdough bread. This is how some families have been able to keep a starter going for generations.

For all questions about how to maintain the sourdough starter, by either method mentioned above, refer to this article from King Arthur Flour. The article also provides you with insight on how to prep the starter for baking if it has been maintained in the fridge. See what I mean? A lot goes into this process!

LET’S MAKE ARTISAN SOURDOUGH BREAD

TO LEVAIN, OR NOT TO LEVAIN

As mentioned earlier, I needed all the help I could get from the experts. During my research, I became acquainted with levain. Somehow, I just knew I wanted to create a levain with my starter. Technially, levain is a starter. Honestly, I really did not even need to take this extra step. However, I am extra fancy! So, if you wish NOT to build a levain with the starter, you can skip this step entirely and just use the sourdough starter. For all there is to know about a levain, click here! It’s not just for making bread.

To prepare my levain, and to ultimately create the most perfect loaves of Artisan Sourdough Bread, I utilized this recipe from Joshua Weissman. He was featured on a segment of Babish’s Culinary Universe on YouTube. Click here to watch the full tutorial. Follow these steps! Yes, I had to watch over, and over again. Paused numerous times and hit the rewind button, quite often. You get my point. Not only did these two guys make baking sourdough bread making easy, but they are quite a funny pair.

Regardless of whether or not you are creating a levain, time management (and a ton of patience) is key to creating the most perfect Artisan Sourdough Bread. Once the loaves are nicely tucked inside the bannetons, they must be refrigerated for at least 12 to 15 hours prior to baking. Of course, this means pulling the dough together the day before. If you are utilizing a levain, the levain must rest (covered) for five hours. For me, I started around noon the day prior to baking. With the levain, mixing the flours, incorporating the levain, folding the dough, and shaping, my loaves were in the fridge by 8pm.

PREPPING AND BAKING ARTISAN SOURDOUGH BREAD

The next day, place the baking vessel into the oven as it preheats to 500°. The pan needs to be super hot. Allow the pan to heat up for about an hour. Dust with flour. Very carefully, transfer the molded dough from the bannetons into the floured pan. Dust with flour and create designs using a lame. Cover and bake at 500° for 20 minutes. Remove lid. Reduce heat to 450° and bake uncovered, for another 20-25 minutes. The levain I created incorporated wheat flour, so I was able to achieve a beautiful caramel-colored crust. Cool on wire rack for at least an hour prior to cutting.

For a quick summary of how I created amazing Artisan Sourdough Bread loaves from start to finish, click here! I’m so very thankful for Amanda and Joshua for sharing their recipes and to one lovely couple for creating The Challenger! Buy one ASAP!

Good luck! I anxiously await seeing your beautiful loaves of Sourdough you will create in your very own kitchen. Go for rustic and misshapen. Imperfection is perfection to me!

SOURDOUGH BREAD BOWLS

As I am writing this blog, I’m also busy making sourdough bread bowls to house my Broccoli Cheddar Soup tonight. Utilizing the same dough recipe, I used 5″ round bannetons to mold the dough. They came out so cute. Honestly, I can’t wait to make the soup tonight. However, I will probably try 7″ round bannetons the next go round. I would have preferred the bowls a bit larger.

Of course, I created a short video on TikTok making these beauties. Click here to view!

Not only did I use these sourdough bread bowls for soup, but I also made one to house my Cheesy Spinach Dip. Actually, I fancied the bread bowl up just a bit. Cannot wait to serve my Creamy Tomato Basil Soup in this one!

LET’S GET SOCIAL!

I am more than just recipes. I love fashion and style too! Most importantly, I love my Family (my Hubby and my Fur Babies). My Husband (aka my “Kitchen Bitch”) means the world to me. He’s pretty damn cool too. Not only is he one of the nicest guys you will ever meet, he also has had a lengthy career in professional hockey. Not only winning two Stanley Cups with the Pittsburgh Penguins in the early ’90’s, but most recently winning the Calder Cup with the Charlotte Checkers, amongst many other accolades. If you live in Charlotte and play hockey, or have a family member who plays, be sure to contact him. He is known as one of the best skate sharpeners in the world!

Our life has changed dramatically in the past few years with the passing of our two goldendoodles, Vegas and Viva. We were lucky enough to have Vegas for five years (totally wish it was longer). Most recently, losing our Viva to a brain tumor in July of 2020. We welcomed our mini goldendoodle 7, almost seven years ago. We just added the amazing Hazel! Of course, I am always posting tons and tons of photos! Be sure to check out my recipe for Pet Bone Broth! This broth is super rich in nutrients and will provide your pet with a multitude of health benefits!

Be sure to follow me on social media! I’m always talking food, fashion, and family! I also love sharing some of my favorite Amazon Finds too. Click here to check out my Amazon page! FacebookInstagramTikTokTwitter and Pinterest!

GRUYÈRE AND BLACK PEPPER POPOVERS

three plates filled each with two Gruyère and black pepper popovers with butter

A few years ago, I was dying to make popovers. They are one of my favorite welcoming table gifts while dining at BLT Steakhouse in Charlotte. However, I had zero clue how to make them. As you know by now, I can cook very well. Baking is not really my jam. So, I ventured onto Pinterest and found this recipe for Gruyère and Black Pepper Popovers from a restaurant in Austin, Texas called Foreign & Domestic. They looked amazing. Of course, I immediately ran to Amazon’s website and ordered these popover pans. Yes, you can use muffin tins. However, I wanted the full experience and highly suggest investing in one of these. You will definitely be making these popovers again, and again!

For certain, you need to add these to your holiday dinner table. These Gruyère and Black Pepper Popovers will be a perfect compliment to your Thanksgiving Dinner or your even Feast of the Seven Fishes meal on Christmas Eve.

To be clear, this was my third time making these. After doing a bit more research, I found a recipe the other day that was similar to the one linked above, and used it. However, I believe the original worked so much better. You can view the video of this recipe by clicking here. Although it is a bit easier, I do not think the popovers puffed up as much as the original. So, follow the recipe below and only use the video as guidance.

Feel free to play around with the ingredients. Substitute the Gruyère with another cheese. A sharp white cheddar would be amazing. You could also eliminate the cheese and black pepper altogether, and serve the popovers with jam. Have fun, and get creative.

three plates filled each with two Gruyère and black pepper popovers with butter

A FEW THINGS TO NOTE:

  • invest in a popover pan (they are relatively inexpensive)
  • the popover pan needs to be warmed in the oven prior to filling with the batter and baking
  • eggs should be at room temperature
  • do NOT open the oven while the popovers are baking
  • remove the popovers from the pan immediately after baking
  • the popovers are best enjoyed while they are warm and crispy

HOW TO PREPARE GRUYÈRE AND BLACK PEPPER POPOVERS

Preheat oven to 450 degrees. Place popover pan in oven to warm while you are preparing the batter. Warm the milk in a saucepan. You want the milk hot, but not boiling. Remove from heat. In a bowl whisk together the eggs, kosher salt and black pepper. Slowly whisk in the warmed milk. Add the flour to the mixture. Mix.

Remove the warmed popover pan from the oven. Reduce heat to 375 degrees. Generously spray each well with non-stick spray (including the sides). Fill the wells about three-quarters of the way full. Gently, place two to three cubes of the Gruyère cheese on top of the batter. Bake until the popovers have puffed up, and are a deep golden brown. This should take about forty minutes. Just be sure to check, with the oven light, at about the thirty minute mark. As mentioned above, do NOT open the oven door while the popovers are baking. If you do, you may run the risk that the popovers will collapse and not puff up.

Once fully baked, immediately remove the popovers from the pan. Garnish with additional freshly shredded cheese. Serve these amazing Gruyère and Black Pepper Popovers while they are warm. You should have enough batter left to bake up another batch.

LET’S GET SOCIAL!

I am more than just recipes. I love fashion and style too! Most importantly, I love my Family. My Husband (aka my “Kitchen Bitch”) means the world to me. He’s pretty damn cool too. Not only is he one of the nicest guys you will ever meet, he also has had a lengthy career in professional hockey. Not only winning two Stanley Cups with the Pittsburgh Penguins in the early ’90’s, but most recently winning the Calder Cup with the Charlotte Checkers, amongst many other accolades. If you live in Charlotte and play hockey, or have a family member who plays, be sure to contact him. He is known as one of the best skate sharpeners in the world!

Our life has changed dramatically in the past few years with the passing of our two goldendoodles, Vegas and Viva. We were lucky enough to have Vegas for five years (totally wish it was longer). Most recently, losing our Viva to a brain tumor in July of 2020. We welcomed our mini goldendoodle 7, almost seven years ago. We just added the amazing Hazel! Be sure to check out my recipe for Pet Bone Broth! This broth is super rich in nutrients and will provide your pet with a multitude of health benefits!

FOLLOW ME!

Be sure to follow me on social media! I’m always talking food, fashion, and family! I also love sharing some of my favorite Amazon Finds too. Click here to check out my Amazon page! FacebookInstagramTikTokTwitter and Pinterest!

HOMEMADE PITA

pita wrapped in a kitchen towel

What better way to enjoy Homemade Hummus or anything for that matter, than with your very own Homemade Pita bread? Well…I had a lot of help. As I have mentioned many times…I am not much of a baker. So, I decided to do a bit of research on Pinterest and found this recipe for Homemade Pita from “Let the Baking Begin”. Click here for original recipe. Thanks for sharing your amazing recipe! It was super easy to follow, and I really did not change a thing. It will take about 2 to 3 hours to complete, but oh so worth it. You can pass part of the time by making my Homemade Hummus…click here!

homemade pita wrapped in a kitchen towel

In a small bowl, combine the yeast, the one-half cup warm water and sugar. Allow to sit and foam up for about ten minutes. If you see no foam at the end, your yeast may be expired. You will need to start over.

yeast mixture in a white bowl for homemade pita

Once the yeast has proofed, in a larger bowl, or bowl to a stand mixer, add in the flour, salt, remaining one-half cup of warm water and the yeast mixture. Knead with dough hook if you are using a stand mixer until the dough is smooth and elastic (about ten minutes). I did mine by hand, and kneaded for the same amount of time. Once a nice dough has formed. Line a bowl and the dough with olive oil. Cover with a kitchen towel. Place in a warm area to double in size. Depending on the temperature, this can take up to two hours.

Once dough has doubled. Remove from bowl and place on floured surface.

Cut dough into eight equal portions. Form each piece of dough into a ball and flatten with a rolling pin to about 1/4″. Allow to sit for another thirty minutes.

With about 15 minutes left of proofing the pita rounds, preheat the oven to 500 degrees. Place a pizza stone or cast iron pan (upside down) in the oven to warm up. Once dough has fully proofed, quickly open up the oven door and place one pita round on the stone or cast iron pan. Allow to bake for three minutes. You can flip halfway through, as I did, to crisp up both sides. Remove and cover with kitchen towel. Repeat for the remaining pita rounds.

That’s it…you very own homemade pita bread! It was amazing to me that there was an actual pocket inside! Serve with whatever you desire. This sent my Hummus over the top! ENJOY!

LET’S GET SOCIAL!

I am more than just recipes. I love fashion and style too! Most importantly, I love my Family (my Hubby and my Fur Babies). My Husband (aka my “Kitchen Bitch”) means the world to me. He’s pretty damn cool too. Not only is he one of the nicest guys you will ever meet, he also has had a lengthy career in professional hockey. Not only winning two Stanley Cups with the Pittsburgh Penguins in the early ’90’s, but most recently winning the Calder Cup with the Charlotte Checkers, amongst many other accolades. If you live in Charlotte and play hockey, or have a family member who plays, be sure to contact him!

Our life has changed dramatically in the past few years with the passing of our two goldendoodles, Vegas and Viva. We were lucky enough to have Vegas for five years (totally wish it was longer). Most recently, losing our Viva to a brain tumor in July of 2020. We welcomed our mini goldendoodle 7, almost seven years ago. We just added the amazing Hazel! Of course, I am always posting tons and tons of photos! Be sure to check out my recipe for Pet Bone Broth! This broth is super rich in nutrients and will provide your pet with a multitude of health benefits!

FOLLOW ME!

Be sure to follow me on social media! I’m always talking food, fashion, and family! I also love sharing some of my favorite Amazon Finds too. Click here to check out my Amazon page! Facebook, Instagram, TikTok, Twitter and Pinterest! THANK YOU!

JALAPEÑO CHEDDAR SKILLET CORNBREAD

https://www.charlottefashionplate.com/recipes/turkey-chili/

I have been wanting to make Jalapeño Cheddar Skillet Cornbread FOREVER! I just so happened upon a gentleman in the grocery store last week in the baking aisle. His cart was full of goodies, and I just knew he knew how to throw it down in the kitchen. So, we started talking cornbread and I told him how I was longing to make it with jalapeños.

He told me to sauté my jalapeños prior to folding them into the batter. Hello? Awesome! I grabbed a bag of Tenda Bake self-rising yellow cornmeal and I was on my merry way, totally unsure if I could pull this off. Only one little glitch which I will tell you about later. I used this 12″ cast iron skillet from Lodge. Click here! Don’t own a cast iron pan? Why not? You really need one in your kitchen. If you do not, a 9×12 baking pan will work just fine.

Now that I am living in the South, I have found that many Southerners use cornbread in their dressing or stuffing on Thanksgiving. Feel free to substitute my cornbread (possibly minus the jalapeños and cheddar) in your recipe. Check out my recipe for Sausage Stuffing and Oyster Dressing.

Jalapeño cheddar cornbread in a cast iron skillet

HOW TO MAKE JALAPEÑO CHEDDAR SKILLET CORNBREAD

Preheat your oven to 400 degrees. Sauté the diced jalapeños in the olive oil until tender.

diced jalapeños in a pan with olive oil

Prepare your cast iron pan by lining it with a tablespoon of butter or cooking spray. Be sure to get the sides. In a large bowl, whisk to combine the cornmeal, flour, sugar, baking powder, and salt.

Add the buttermilk, melted butter, honey, eggs and sautéed jalapeños to the flour mixture. Mix with a wooden spoon until combined. Try not to over work the batter. Gently fold in the cheddar cheese. You will see the mixture already start to rise.

Pour mixture into the cast iron pan. Bake for 25 minutes. Now, this is where I kind of screwed up. However, I was able to recover. So, one thing you do not want is dry cornbread. Keeping that in mind, I kind of pulled it out of the oven a bit too soon. It looked done on the inside and even a toothpick came out clean. However, when I went to cut, it was not done. Luckily, I placed it back in the oven for about ten minutes and all was good! Try keeping it in at least 25 minutes. You may need 30 to 35 minutes, depending on your oven. The top will turn a very nice deep golden brown. About halfway through, I placed a few jalapeño slices in the middle of the cornbread for garnish.

Jalapeño Cheddar skillet cornbread batter in a cast iron pan ready to bake

Remove the Jalapeño Cheddar Skillet Cornbread from the oven. Allow to cool just a few minutes. I served my with my Turkey Chili! ENJOY!

LET’S GET SOCIAL!

I am more than just recipes. I love fashion and style too! Most importantly, I love my Family (my Hubby and my Fur Babies). My Husband (aka my “Kitchen Bitch”) means the world to me. He’s pretty damn cool too. Not only is he one of the nicest guys you will ever meet, he also has had a lengthy career in professional hockey. Not only winning two Stanley Cups with the Pittsburgh Penguins in the early ’90’s, but most recently winning the Calder Cup with the Charlotte Checkers, amongst many other accolades. If you live in Charlotte and play hockey, or have a family member who plays, be sure to contact him. He is known as one of the best skate sharpeners in the world!

Our life has changed dramatically in the past few years with the passing of our two goldendoodles, Vegas and Viva. We were lucky enough to have Vegas for five years (totally wish it was longer). Most recently, losing our Viva to a brain tumor in July of 2020. We welcomed our mini goldendoodle 7, almost seven years ago. We just added the amazing Hazel! Of course, I am always posting tons and tons of photos! Be sure to check out my recipe for Pet Bone Broth! This broth is super rich in nutrients and will provide your pet with a multitude of health benefits!

Be sure to follow me on social media! I’m always talking food, fashion, and family! I also love sharing some of my favorite Amazon Finds too. Click here to check out my Amazon page! FacebookInstagramTikTokTwitter and Pinterest!

SEAFOOD BOIL

The other day, I made what I think was one of my best meals ever on the grill…a Seafood Boil…well…maybe I should call it a Seafood Grill…you will enjoy this so much…especially if you are a seafood lover.

It is super simple and takes about 30 minutes, including preparation. Remember to shop local for most of these ingredients at the Carolina Meat & Fish Co.

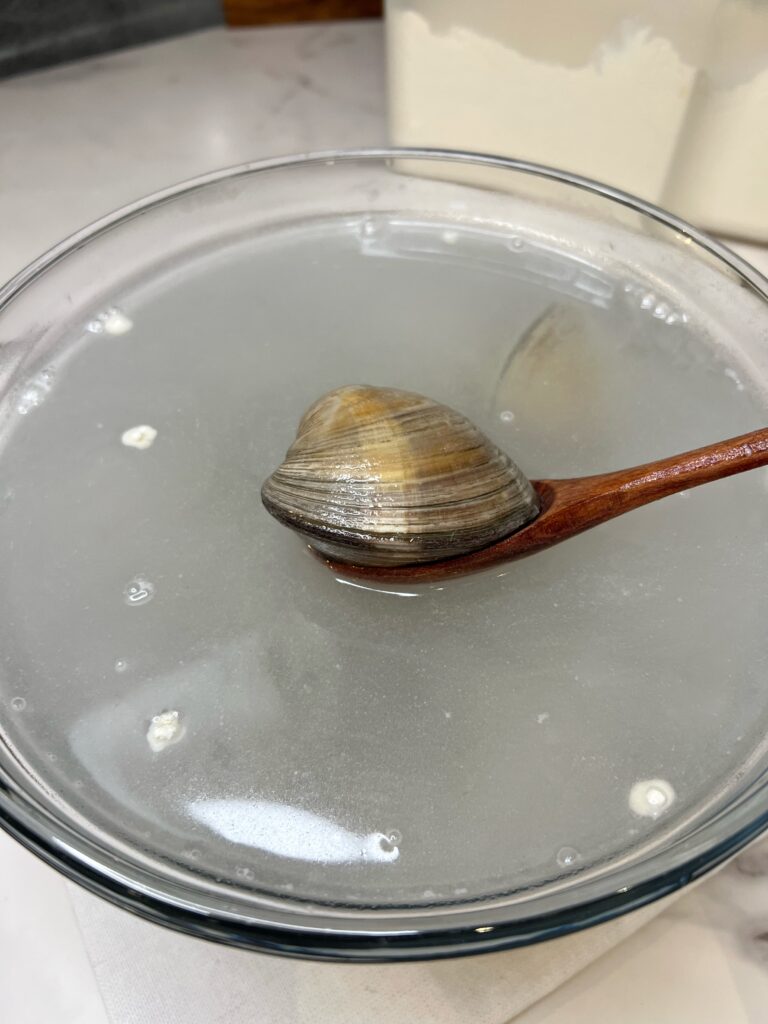
Begin by soaking the clams in water with a touch of flour for about 5 -10 minutes…this will allow the clams to release any dirt. Rinse and set aside. While the clams are soaking, place the steam-in bag of potatoes in the microwave and cook according to the package directions…I cooked mine for 8 minutes. Cut the sausage into pieces and cook until they fully-cooked and browned.

Rinse the shrimp. In the tin foil pan, add a touch of olive oil to coat the bottom of the pan. Add the corn kernels, steamed potatoes, shrimp and sausage. Season with salt, pepper, Old Bay, and hot pepper flakes.

Squeeze the juice of two lemons onto mixture and add lemon rinds. Add the garlic, shallots and some fresh parsley. Throw in the cherry tomatoes, along with the marinara sauce and clam juice. Toss mixture to fully coat then top with rinsed clams.

Cover tightly with aluminum foil and place on hot grill (400-500 degrees) until the shrimp are cooked and clams have opened…should take about 10-15 minutes. You can toss a few times during the cooking process…just be sure to reseal tightly with foil. Once finished, transfer to a big serving dish and top with fresh parsley and lemon juice. ENJOY!

SEAFOOD BOIL

LET’S GET SOCIAL!

I am more than just recipes. I love fashion and style too! Most importantly, I love my Family (my Hubby and my Fur Babies). My Husband (aka my “Kitchen Bitch”) means the world to me. He’s pretty damn cool too. Not only is he one of the nicest guys you will ever meet, he also has had a lengthy career in professional hockey. Not only winning two Stanley Cups with the Pittsburgh Penguins in the early ’90’s, but most recently winning the Calder Cup with the Charlotte Checkers, amongst many other accolades. If you live in Charlotte and play hockey, or have a family member who plays, be sure to contact him!

Our life has changed dramatically in the past few years with the passing of our two goldendoodles, Vegas and Viva. We were lucky enough to have Vegas for five years (totally wish it was longer). Most recently, losing our Viva to a brain tumor in July of 2020. We welcomed our mini goldendoodle 7, almost seven years ago. We just added the amazing Hazel! Of course, I am always posting tons and tons of photos! Be sure to check out my recipe for Pet Bone Broth! This broth is super rich in nutrients and will provide your pet with a multitude of health benefits!

FOLLOW ME!

Be sure to follow me on social media! I’m always talking food, fashion, and family! I also love sharing some of my favorite Amazon Finds too. Click here to check out my Amazon page! Facebook, Instagram, TikTok, Twitter and Pinterest! THANK YOU!

Clams Oreganata

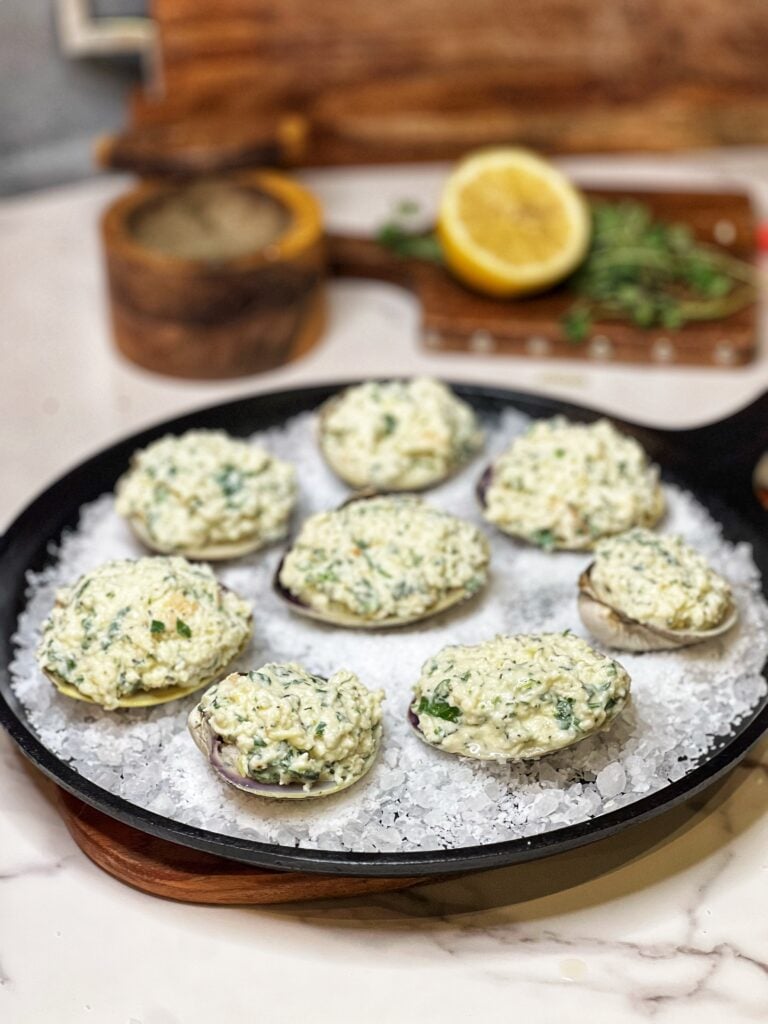
A flat cast iron pan lined with rock salt holding eight clams filled with a breadcrumb mixture. The clams have been baked.

Clams Oreganata is the perfect balance of simplicity and flavor. Tender clams are topped with a savory breadcrumb mixture seasoned with garlic, oregano, and a touch of lemon, then baked until golden and fragrant. This classic Italian-American appetizer is not only easy to make but also a guaranteed crowd-pleaser, making it a go-to recipe for family dinners or special occasions.

This Clams Oreganata is an elegant addition to your Feast of the Seven Fishes menu, bringing a classic touch to this cherished holiday tradition.

A flat cast iron pan lined with rock salt holding eight clams filled with a breadcrumb mixture. The clams have been baked.

Why Use Large-Sized Clams?

For this recipe, large-sized clams such as quahogs or cherrystone clams are ideal. They provide enough space for the delicious breadcrumb mixture and hold up well during baking. If you prefer, the clams can also be chopped and mixed into the filling for a slightly different texture that still captures all the rich, briny flavors.

Prior to making any clam recipe, be sure you know How to Clean Clams, properly.

Why You Should Make This Clams Oreganata Recipe

  • Perfect for Special Occasions: Clams Oreganata is a standout dish that elevates any table, whether it’s a casual dinner or a holiday feast.
  • Quick and Easy to Prepare: With just a few simple steps, this seafood appetizer comes together in under 30 minutes, making it ideal for entertaining or weeknight dinners.
  • Packed with Fresh, Bold Flavors: The combination of garlic, fresh herbs, and creamy breadcrumbs creates a topping that complements the natural sweetness of the clams.
  • Great for the Feast of the Seven Fishes: This clam recipe fits seamlessly into the traditional Italian-American Christmas Eve menu, offering a flavorful seafood option that everyone will enjoy.

Ingredients

  • Large-sized clams: Quahogs or cherrystone clams work best, but middleneck or littleneck clams can be used for a smaller option.
  • Italian bread: Substitute with French bread, sourdough, or panko breadcrumbs for a similar texture.
  • Heavy whipping cream: Swap with half-and-half or whole milk for a lighter option.
  • Garlic cloves: Use garlic powder if fresh garlic is unavailable.
  • Fresh oregano: Dried oregano can be substituted, but use about half the amount as dried herbs are more concentrated.
  • Clam juice: Replace with a splash of white wine or fish stock for added flavor.

How to Prepare Clams Oreganata

  1. Soak the clams in cold water with a tablespoon of flour for about 10 minutes to remove sand and grit.
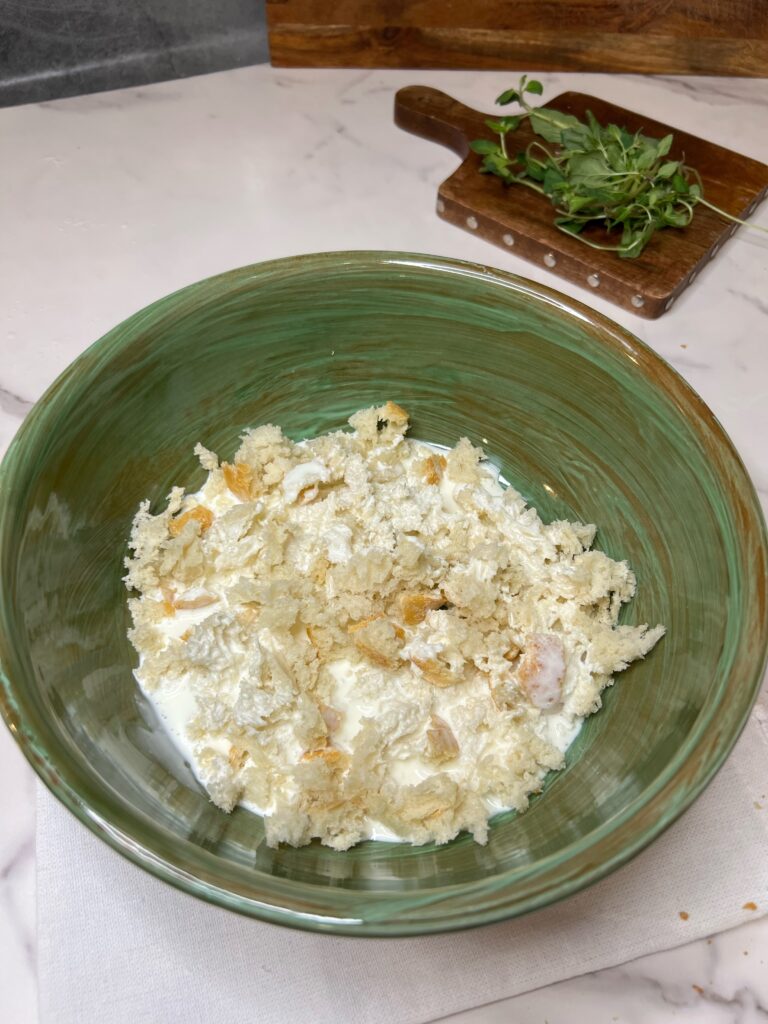
  2. Tear the Italian bread into small pieces and place in a bowl. Add the heavy whipping cream and let it soak.
  3. Preheat the oven to 450°F (232°C).
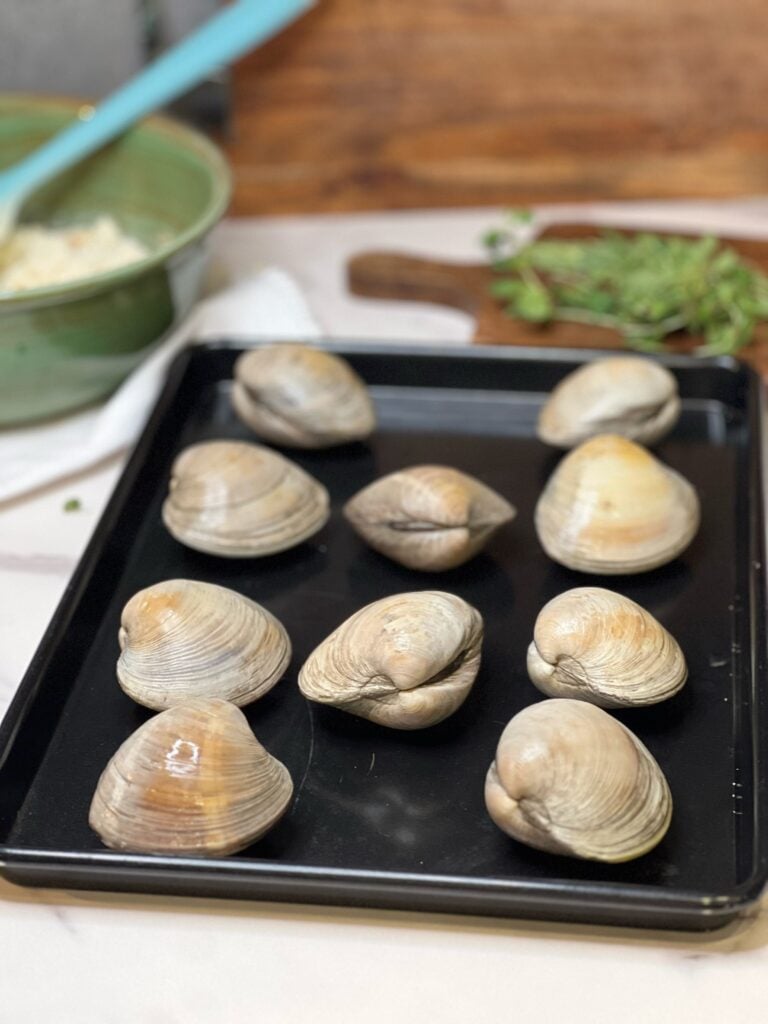
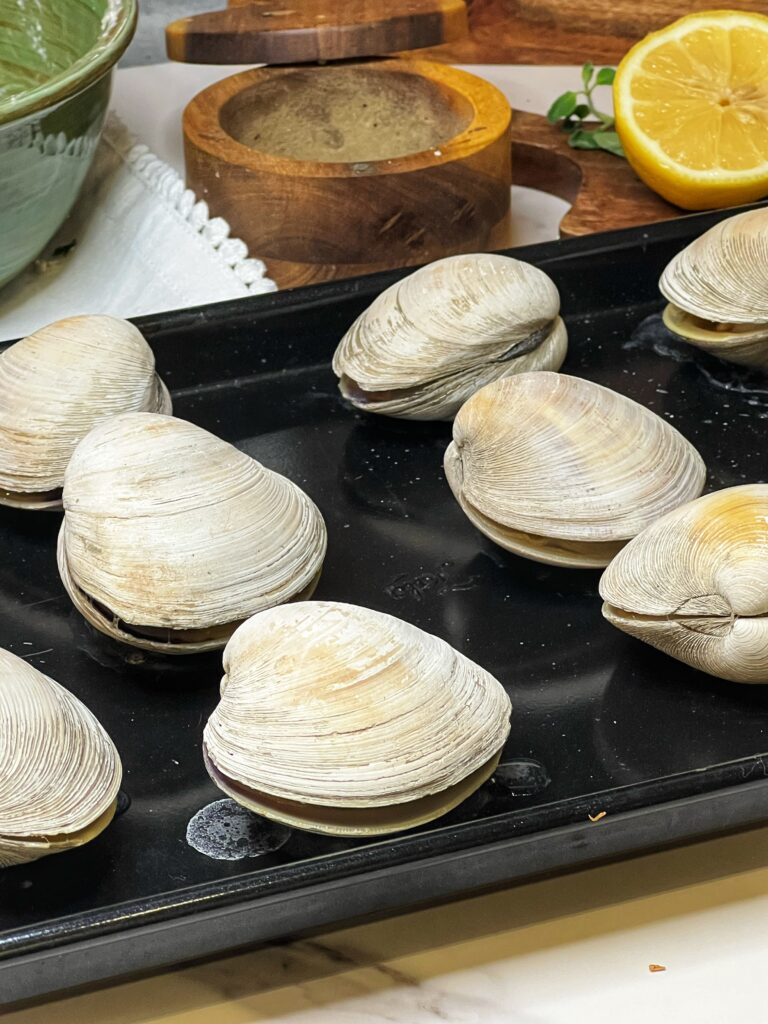
  4. Lay the cleaned clams on a baking sheet. Bake for 3–4 minutes until the shells slightly open.
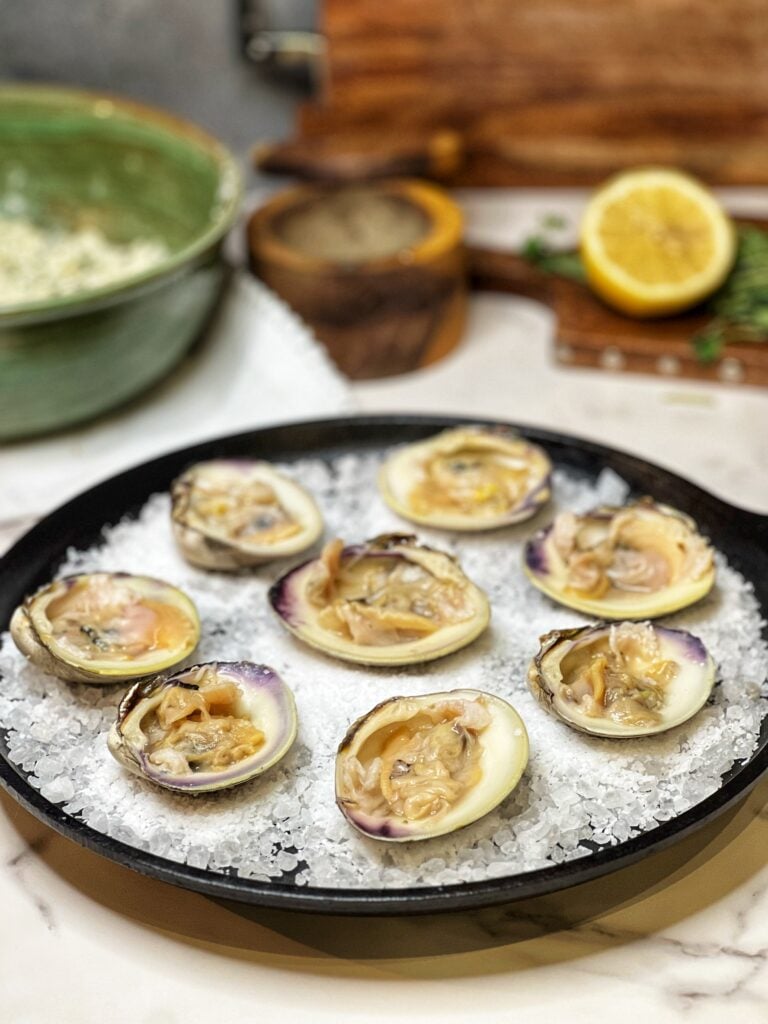
  5. Once cooled to the touch, use a shucking knife to open the clams. Remove the top shell and loosen the clam from the bottom shell, keeping it in place. Discard the lid.
  6. Line a flat cast-iron pan or sheet pan with rock salt to steady the clams. Arrange the clams on top.
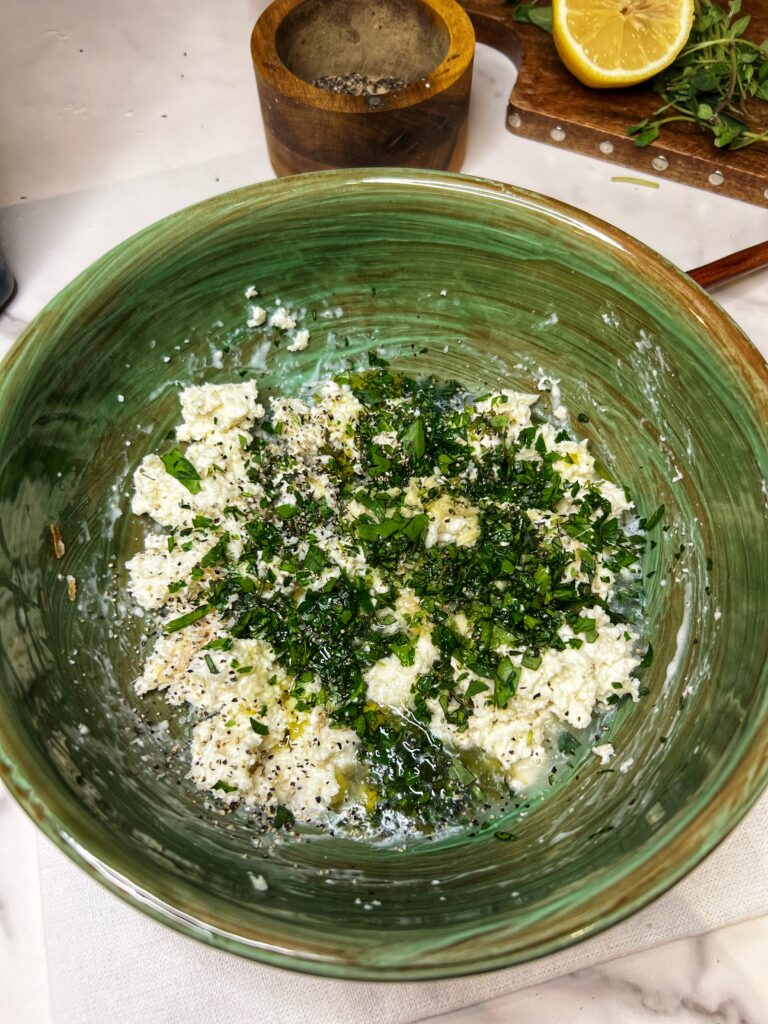
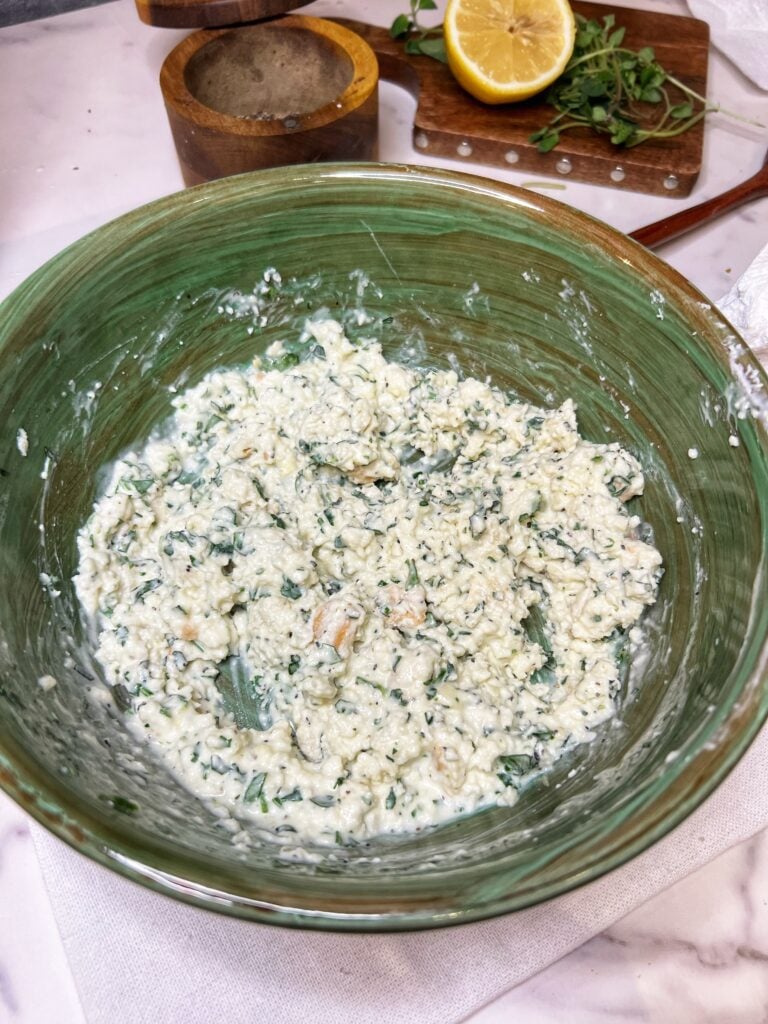
  7. To the bowl with the soaked bread, add parsley, oregano, garlic, clam juice, olive oil, salt, and pepper. Mix until combined.
  8. Generously fill each clam with the breadcrumb mixture.
  9. Lower the oven temperature to 375°F (190°C) and bake for 8–10 minutes.
  10. Broil for 1–2 minutes at the end to brown the tops.
  11. Garnish with parsley and serve with lemon wedges.

How to Serve and Store Clams Oreganata

  • Serving Suggestions: Serve Clams Oreganata hot, garnished with a squeeze of fresh lemon juice. Pair with crusty bread to soak up any leftover juices or as a part of a larger seafood platter.
  • Storing Leftovers: Refrigerate any leftovers in an airtight container for up to 2 days.
  • To Reheat: Bake at 350°F (177°C) for 5–7 minutes, or until warmed through. Avoid microwaving, as it can toughen the clams.

More Clam Recipes to Love

Print
clock clock iconcutlery cutlery iconflag flag iconfolder folder iconinstagram instagram iconpinterest pinterest iconfacebook facebook iconprint print iconsquares squares iconheart heart iconheart solid heart solid icon
A flat cast iron pan lined with rock salt holding eight clams filled with a breadcrumb mixture. The clams have been baked.

Clams Oreganata


5 Stars 4 Stars 3 Stars 2 Stars 1 Star

No reviews

Description

Clams Oreganata is the perfect balance of simplicity and flavor. Tender clams are topped with a savory breadcrumb mixture seasoned with garlic, oregano, and a touch of lemon, then baked until golden and fragrant.


Ingredients

Scale
  • 8 to 10 large-sized clams (quahogs or cherrystones)
  • 2 slices Italian bread
  • 1/3 cup heavy whipping cream
  • 3 garlic cloves, minced
  • 1 1/2 tablespoons fresh oregano, chopped
  • 2 tablespoons fresh parsley, chopped
  • 1 tablespoon clam juice
  • 1/2 teaspoon salt
  • 1 teaspoon black pepper
  • 1 tablespoon olive oil
  • Lemon wedges, for serving

Instructions

  1. Soak the clams in cold water with a tablespoon of flour for 10 minutes to remove sand and grit.
  2. Tear the Italian bread into small pieces and place in a bowl. Add the heavy whipping cream and let it soak.
  3. Preheat the oven to 450°F (232°C).
  4. Lay the cleaned clams on a baking sheet. Bake for 3–4 minutes until the shells slightly open.
  5. Once cooled, use a shucking knife to open the clams. Remove the top shell and loosen the clam from the bottom shell, keeping it in place.
  6. Line a flat cast-iron pan or sheet pan with rock salt to steady the clams. Arrange the clams on top.
  7. To the bowl with the soaked bread, add parsley, oregano, garlic, clam juice, olive oil, salt, and pepper. Mix until combined.
  8. Generously fill each clam with the breadcrumb mixture.
  9. Lower the oven temperature to 375°F (190°C) and bake for 8–10 minutes.
  10. Broil for 1–2 minutes at the end to brown the tops.
  11. Garnish with parsley and serve with lemon wedges.
  12. ENJOY!
@charlottefashionplate

Clams Oreganata Recipe! This easy clam recipe is perfect to serve over the holidays, and makes for a great addition to your Feast of the Seven Fishes menu on Christmas Eve! Tender clams are baked with a tasty filling featuring fresh oregano. #clams #clam #seafood #easyrecipe #foodtiktok #feastofthesevenfishes #quickrecipes

♬ Idea 10 – Clavier

Notes

  • Larger clams work best in this recipe.
  • Feel free to chop the clams and add to the mixture prior to filling.
  • Take caution when shucking the clams. Use a shucking knife and glove or towel.
  • To prevent the clams from tipping over during the baking process, line a cast iron pan or sheet pan with rock salt. 
  • Prep Time: 15 minutes
  • Cook Time: 10 minutes
  • Category: Appetizer
  • Method: Easy
  • Cuisine: American, Italian

GET TO KNOW ME!

A photo of me in a black floral dress cooking at the stovetop at Williams-Sonoma

WELCOME! My name is Melissa Latin aka. Charlotte Fashion Plate. Happy to meet you! I am more than just recipes. I love fashion and style too! Most importantly, I love my Family (my Hubby and my Fur Babies). My Husband (aka my “Kitchen Bitch”) means the world to me. He’s pretty damn cool too. Not only is he one of the nicest guys you will ever meet, he also has had a lengthy career in professional hockey. Not only winning two Stanley Cups with the Pittsburgh Penguins in the early ’90’s, but most recently winning the Calder Cup with the Charlotte Checkers, amongst many other accolades. If you live in Charlotte and play hockey, or have a family member who plays, be sure to contact him!

Our life has changed dramatically in the past few years with the passing of our two goldendoodles, Vegas and Viva. We were lucky enough to have Vegas for five years (totally wish it was longer). Most recently, losing our Viva to a brain tumor in July of 2020. We welcomed our mini goldendoodle 7, almost seven years ago. We just added the amazing Hazel! Of course, I am always posting tons and tons of photos! Be sure to check out my recipe for Pet Bone Broth! This broth is super rich in nutrients and will provide your pet with a multitude of health benefits!

In addition, I’m so very excited to announce I have published my first e-book and paperback, “Mastering Thanksgiving – A Guide to Perfecting Your Thanksgiving Dinner.” Your support would mean the world to me.

Let’s Get Social!

Be sure to follow me on social media! I’m always talking food, fashion, and family! I also love sharing some of my favorite Amazon Finds too. Click here to check out my Amazon page! FacebookInstagramTikTokTwitter and Pinterest! Check out my LTK to find out what I’m wearing! THANK YOU!