Homemade Cheddar Bay Biscuits

a parchment lined baking sheet filled with eight homemade cheddar bay biscuits

Did you know you can make Red Lobster’s iconic hot, buttery, garlicky, cheddar biscuits at home? These biscuits are made with a combination of cheddar cheese, butter, garlic powder, herbs and buttermilk which give them a savory and buttery flavor that is hard to resist. They are a popular side dish that is often served with seafood, but they can also be enjoyed with any meal. With this recipe, you can make your own tender, Homemade Cheddar Bay Biscuits at home, and enjoy them fresh from the oven.

It’s safe to say these copycat Red Lobster Biscuits may even be better than the original. These savory biscuits are so tender and bake up beautifully golden brown. This entire homemade biscuit recipe comes together in under 30 minutes, from prep to plate!

a parchment lined baking sheet filled with eight homemade cheddar bay biscuits

RED LOBSTER’S CHEDDAR BAY BISCUITS

The seafood restaurant chain started making these warm, cheesy biscuits in 1992 and were initially served to guests in the lobby as they waited to be seated. As a restaurant with southern origins, you can imagine how popular these biscuits had become. As demand grew, Red Lobster started serving them table side. The restaurant currently serves over one million Cheddar Bay Biscuits, daily!

In fact, you can actually buy Red Lobster’s Cheddar Bay Biscuit Mix. However, I think you will find that more of an expensive option. Additionally, you can also substitute the flour, baking powder and baking soda in this recipe with a baking mix like Bisquick , or with a gluten-free baking mix for Gluten-Free Cheddar Bay Biscuits.

HOW TO PREPARE HOMEMADE CHEDDAR BAY BISCUITS

As with the original Red Lobster recipe, these are a buttermilk-based biscuit with amped up flavor from the garlic powder, butter and cheddar cheese. Cold butter fat is incorporated into the flour mixture with a pastry cutter or fork until floury pebbles form. Best not to use your hands as the warmth from your body will warm the butter.

The dough comes together with the cold buttermilk.

Unlike most biscuit recipes, the dough is dropped onto a baking sheet instead of shaped and cut. This is known as a drop biscuit.

Easily bake on a parchment-lined baking sheet. These parchment paper sheets have been a lifesaver. Little to no clean up involved!

INGREDIENTS FOR COPYCAT RED LOBSTER BISCUITS

Although Red Lobster never released its official Cheddar Bay Biscuit recipe, this copycat recipe comes pretty close. As mentioned earlier, they might even be better!

As you are making the biscuit dough, always remember NOT to over mix!

Cold Butter – I used salted, but feel free to use unsalted. Cold butter will make for a flakier biscuit.

Flour – Self-rising flour worked really well, but feel free to substitute with all-purpose flour

Baking Powder and Baking Soda – Both of these leavening agents work to help the biscuits rise, expand and stay tender. Be sure to use only baking powder and baking soda that is fresh and NOT expired or your biscuits may turn out flat!

Spices – Garlic powder is the key ingredient and a touch of salt if using unsalted butter. Can also add a touch more garlic powder to the melted butter for brushing on the warmed biscuits for added flavor.

Cheddar Cheese – Freshly grated sharp or medium cheddar is best, or substitute with pre-shredded in a bag.

Parsley – Fresh parsley (use dried as a substitute) mixed with melted butter is perfect to brush on the warm biscuits right out of the oven.

Buttermilk – Buttermilk adds so much flavor and the little bit extra called for in this recipe keeps the biscuits from becoming dry. You can substitute with milk, but the final product may not be as good. Easily make homemade buttermilk by combining 1 cup of milk with a tablespoon of lemon juice or white vinegar and let stand for 10 minutes.

HOW TO SERVE AND STORE LEFTOVER CHEDDAR BISCUITS

As mentioned earlier, these Homemade Cheddar Biscuits are a perfect compliment to any seafood dish. In fact, I served them with my Seafood Chowder (recipe coming soon)! The biscuits would also go well with my New England Clam Chowder.

a bowl of seafood chowder garnished with crisp bacon with a wooden platter in the background topped with homemade cheddar bay biscuits

In addition, serve these warm biscuits for breakfast or brunch as part of a breakfast sandwich.

This Homemade Cheddar Bay Biscuit recipe will yield 10 large biscuits. Once cooled, the biscuits can be placed in a sealable bag or container, at room temperature, for up to 3 days! Reheat in the oven at 350°, or for a few seconds in the microwave.

Freezing the biscuits is also an option. Cool the biscuits then individually wrap in plastic wrap or foil then seal them all together in a freezer-safe bag or container for up to a month. Reheat frozen in a 350° for about 10 minutes.

BISCUIT RECIPES

If you love both sweet and savory biscuits, try a few of my other recipes:

Print
clock clock iconcutlery cutlery iconflag flag iconfolder folder iconinstagram instagram iconpinterest pinterest iconfacebook facebook iconprint print iconsquares squares iconheart heart iconheart solid heart solid icon
a parchment lined baking sheet filled with eight homemade cheddar bay biscuits

Homemade Cheddar Bay Biscuits


5 Stars 4 Stars 3 Stars 2 Stars 1 Star

No reviews

Description

Did you know you can make Red Lobster’s iconic hot, buttery, garlicky, cheddar biscuits at home? These biscuits are made with a combination of cheddar cheese, butter, garlic powder, herbs and buttermilk which give them a savory and buttery flavor that is hard to resist.


Ingredients

Scale
  • 2 cups self-rising or all-purpose flour
  • 2 teaspoons baking powder
  • 1 teaspoon baking soda
  • 1/2 teaspoon garlic powder
  • pinch of salt (if using unsalted butter)
  • 8 tablespoons cold, salted butter plus 2 tablespoons for melting
  • 1 cup freshly grated medium or sharp cheddar cheese
  • 1 cup buttermilk, plus 2 tablespoons
  • 2 tablespoons fresh parsley, minced

Instructions

  1. Heat oven to 425°.
  2. Sift together in a large bowl the flour, baking powder, baking soda, garlic powder. If using, sift the salt in, as well.
  3. Add the cold butter and combine into the flour using a pastry cutter or fork until buttery, flour pebbles form.
  4. Gently stir in the shredded cheese.
  5. Pour in 1 cup of the buttermilk.
  6. Gently stir to combine. Add the additional two tablespoons of buttermilk, as needed (I used both).
  7. Using a large spoon or large cookie scoop, scoop out about 2 1/2 to 3 tablespoons of the dough and drop onto a parchment lined baking sheet.
  8. Bake at 425° for about 20 to 22 minutes.
  9. Right before the biscuits are ready to come out of the oven, melt the additional two tablespoons of butter and stir in the fresh parsley.
  10. Once the biscuits are golden browned and fully-baked, remove from the oven and brush on the melted butter mixture.
  11. Serve immediately, or serve warmed up later.
  12. ENJOY!

Notes

  • do NOT over mix the dough
  • the dough will be sticky, spray the cookie scoop or spoon with a little non-stick spray for ease
  • these biscuits can be made ahead of time
  • see post for additional tips and notes 
  • Prep Time: 8 minutes
  • Cook Time: 22 minutes
  • Category: Biscuit, Bread
  • Method: Easy
  • Cuisine: American

Nutrition

  • Serving Size: 1 biscuit

GET TO KNOW ME!

I am more than just recipes. I love fashion and style too! Most importantly, I love my Family (my Hubby and my Fur Babies). My Husband (aka my “Kitchen Bitch”) means the world to me. He’s pretty damn cool too. Not only is he one of the nicest guys you will ever meet, he also has had a lengthy career in professional hockey. Not only winning two Stanley Cups with the Pittsburgh Penguins in the early ’90’s, but most recently winning the Calder Cup with the Charlotte Checkers, amongst many other accolades. If you live in Charlotte and play hockey, or have a family member who plays, be sure to contact him!

Our life has changed dramatically in the past few years with the passing of our two goldendoodles, Vegas and Viva. We were lucky enough to have Vegas for five years (totally wish it was longer). Most recently, losing our Viva to a brain tumor in July of 2020. We welcomed our mini goldendoodle 7, almost seven years ago. We just added the amazing Hazel! Of course, I am always posting tons and tons of photos! Be sure to check out my recipe for Pet Bone Broth! This broth is super rich in nutrients and will provide your pet with a multitude of health benefits!

Let’s Get Social!

Be sure to follow me on social media! I’m always talking food, fashion, and family! I also love sharing some of my favorite Amazon Finds too. Click here to check out my Amazon page! FacebookInstagramTikTokTwitter and Pinterest! THANK YOU!

ARTISAN SOURDOUGH BREAD

a loaf of artisan sourdough bread sitting on a cast iron pan

As I have said, over and over again, I do not consider myself much of a baker. My Mother and Brother hold that title in our Family. You must see the loaves of French bread my Brother creates in his kitchen. They are perfect! So, when I created an account on TikTok last summer, I came across this fabulous girl, Hannah. She was baking up the most incredible loaves of Artisan Sourdough Bread. Finally, I decided to try and make my own. Believe me, I have tried baking bread in the past. I am not ashamed to say, more often than not, it was a major fail.

Given all of this, I had no idea where to begin starting my sourdough starter. So, to Pinterest I ran for expert guidance. Luckily, I found Amanda’s ( I am Homesteader blog) recipe for Sourdough Starter. It looked easy enough. Not only did she provide the starter recipe, but also ideas on how to use the discard and so many other valuable links. Time management and patience are key to sourdough bread making. WE all got you! Oh, and yes, I did name my sourdough starter. Her name is Vegas. An ode to the name of our first goldendoodle and for luck!

This recipe will yield two beautiful loaves of Artisan Sourdough Bread. As I am writing this, I am experimenting with Sourdough Bread Bowls for my Broccoli Cheddar Cheese Soup. Using this same recipe, will yield five bread bowls.

a loaf of artisan sourdough bread sitting on a cast iron pan

TOOLS FOR MAKING SOURDOUGH BREAD

Keep in mind, making sourdough bread requires a huge investment of your time and the proper tools. Before you even begin, I suggest grabbing these items to ease the process. Some of these bread making tools you may have already on hand. For a complete kit, click here.

Lastly, you definitely need the proper bakeware. If you have an enameled cast iron pot like this one from Lodge, that will work perfectly. However, I decided to make the investment in The Challenger. Not only can you use this cast iron pan for bread making, but it’s also perfect for creating many other fabulous recipes (tons of recommendations on their website). Totally worth the price. As an added bonus, you will be supporting a U.S. based, family-owned business.

HOW TO MAKE A SOURDOUGH STARTER

As mentioned earlier, I followed Amanda’s recipe to create the sourdough starter, step-by-step. However, instead of making one starter, I actually made two at the same time. I did this for two reasons. One, I was filming the process for videos. So, I needed one for just the daily starter post and one for the final post of the overall process. Secondly, I wanted to give a starter to my Brother. It’s actually on its way to him as I am writing. Also, the starter will not be ready to create bread until the seventh day!

Keep in mind that you not be discarding until Day Three! After EVERY discard, you will be feeding in that same ratio of one-half cup flour and one-third cup filtered water. Please note, when I refer to water at anytime in the remainder of this recipe, I will always be referring to filtered water. My choice of flour for the starter was Unbleached King Arthur All-Purpose Flour. To make the Artisan Sourdough Bread, I used King Arthur’s Unbleached Bread Flour and Whole Wheat Flour. Refer to this article from Serious Eats for more information on what types of flours are best, and can be used for sourdough starters.

DAY ONE AND TWO

On Day One, in a glass jar (I used a 16-ounce ball jar), combine one-half cup flour with one-third cup of water. Mix with a wooden spoon. Cover loosely with a paper towel and seal with a rubber band. Store in the warmest part of your home. Check back in 24 hours.

On Day Two, feed the mixture by adding another one-third cup of water and one-half cup of flour to the same jar. Someone was so kind to mention to add the water first for ease of mixing. Mix and cover for another 24 hours.

Click to watch short videos I created on TikTok of Day One and Day Two. If you have not yet signed up for this social media platform, use my code 5SSIS800K0H06 to create an account.

DAY THREE

By Day Three, the mixture should be grabbing up the bacteria from the environment and creating a science experiment. You should notice bubbles. If you notice bubbles, discard half of the starter. As mentioned earlier, Amanda gives several suggestions on what to do with the discard. My discard was used to make Sourdough Crackers, Sourdough Muffins and Sourdough Bagels. Also, you can just throw it away, or use the discard as a starter, and gift it to someone. Feed again using the same measurements (1/3 C water and 1/2 C flour). Cover loosely and check back in another 24 hours. Be sure to watch my short video of Day Three.

DAYS FOUR, FIVE AND SIX

Over the next few days, you will be discarding AND feeding twice a day. Do this at least eight hours apart. After discarding and feeding on Day Four, I would suggest transferring the starter to a larger jar. Honestly, I even changed the jar on Day Six. Discarding and feeding twice a day, over these three days, can really make the jar kind of crudy on the sides. Also, I combined all of the discards in jars and placed them in the fridge to make the crackers and muffins. All told, I had almost three jars of discard.

DAY SEVEN

It’s Day Seven!!! You should have a very healthy, and active sourdough starter. Guess what? You can finally make Artisan Sourdough Bread! The sourdough starter should start to smell “yeasty” around day three. If at any point, your starter has a really bad, almost “rotten-like” smell, you should probably start the entire process over. Amanda has some really great advice in her comment section regarding what to do if this happens. Also, she can answer any questions about what to do if you miss a discard/feed.

If you are not ready to make sourdough bread on Day Seven, you can either store the starter in the fridge and discard/feed once a week. Or, place the starter on the counter and discard/feed twice daily. You will NOT be using all of the starter for making sourdough bread. This is how some families have been able to keep a starter going for generations.

For all questions about how to maintain the sourdough starter, by either method mentioned above, refer to this article from King Arthur Flour. The article also provides you with insight on how to prep the starter for baking if it has been maintained in the fridge. See what I mean? A lot goes into this process!

LET’S MAKE ARTISAN SOURDOUGH BREAD

TO LEVAIN, OR NOT TO LEVAIN

As mentioned earlier, I needed all the help I could get from the experts. During my research, I became acquainted with levain. Somehow, I just knew I wanted to create a levain with my starter. Technially, levain is a starter. Honestly, I really did not even need to take this extra step. However, I am extra fancy! So, if you wish NOT to build a levain with the starter, you can skip this step entirely and just use the sourdough starter. For all there is to know about a levain, click here! It’s not just for making bread.

To prepare my levain, and to ultimately create the most perfect loaves of Artisan Sourdough Bread, I utilized this recipe from Joshua Weissman. He was featured on a segment of Babish’s Culinary Universe on YouTube. Click here to watch the full tutorial. Follow these steps! Yes, I had to watch over, and over again. Paused numerous times and hit the rewind button, quite often. You get my point. Not only did these two guys make baking sourdough bread making easy, but they are quite a funny pair.

Regardless of whether or not you are creating a levain, time management (and a ton of patience) is key to creating the most perfect Artisan Sourdough Bread. Once the loaves are nicely tucked inside the bannetons, they must be refrigerated for at least 12 to 15 hours prior to baking. Of course, this means pulling the dough together the day before. If you are utilizing a levain, the levain must rest (covered) for five hours. For me, I started around noon the day prior to baking. With the levain, mixing the flours, incorporating the levain, folding the dough, and shaping, my loaves were in the fridge by 8pm.

PREPPING AND BAKING ARTISAN SOURDOUGH BREAD

The next day, place the baking vessel into the oven as it preheats to 500°. The pan needs to be super hot. Allow the pan to heat up for about an hour. Dust with flour. Very carefully, transfer the molded dough from the bannetons into the floured pan. Dust with flour and create designs using a lame. Cover and bake at 500° for 20 minutes. Remove lid. Reduce heat to 450° and bake uncovered, for another 20-25 minutes. The levain I created incorporated wheat flour, so I was able to achieve a beautiful caramel-colored crust. Cool on wire rack for at least an hour prior to cutting.

For a quick summary of how I created amazing Artisan Sourdough Bread loaves from start to finish, click here! I’m so very thankful for Amanda and Joshua for sharing their recipes and to one lovely couple for creating The Challenger! Buy one ASAP!

Good luck! I anxiously await seeing your beautiful loaves of Sourdough you will create in your very own kitchen. Go for rustic and misshapen. Imperfection is perfection to me!

SOURDOUGH BREAD BOWLS

As I am writing this blog, I’m also busy making sourdough bread bowls to house my Broccoli Cheddar Soup tonight. Utilizing the same dough recipe, I used 5″ round bannetons to mold the dough. They came out so cute. Honestly, I can’t wait to make the soup tonight. However, I will probably try 7″ round bannetons the next go round. I would have preferred the bowls a bit larger.

Of course, I created a short video on TikTok making these beauties. Click here to view!

Not only did I use these sourdough bread bowls for soup, but I also made one to house my Cheesy Spinach Dip. Actually, I fancied the bread bowl up just a bit. Cannot wait to serve my Creamy Tomato Basil Soup in this one!

LET’S GET SOCIAL!

I am more than just recipes. I love fashion and style too! Most importantly, I love my Family (my Hubby and my Fur Babies). My Husband (aka my “Kitchen Bitch”) means the world to me. He’s pretty damn cool too. Not only is he one of the nicest guys you will ever meet, he also has had a lengthy career in professional hockey. Not only winning two Stanley Cups with the Pittsburgh Penguins in the early ’90’s, but most recently winning the Calder Cup with the Charlotte Checkers, amongst many other accolades. If you live in Charlotte and play hockey, or have a family member who plays, be sure to contact him. He is known as one of the best skate sharpeners in the world!

Our life has changed dramatically in the past few years with the passing of our two goldendoodles, Vegas and Viva. We were lucky enough to have Vegas for five years (totally wish it was longer). Most recently, losing our Viva to a brain tumor in July of 2020. We welcomed our mini goldendoodle 7, almost seven years ago. We just added the amazing Hazel! Of course, I am always posting tons and tons of photos! Be sure to check out my recipe for Pet Bone Broth! This broth is super rich in nutrients and will provide your pet with a multitude of health benefits!

Be sure to follow me on social media! I’m always talking food, fashion, and family! I also love sharing some of my favorite Amazon Finds too. Click here to check out my Amazon page! FacebookInstagramTikTokTwitter and Pinterest!

GRUYÈRE AND BLACK PEPPER POPOVERS

three plates filled each with two Gruyère and black pepper popovers with butter

A few years ago, I was dying to make popovers. They are one of my favorite welcoming table gifts while dining at BLT Steakhouse in Charlotte. However, I had zero clue how to make them. As you know by now, I can cook very well. Baking is not really my jam. So, I ventured onto Pinterest and found this recipe for Gruyère and Black Pepper Popovers from a restaurant in Austin, Texas called Foreign & Domestic. They looked amazing. Of course, I immediately ran to Amazon’s website and ordered these popover pans. Yes, you can use muffin tins. However, I wanted the full experience and highly suggest investing in one of these. You will definitely be making these popovers again, and again!

For certain, you need to add these to your holiday dinner table. These Gruyère and Black Pepper Popovers will be a perfect compliment to your Thanksgiving Dinner or your even Feast of the Seven Fishes meal on Christmas Eve.

To be clear, this was my third time making these. After doing a bit more research, I found a recipe the other day that was similar to the one linked above, and used it. However, I believe the original worked so much better. You can view the video of this recipe by clicking here. Although it is a bit easier, I do not think the popovers puffed up as much as the original. So, follow the recipe below and only use the video as guidance.

Feel free to play around with the ingredients. Substitute the Gruyère with another cheese. A sharp white cheddar would be amazing. You could also eliminate the cheese and black pepper altogether, and serve the popovers with jam. Have fun, and get creative.

three plates filled each with two Gruyère and black pepper popovers with butter

A FEW THINGS TO NOTE:

  • invest in a popover pan (they are relatively inexpensive)
  • the popover pan needs to be warmed in the oven prior to filling with the batter and baking
  • eggs should be at room temperature
  • do NOT open the oven while the popovers are baking
  • remove the popovers from the pan immediately after baking
  • the popovers are best enjoyed while they are warm and crispy

HOW TO PREPARE GRUYÈRE AND BLACK PEPPER POPOVERS

Preheat oven to 450 degrees. Place popover pan in oven to warm while you are preparing the batter. Warm the milk in a saucepan. You want the milk hot, but not boiling. Remove from heat. In a bowl whisk together the eggs, kosher salt and black pepper. Slowly whisk in the warmed milk. Add the flour to the mixture. Mix.

Remove the warmed popover pan from the oven. Reduce heat to 375 degrees. Generously spray each well with non-stick spray (including the sides). Fill the wells about three-quarters of the way full. Gently, place two to three cubes of the Gruyère cheese on top of the batter. Bake until the popovers have puffed up, and are a deep golden brown. This should take about forty minutes. Just be sure to check, with the oven light, at about the thirty minute mark. As mentioned above, do NOT open the oven door while the popovers are baking. If you do, you may run the risk that the popovers will collapse and not puff up.

Once fully baked, immediately remove the popovers from the pan. Garnish with additional freshly shredded cheese. Serve these amazing Gruyère and Black Pepper Popovers while they are warm. You should have enough batter left to bake up another batch.

LET’S GET SOCIAL!

I am more than just recipes. I love fashion and style too! Most importantly, I love my Family. My Husband (aka my “Kitchen Bitch”) means the world to me. He’s pretty damn cool too. Not only is he one of the nicest guys you will ever meet, he also has had a lengthy career in professional hockey. Not only winning two Stanley Cups with the Pittsburgh Penguins in the early ’90’s, but most recently winning the Calder Cup with the Charlotte Checkers, amongst many other accolades. If you live in Charlotte and play hockey, or have a family member who plays, be sure to contact him. He is known as one of the best skate sharpeners in the world!

Our life has changed dramatically in the past few years with the passing of our two goldendoodles, Vegas and Viva. We were lucky enough to have Vegas for five years (totally wish it was longer). Most recently, losing our Viva to a brain tumor in July of 2020. We welcomed our mini goldendoodle 7, almost seven years ago. We just added the amazing Hazel! Be sure to check out my recipe for Pet Bone Broth! This broth is super rich in nutrients and will provide your pet with a multitude of health benefits!

FOLLOW ME!

Be sure to follow me on social media! I’m always talking food, fashion, and family! I also love sharing some of my favorite Amazon Finds too. Click here to check out my Amazon page! FacebookInstagramTikTokTwitter and Pinterest!

MAPLE ROASTED POTATOES AND BACON

a bowl of maple roasted potatoes and bacon with fresh thyme sprigs

There are really only a few things that I refuse to eat. Peas and liver are tops. With sweet potatoes being a strong third. Yes, I have lived in the South for almost ten years. However, I just cannot seem to acquire a taste for them. For most, they are a food staple. Not only being served on holidays, but throughout the year in every way imaginable. So, I decided to create a recipe that was sort of a play on the sweet potato casserole. These Maple Roasted Potatoes and Bacon are the perfect balance of sweet and salty. Seriously, one of my new favorite side dishes.

The other day while shopping at my local Fresh Market, I came across this organic maple syrup from Runamok Maple. Yes, it is a bit expensive. However, the taste will blow you away. Additionally, I love every single thing about the company and their mission. They are certified organic. The company treats the land they utilize with respect and continually put forth efforts to reduce their carbon imprint.

Once again, I kind of failed at taking photos throughout the process of making this dish. Mostly because I was busy creating a video. Click here to watch. The video should give you a great idea of how I made these fabulous Maple Roasted Potatoes and Bacon.

a bowl of maple roasted potatoes and bacon with fresh thyme sprigs

HOW TO MAKE MAPLE ROASTED POTATOES AND BACON

First, you can use any kind of potato you desire. I found this bag of petite Yukon gold potatoes at my local grocery store and thought they would work perfectly in this recipe. Cut each in half lengthwise. Start heating up a pot of salted water. Add in the potatoes and allow them to cook just until you can stick a fork in them. This will only take a few minutes. Keep in mind, you are NOT boiling them to the point you would for mashed potatoes.

Preheat oven to 425 degrees. Drain the potatoes and lay them out on a deep cookie sheet to dry for a few minutes. Dice the thick-cut bacon and mix in with the potatoes. If you have not yet tried Wright’s bacon, please do so. By far one of my favorite brands to use in my recipes, or just eat naturally. I used their hickory smoked bacon here, but I am sure their applewood would also work well.

In a bowl, whisk together the maple syrup and olive oil. Pour on top of the potato/bacon mixture. Mix around to generously coat each piece of potato and bacon. Roast for at least thirty minutes. Be sure to toss around a few times while it is roasting. You are going to wonder if this dish is every going to come together. Believe me, it will. The dish is done when the potatoes are tender and brown, and the diced bacon is super crispy and caramelized.

TO FINISH AND SERVE THE MAPLE ROASTED POTATOES AND BACON

During the final few minutes of roasting, I did increase the heat to 450 degrees just to add a touch more crispiness to the dish. Remove pan from oven. Season immediately with kosher salt. Garnish with fresh thyme leaves. Serve up these fabulous Maple Roasted Potatoes and Bacon in a big bowl as a beautiful compliment to your holiday meal, or any weeknight dinner. ENJOY!

NOTE: When transferring to a bowl, you may find it a bit sticky. This is exactly what you want. As it cools a bit, the bacon will kind of morph into a candy. Speaking of which, be sure to check out my recipe for Candied Bacon. It’s probably the most perfect appetizer for any gathering!

LET’S GET SOCIAL!

I am more than just recipes. I love fashion and style too! Most importantly, I love my Family (my Hubby and my Fur Babies). My Husband (aka my “Kitchen Bitch”) means the world to me. He’s pretty damn cool too. Not only is he one of the nicest guys you will ever meet, he also has had a lengthy career in professional hockey. Not only winning two Stanley Cups with the Pittsburgh Penguins in the early ’90’s, but most recently winning the Calder Cup with the Charlotte Checkers, amongst many other accolades. If you live in Charlotte and play hockey, or have a family member who plays, be sure to contact him. He is known as one of the best skate sharpeners in the world!

Our life has changed dramatically in the past few years with the passing of our two goldendoodles, Vegas and Viva. We were lucky enough to have Vegas for five years (totally wish it was longer). Most recently, losing our Viva to a brain tumor in July of 2020. We welcomed our mini goldendoodle 7, almost seven years ago. We just added the amazing Hazel! Of course, I am always posting tons and tons of photos! Be sure to check out my recipe for Pet Bone Broth! This broth is super rich in nutrients and will provide your pet with a multitude of health benefits!

Be sure to follow me on social media! I’m always talking food, fashion, and family! I also love sharing some of my favorite Amazon Finds too. Click here to check out my Amazon page! FacebookInstagramTikTokTwitter and Pinterest!

SCALLOPED POTATOES

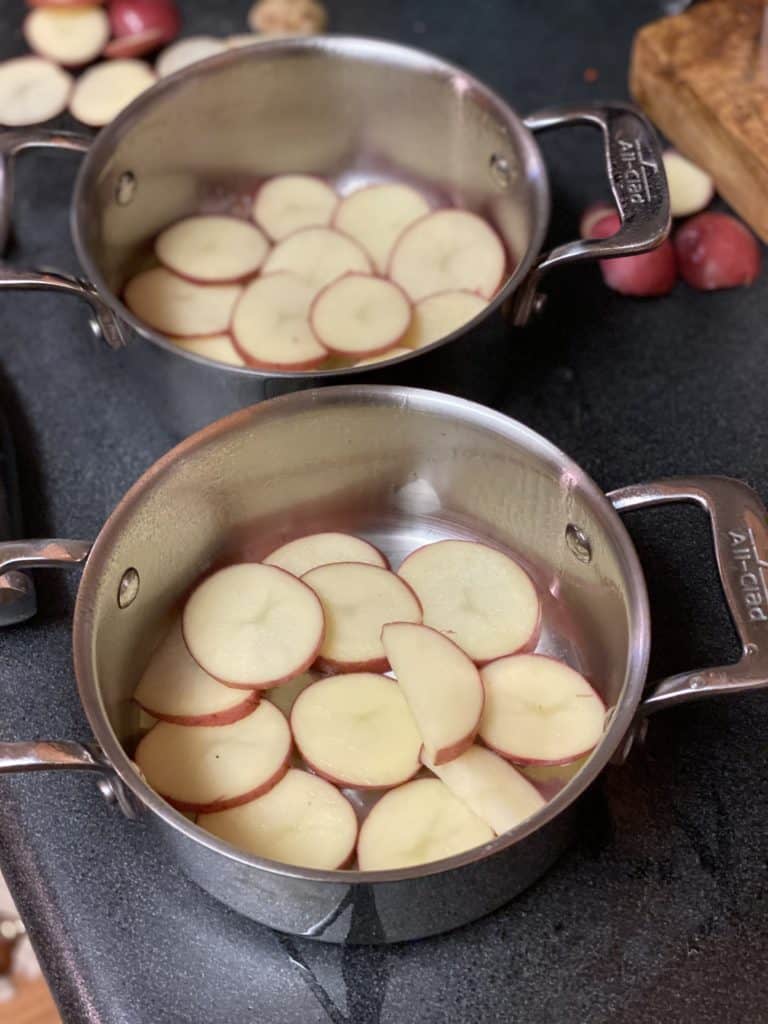
two pots of scalloped potatoes

This is one of those most perfect side dishes I remember my Mom making when we were children. It’s super old school, and brings back many fond memories of watching my Mom in the kitchen. Comfort food at it’s best. The rich and creamy sauce, combined with flour, butter, and onions is so very simple, with a subtle elegance. Even though we cook quite differently today, she taught me so much about the importance of family meals. Hope you enjoy this recipe for Scalloped Potatoes. It has been in my Family for generations.

Typically, these Scalloped Potatoes would be made in a casserole or baking dish. I just wanted to have a little bit of fun and use red and white creamer potatoes I found at Unity Farms with these All-Clad cocottes. Want to try a more “upscale” version of Scalloped Potatoes? Check out my recipe for Dauphinoise Potatoes.

Bare with me as this recipe is not really about measurements, but more about building the layers. Lumps versus no lumps? Some recipes call for mixing the flour and milk/cream so as not to have lumps. It is my belief that if there was ever a time for lumps in your potatoes, it’s for this recipe! Team lumps all the way!

Cheese or no cheese? Ok, so if you add cheese then they tend to be more of an au gratin. Who cares! Add the cheese, or not. Totally up to you. I wouldn’t normally, but I had Gruyere on hand, so I threw a touch on at the end and broiled for a few minutes to brown.

two pots of scalloped potatoes

HOW TO LAYER FOR SCALLOPED POTATOES

As mentioned earlier, this recipe is all about building layers of goodness and flavor. There is really no right or wrong way, as long as each layer contains the building ingredients.

First things first. Thinly slice the potatoes. Peel or don’t peel? Again, totally up to you. You can slice by hand or with a mandoline. If you are using a mandoline, be sure to use the guard. Take my word for this after having suffered from many, many cuts because I thought I could get by without it.

slicing a potato on a mandoline

Preheat oven to 375 degrees. Line a casserole or baking dish with a thin layer of butter. Be sure to butter the sides. Place sliced potatoes on bottom of baking dish in one layer. It’s quite ok if they overlap just a bit. Season with kosher salt and pepper. Take a spoon and dust the tops of the seasoned potatoes with flour. Again, it’s ok if the flour clumps in certain spots. The flour will bake long enough, so you will not have to worry about a raw flour taste. Dot the first layer with butter. Add a layer of the sliced onions. Pour about one-third of the milk or heavy cream over the layer.

Keep repeating these steps until you have used up all of the potatoes. You should be able to build three nice layers. Keep in mind that you may need a touch more flour or milk/cream as you are building the layers than what the recipe calls for. Most of us have these ingredients in our pantry, so use more if you need to.

Cover the casserole or baking dish with foil. Place in oven and allow to bake for at least an hour. Test the potatoes after an hour for doneness. Once potatoes are tender and falling apart, if you so desire, add a thin layer of shredded Gruyere cheese. Turn on the broiler, and allow the cheese to brown.

TO SERVE THE SCALLOPED POTATOES

Remove from broiler. Garnish with fresh chopped parsley. Serve up these magnificent Scalloped Potatoes with your favorite protein. ENJOY! Take a look how I served mine below!

These potatoes are even better the next day. So, if you have leftovers, which may be highly unlikely, serve them up for dinner tomorrow!

two pots of scalloped potatoes

BRASSTOWN BEEF

I was lucky enough to grab a few local, grass-fed ribeye and strips steaks from my Friends at Brasstown Beef. They are a ranch located in the Northwestern part of North Carolina. Steve Whitmire, owner, touts himself as more of a grass farmer, than a rancher. This means a lot to me, as his cattle are very well fed, and drink the same water his Family drinks. Read their entire story, and history on their website!

You can easily order from Brasstown Beef online. Shipping is quick. You can tell the packaging has been well thought out to ensure your order stays frozen during shipping. All of your items are packed in a thermal logo bag which is then placed in a styrofoam box lined with dry ice. Use my code CFP15 for discount!

a black thermal bag from Brasstown Beef

Now, let’s talk how phenomenal these steaks were. Each steak is individually, vacuumed sealed and frozen. Thaw gently in the fridge. Bring to room temperature prior to cooking. I grilled mine to a perfect medium-rare. The steaks were super tender, juicy and oh the FLAVOR! Try them out. Support local ranchers and farmers during these times. Remember that not only are restaurants having difficulties, but so are the small business that they source their products from. Be sure to grab a few packages of ground meat, burgers and do NOT forget the hot dogs! You will thank me later. I have more recipes coming soon using more of Brasstown Beef’s amazing meats! Do NOT forget to use CFP15 at checkout!

LET’S GET SOCIAL!

I am more than just recipes. I love fashion and style too! Most importantly, I love my Family (my Hubby and my Fur Babies). My Husband (aka my “Kitchen Bitch”) means the world to me. He’s pretty damn cool too. Not only is he one of the nicest guys you will ever meet, he also has had a lengthy career in professional hockey. Not only winning two Stanley Cups with the Pittsburgh Penguins in the early ’90’s, but most recently winning the Calder Cup with the Charlotte Checkers, amongst many other accolades. If you live in Charlotte and play hockey, or have a family member who plays, be sure to contact him. He is known as one of the best skate sharpeners in the world!

Our life has changed dramatically in the past few years with the passing of our two goldendoodles, Vegas and Viva. We were lucky enough to have Vegas for five years (totally wish it was longer). Most recently, losing our Viva to a brain tumor in July of 2020. We welcomed our mini goldendoodle 7, almost seven years ago. We just added the amazing Hazel! Of course, I am always posting tons and tons of photos! Be sure to check out my recipe for Pet Bone Broth! This broth is super rich in nutrients and will provide your pet with a multitude of health benefits!

Be sure to follow me on social media! I’m always talking food, fashion, and family! I also love sharing some of my favorite Amazon Finds too. Click here to check out my Amazon page! FacebookInstagramTikTokTwitter and Pinterest!

PATATAS BRAVAS

two crocks of patatas bravas

In January, I had the pleasure of dining in my first Latin Fusion restaurant. The food was phenomenal. Two of my favorite dishes, which I immediately came home to make, were the Tostones with Blackened Shrimp and Guacamole and Ropa Vieja. I had also been itching to prepare my favorite tapas, Patatas Bravas. To my surprise, while scrolling through Instagram one day, I saw a picture of them posted by America’s Test Kitchen. Imagine my excitement.

For the most part, I followed the recipe exactly, except for a few tweaks of my own. Definitely needed more sweet smoked paprika, and the addition of the garlic aioli sent this recipe to a whole new level!

I served the Patatas Bravas in these fancy crocks I found at Home Goods. Click here for ones similar. These crocks are also perfect for French Onion Soup.

two crocks of patatas bravas

HOW TO PREPARE PATATAS BRAVAS

There are a number of steps involved in this recipe. The garlic aioli can be prepared in advance and stored in the fridge. Prep the potatoes for frying before creating the bravas sauce.

FOR THE GARLIC AIOLI

Aioli is basically a Mediterranean mayo, and the perfect compliment to this dish. In a food processor, combine all of the ingredients for the garlic aioli, except for the oils. Start processing while slowly pouring the oil in from the top. Process until a nice thick sauce has formed. Just about a minute. Store in fridge.

garlic aioli in a food processor for patatas bravas

FOR THE POTATOES

Cutting the potatoes, in my opinion, is going to be a matter of size preference. Diced small was my way, but feel free to create larger chunks. Boil a large pot of water with the baking soda and tablespoon of salt. Once at the boiling stage, add in the potatoes. Allow to come back to a boil, and boil for just a minute.

Drain. Place potatoes back in the pot. Set pot back on stove at a low heat. Allow any moisture to cook off. Do this for just under a minute. Remove from heat. Gently, using a spatula, stir in the remaining teaspoon of kosher salt. You will notice the potatoes have a starch-like consistency, but still hold their shape. This is exactly what you are looking for.

Grab a baking sheet, place potatoes in a single layer to cool.

Heat up enough canola oil in a deep pot or large dutch oven to just cover the potatoes. I used this Lodge cast iron pot. Temperature should be around 375 degrees. Add in the cooled potatoes and allow to fry until golden brown. Stir the pot often with a slotted spoon. Once potatoes are brown and crispy, remove from pot with a slotted spoon onto a paper towel lined cooling rack. Sprinkle with kosher salt.

FOR THE BRAVAS SAUCE

As the potatoes are frying, prepare the bravas sauce. On medium-low heat, heat up the olive oil. Toss in the garlic, paprika, salt and cayenne pepper. Cook for just under a minute. Stir in the tomato paste and cook for another 30 seconds. Whisk in the water. Bring to a boil. Reduce heat and allow to simmer until the sauce thickens. This will take about three to four minutes. Pour sauce into a bowl, stir in the vinegar, and allow to cool completely. Once cooled, whisk in the mayo.

TO SERVE THE PATATAS BRAVAS

You can the patatas bravas family-style, or in individual servings. Spoon a touch of the bravas sauce onto a plate or in a bowl. Place potatoes. Drizzle with more bravas sauce. Garnish with the garlic aioli and chopped parsley. Enjoy this fabulous tapas prepared in your very own home!

two crocks of patatas bravas

LET’S GET SOCIAL!

I am more than just recipes. I love fashion and style too! Most importantly, I love my Family (my Hubby and my Fur Babies). My Husband (aka my “Kitchen Bitch”) means the world to me. He’s pretty damn cool too. Not only is he one of the nicest guys you will ever meet, he also has had a lengthy career in professional hockey. Not only winning two Stanley Cups with the Pittsburgh Penguins in the early ’90’s, but most recently winning the Calder Cup with the Charlotte Checkers, amongst many other accolades. If you live in Charlotte and play hockey, or have a family member who plays, be sure to contact him!

Our life has changed dramatically in the past few years with the passing of our two goldendoodles, Vegas and Viva. We were lucky enough to have Vegas for five years (totally wish it was longer). Most recently, losing our Viva to a brain tumor in July of 2020. We welcomed our mini goldendoodle 7, almost seven years ago. We just added the amazing Hazel! Of course, I am always posting tons and tons of photos! Be sure to check out my recipe for Pet Bone Broth! This broth is super rich in nutrients and will provide your pet with a multitude of health benefits!

FOLLOW ME!

Be sure to follow me on social media! I’m always talking food, fashion, and family! I also love sharing some of my favorite Amazon Finds too. Click here to check out my Amazon page! Facebook, Instagram, TikTok, Twitter and Pinterest! THANK YOU!

FUDGE BROWNIES

three fudge brownies stacked on a wooden board topped with whipped cream and powdered sugar

So basically, I am just passing along this recipe for Homemade Fudge Brownies from a recipe I found on The Kitchn! I only changed up a few things. Instead of baking in a 9×9 inch pan, I used a 10.25″ cast iron pan from Lodge. Click here! Oh…and I also added chopped walnuts. When I tell you, this is the best homemade fudge brownie recipe ever…it is the BEST. You will never buy a box mix fudge brownie mix again. The best part…you probably have all of the ingredients in your pantry. It does require a number of steps that you need to follow exactly…but you got this!

three fudge brownies stacked on a wooden board topped with whipped cream and powdered sugar

Heat oven to 325 degrees. Prepare your pan or cast iron skillet by spraying bottom and sides with cooking spray. Add a touch of flour and coat the spray. Shake off any excess. Line the bottom of the pan with parchment paper. I just laid the skillet on top of parchment then traced a line with scissors and cut out the circle.

Adjust the temperature of your microwave to low. Pour the oil into a microwave-safe bowl. Place in microwave and heat in five-second intervals. Four to six intervals should do. You just want the oil to warm up…not hot. Remove bowl from microwave and whisk in the cocoa powder. Set aside as you prepare the other ingredients.

In a smaller bowl, combine the flour, baking powder and salt. In a large bowl (if you are using a stand mixer with paddle attachment, that bowl is perfect), combine the eggs, powdered sugar and brown sugar. Beat on medium for about three minutes. You are looking for a fluffy texture and light color. Beat in the vanilla.

Add in one-half of the cocoa/oil mixture and beat on medium-high for about five minutes. You will notice the batter take on a sheen. Add in the flour mixture and beat on low until combined. Add in the remaining cocoa/oil mixture. Beat for another minute. Gently fold in the walnuts.

Pour batter into prepared skillet/pan and bake for 20 to 25 minutes. Longer, if you want a more crispy-edged brownie. Do not test the middle with a toothpick…these are fudgy and the toothpick will not come out clean.

brownies baked in a cast iron skillet

Allow to cool before cutting (if you can). There you have it…the best Homemade Fudge Brownies! Serve with homemade whipped topping or ice cream. ENJOY!

Longing for more homemade desserts? Click here!

LET’S GET SOCIAL!

I am more than just recipes. I love fashion and style too! Most importantly, I love my Family (my Hubby and my Fur Babies). My Husband (aka my “Kitchen Bitch”) means the world to me. He’s pretty damn cool too. Not only is he one of the nicest guys you will ever meet, he also has had a lengthy career in professional hockey. Not only winning two Stanley Cups with the Pittsburgh Penguins in the early ’90’s, but most recently winning the Calder Cup with the Charlotte Checkers, amongst many other accolades. If you live in Charlotte and play hockey, or have a family member who plays, be sure to contact him!

Our life has changed dramatically in the past few years with the passing of our two goldendoodles, Vegas and Viva. We were lucky enough to have Vegas for five years (totally wish it was longer). Most recently, losing our Viva to a brain tumor in July of 2020. We welcomed our mini goldendoodle 7, almost seven years ago. We just added the amazing Hazel! Of course, I am always posting tons and tons of photos! Be sure to check out my recipe for Pet Bone Broth! This broth is super rich in nutrients and will provide your pet with a multitude of health benefits!

FOLLOW ME!

Be sure to follow me on social media! I’m always talking food, fashion, and family! I also love sharing some of my favorite Amazon Finds too. Click here to check out my Amazon page! Facebook, Instagram, TikTok, Twitter and Pinterest! THANK YOU!

THE BEST TWICE BAKED POTATOES

five twice baked red potatoes on a sheet pan

I have been on a red potato kick lately. Just created a recipe for Crispy Smashed Potatoes the other day. Thought I would give Twice Baked Potatoes a go! You probably already have everything you need. Don’t have red potatoes…you can definitely substitute with whatever potatoes you have, or like! Even though the red potatoes are a bit smaller than baking potatoes, they are so hearty that one should be enough per person…yeah right!

five twice baked red potatoes on a sheet pan

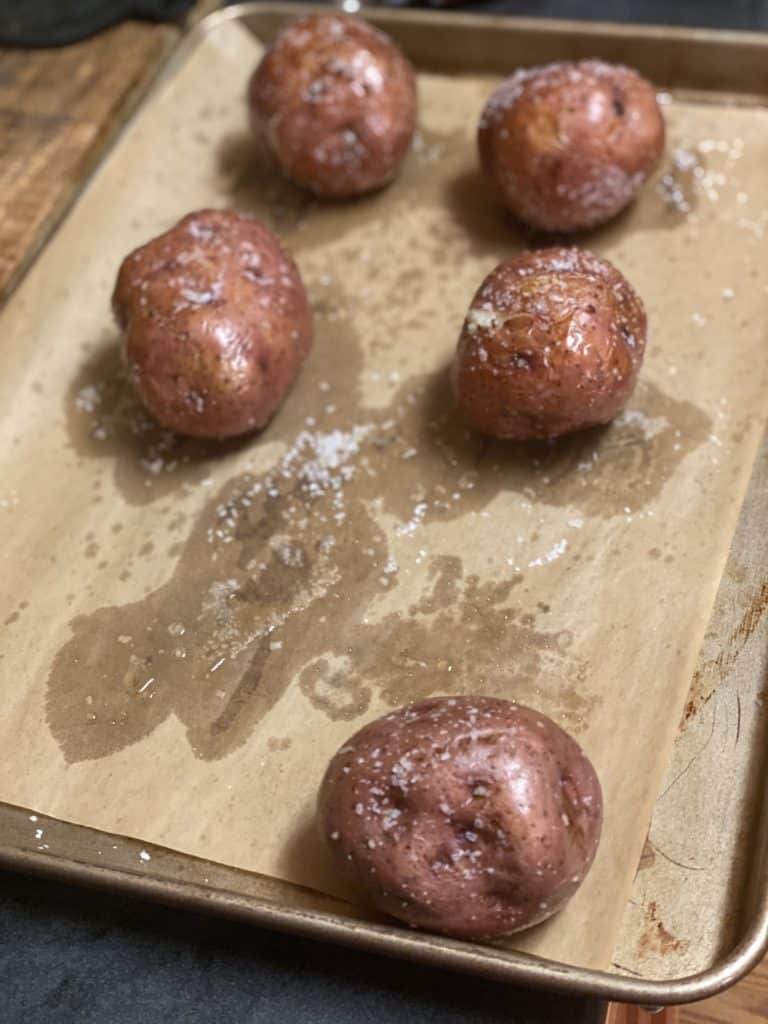
Heat oven to 425 degrees. Rinse and dry the potatoes. Poke a few holes in the potatoes with a fork. Line a baking sheet with parchment paper. Rub the potatoes with olive oil on all sides. Coat with kosher salt. Place in oven for about 40 minutes, or until the potatoes are fork tender. While the potatoes are baking, cut your bacon into tiny pieces and crisp up. Drain any excess fat.

five red potatoes on a baking sheet covered in olive oil and salt for the best baked twice potatoes

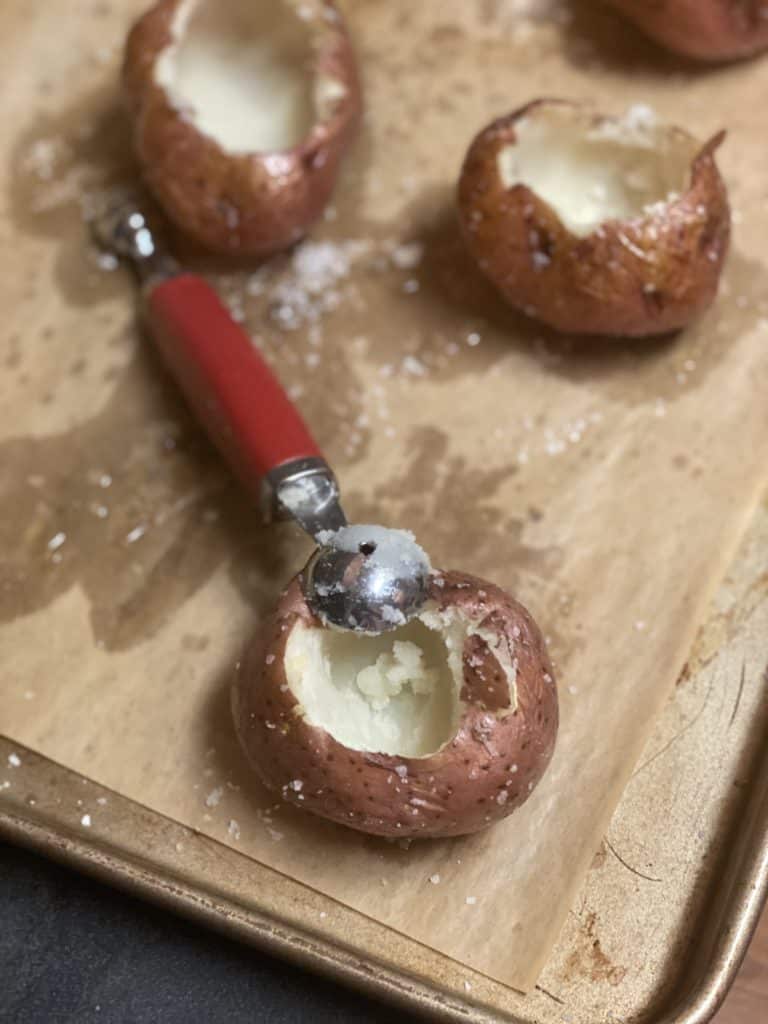
Remove potatoes from oven. Once the potatoes are cool enough to handle. I think I did mine right out of the oven (you do not want the insides to cool down too much). That will make mashing more difficult. Using a melon baller or spoon, scoop out the insides and place in a bowl, including the top peel. Leave enough of the insides to create a firm “boat.” About a quarter inch should do fine.

Add the butter, shredded cheese, half of the bacon, cream/milk, black pepper and sour cream to the potatoes. With a hand mixer or potato masher, combine all of the ingredients. The consistency will not be exactly like mashed…that’s what you want. If you feel like it is too dry…add a touch more cream/milk. Just try to get out any big clumps. Spoon, or as I did, use a pastry bag to fill each potato with the mixture. Top with a bit more cheddar cheese.

Place potatoes back in oven for about 15 minutes. After the 10 minute mark…add a touch more cheddar cheese, and a few more bacon pieces. You can even turn on the broiler for the last minute to get the cheese nice and brown…just be sure to keep an eye on them…you do not want the bacon to burn. Top with sour cream and bacon. Garnish with fresh chopped parsley. You can even add your own favorite toppings! Serve an incredible side dish, appetizer, or even as a meal. ENJOY! They will certainly be the best twice baked potatoes ever! Want more potato recipes? Click here!

LET’S GET SOCIAL!

I am more than just recipes. I love fashion and style too! Most importantly, I love my Family (my Hubby and my Fur Babies). My Husband (aka my “Kitchen Bitch”) means the world to me. He’s pretty damn cool too. Not only is he one of the nicest guys you will ever meet, he also has had a lengthy career in professional hockey. Not only winning two Stanley Cups with the Pittsburgh Penguins in the early ’90’s, but most recently winning the Calder Cup with the Charlotte Checkers, amongst many other accolades. If you live in Charlotte and play hockey, or have a family member who plays, be sure to contact him!

Our life has changed dramatically in the past few years with the passing of our two goldendoodles, Vegas and Viva. We were lucky enough to have Vegas for five years (totally wish it was longer). Most recently, losing our Viva to a brain tumor in July of 2020. We welcomed our mini goldendoodle 7, almost seven years ago. We just added the amazing Hazel! Of course, I am always posting tons and tons of photos! Be sure to check out my recipe for Pet Bone Broth! This broth is super rich in nutrients and will provide your pet with a multitude of health benefits!

FOLLOW ME!

Be sure to follow me on social media! I’m always talking food, fashion, and family! I also love sharing some of my favorite Amazon Finds too. Click here to check out my Amazon page! Facebook, Instagram, TikTok, Twitter and Pinterest! THANK YOU!

CRISPY SMASHED RED POTATOES

a sheet pan of crispy smashed red potatoes

Crispy Smashed Red Potatoes may just be the perfect side dish…well…or least top five! You can actually make with any small potato, but I really like using the red. There is really not much to the recipe at all. I will give you a little shortcut. I did not do this, but I would have, had I had them. You can buy a bag of red “steam-in-bag” potatoes and just microwave for about five minutes. I used these from Nature’s Way. This will allow you to skip the simmering process. First, I did not have any. Secondly, I wanted a great photo, and sometimes the “steam-in-bag” potatoes are not uniform in size. You really want to pick a small potato. Larger potatoes are not only harder to smash, will take longer to bake and, will cover a larger surface area.

a sheet pan of crispy smashed red potatoes with a wooden bowl of ranch dip

Preheat oven to 450 degrees. Simmer potatoes in salted water until fork tender. If you are using a “steam-in-bag,” microwave for about five minutes.

red potatoes simmering in a pot of salted water

Once tender, drain potatoes and allow to sit for just a few minutes to dry. Line a baking sheet with parchment paper. Drizzle on a touch of the olive oil. Place potato on pan and smash with the bottom of a glass or bowl. You may have to line the bottom of the glass/bowl with just a touch of oil. Repeat until all of the potatoes are smashed. Drizzle olive oil on top of each potato. Sprinkle on kosher salt, pepper and paprika.

Bake for about 25 minutes. Top with a little fresh thyme leaves. Place back in oven until super crispy. Baking time should take anywhere between 30 and 40 minutes. I did flip mine over the last five minutes…just wanted a super crispy edge on each side. Remove from oven and garnish with more fresh thyme leaves. Serve these Crispy Smashed Red Potatoes as a side with your favorite dressing. I roasted up a rack of baby back ribs…they were a perfect compliment! ENJOY!

Check out some of my other favorite potato recipes! Click here!

LET’S GET SOCIAL!

I am more than just recipes. I love fashion and style too! Most importantly, I love my Family (my Hubby and my Fur Babies). My Husband (aka my “Kitchen Bitch”) means the world to me. He’s pretty damn cool too. Not only is he one of the nicest guys you will ever meet, he also has had a lengthy career in professional hockey. Not only winning two Stanley Cups with the Pittsburgh Penguins in the early ’90’s, but most recently winning the Calder Cup with the Charlotte Checkers, amongst many other accolades. If you live in Charlotte and play hockey, or have a family member who plays, be sure to contact him!

Our life has changed dramatically in the past few years with the passing of our two goldendoodles, Vegas and Viva. We were lucky enough to have Vegas for five years (totally wish it was longer). Most recently, losing our Viva to a brain tumor in July of 2020. We welcomed our mini goldendoodle 7, almost seven years ago. We just added the amazing Hazel! Of course, I am always posting tons and tons of photos! Be sure to check out my recipe for Pet Bone Broth! This broth is super rich in nutrients and will provide your pet with a multitude of health benefits!

FOLLOW ME!

Be sure to follow me on social media! I’m always talking food, fashion, and family! I also love sharing some of my favorite Amazon Finds too. Click here to check out my Amazon page! Facebook, Instagram, TikTok, Twitter and Pinterest! THANK YOU!