Knowing How to Clean Clams properly is essential before cooking to avoid gritty, sandy seafood. Fresh clams naturally contain sand, but with a simple soaking method, you can easily purge them for a clean, delicious result. This easy method shows exactly how to clean clams properly to remove sand and grit before cooking for recipes like steamed clams, pasta, or seafood chowder.
If you’re planning to cook clams next, be sure to try my Butter Garlic Steamed Clams. It’s a quick and easy seafood dinner that pairs perfectly with properly cleaned clams.
Why You’ll Love This How to Clean Clams Guide
- Easy step-by-step guide on how to clean clams properly – This beginner-friendly method walks you through exactly how to clean fresh clams, so you can cook them with confidence.
- Removes sand and grit for better texture – Learn how to purge clams effectively, so you don’t end up with sandy or gritty bites in your seafood dishes.
- Works for all types of fresh clams – Whether you’re using littleneck clams, manila clams, or cockles, this cleaning method works across all varieties.
- Essential prep for any clam recipe – Properly cleaned clams are key for recipes like steamed clams, clam pasta, seafood chowder, and garlic butter clams
- Improves flavor and overall quality – Removing sand allows the natural briny, fresh seafood flavor of the clams to shine through.
- Prevents common cooking mistakes – Avoid gritty broth, dirty shells, and improperly prepared shellfish with this easy cleaning method.
- Great for beginner seafood cooks – If you’re new to cooking shellfish, this guide simplifies the process and removes the guesswork.
What You Need
- Fresh clams
- Cold water
- 1–2 tablespoons flour or salt
- Large bowl
How to Tell if Clams Are Fresh
- Shells should be tightly closed or close when tapped
- They should smell clean and briny (like the ocean)
- Avoid clams with cracked shells
- Discard any that remain open after soaking
How to Store Clams Before Cooking
- Use within 1–2 days for best freshness
- Keep clams in the refrigerator in a breathable container
- Cover with a damp paper towel
- Do not store in airtight containers or submerged in water
Best Clams to Clean and Cook
Understanding the different types of clams helps you choose the best clams for steaming, pasta, or chowder recipes.
- Littleneck or Middleneck clams – small, tender, ideal for steaming
- Manila clams – slightly sweeter, very tender
- Cockles – smaller and more briny
- Cherrystone or chowder clams are larger and better for chowders and seafood stews.
Why Do You Soak Clams?
Clams live buried in sand, which means they naturally contain grit inside their shells. Soaking them in water encourages them to filter and expel that sand, resulting in a cleaner, smoother texture when cooked.
Using flour or salt in the water helps mimic their natural environment and encourages them to purge more effectively.
Common Mistakes to Avoid
- Skipping the soak – leads to gritty clams
- Using warm water – can kill the clams
- Pouring clams into a colander – redistributes sand
- Over-soaking – can weaken or kill the clams
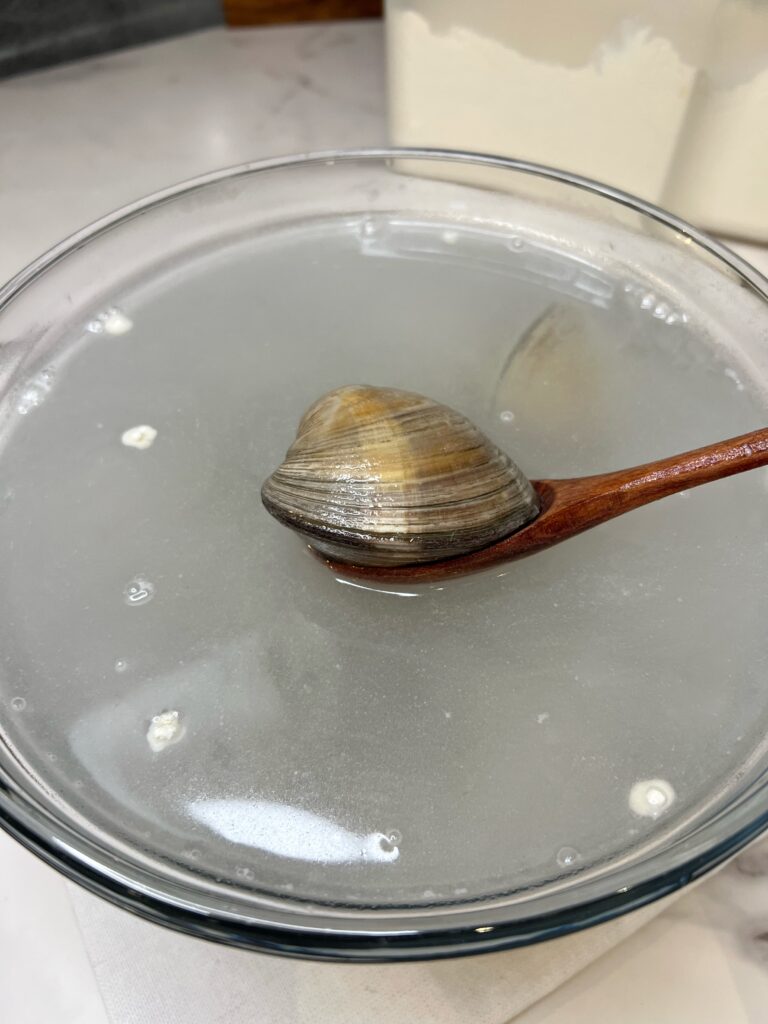
How to Clean Clams Step-by-Step
- Place the clams in a large bowl.
- Fill the bowl with cold water, enough to fully submerge the clams.
- Add 1–2 tablespoons of flour (or salt) to the water.
- While some methods suggest soaking clams for up to 30 minutes, I find that 10–15 minutes works well when combined with a thorough rinse and scrub.
- During this time, the clams will naturally purge sand and grit.
- Remove the clams from the water (do not pour them out, or you’ll reintroduce sand).
- Rinse each clam under cold running water, scrubbing the shells, if needed.
- Discard any clams that are open and do not close when tapped.


Frequently Asked Questions
You may end up with gritty, sandy bites that affect the texture of your dish.
Yes, soaking for too long can kill the clams. Stick to about 10-15 minutes.
If it smells off, has a cracked shell, or stays open when tapped, discard it.
10–15 minutes is usually enough to remove sand and grit.
Both work well. Flour helps clams expel sand, while salt mimics seawater conditions
Yes, even store-bought clams can contain sand and should be soaked before cooking.
How to Use Cleaned Clams
Once your clams are cleaned, they’re ready for cooking. Try them in:
- Butter Garlic Steamed Clams
- Clams Casino
- Steamed Clams with Sausage
- Clams Oreganata
- New England Clam Chowder
- Linguine with White Clam Sauce
Cleaning clams properly is an essential step for any seafood recipe to remove sand and grit and ensure the best texture and flavor. This easy method for how to clean clams uses cold water and either flour or salt to help purge clams before cooking. Whether you’re preparing littleneck clams, manila clams, or cockles, taking the time to soak and rinse them will give you clean, fresh clams ready for recipes like butter garlic steamed clams, clam pasta, or seafood chowder.
Print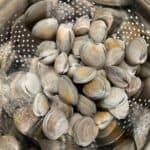
How to Clean Clams
- Total Time: 15 minutes
Description
Learn How to Clean Clams properly to remove sand and grit. Step-by-step guide for soaking, purging, and preparing fresh clams for cooking.
Ingredients
- Fresh clams
- Cold water
- 1–2 tablespoons flour or salt
- Large bowl
Instructions
- Place the clams in a large bowl.
- Fill the bowl with cold water, enough to fully submerge the clams.
- Add 1–2 tablespoons of flour (or salt) to the water.
- While some methods suggest soaking clams for up to 30 minutes, I find that 10–15 minutes works well when combined with a thorough rinse and scrub.
- During this time, the clams will naturally purge sand and grit.
- Remove the clams from the water (do not pour them out, or you’ll reintroduce sand).
- Rinse each clam under cold running water, scrubbing the shells if needed.
- Discard any clams that are open and do not close when tapped.
Equipment
Notes
- Always use fresh, live clams. Discard any clams that are open and do not close when tapped.
- Soaking clams helps remove sand and grit for a clean, smooth texture when cooking.
- You can use flour or salt in the soaking water. Both methods help clams purge sand.
- Do not use warm or hot water, as it can kill the clams before they are cleaned.
- Avoid pouring clams into a colander, as this can redistribute sand back onto the clams.
- Gently lift clams out of the soaking water instead of draining them.
- Do not over-soak, 10–15 minutes is ideal, to keep clams fresh and alive.
- Rinse and lightly scrub shells to remove any dirt or debris on the outside.
- Properly cleaned clams are essential for recipes like butter garlic steamed clams, clam pasta, and seafood chowder.
- Prep Time: 15 minutes
- Category: Appetizers, Lunch, Dinner
- Method: Easy
- Cuisine: Fish and Seafood
GET TO KNOW ME!

WELCOME! My name is Melissa Latin aka. Charlotte Fashion Plate. Happy to meet you! I am more than just recipes. I love fashion and style too! Most importantly, I love my Family (my Hubby and my Fur Babies). My Husband (aka my “Kitchen Bitch”) means the world to me. He’s pretty damn cool too. Not only is he one of the nicest guys you will ever meet, he also has had a lengthy career in professional hockey. Not only winning two Stanley Cups with the Pittsburgh Penguins in the early ’90’s, but most recently winning the Calder Cup with the Charlotte Checkers, amongst many other accolades. If you live in Charlotte and play hockey, or have a family member who plays, be sure to contact him!
Our life has changed dramatically in the past few years with the passing of our two goldendoodles, Vegas and Viva. We were lucky enough to have Vegas for five years (totally wish it was longer). Most recently, losing our Viva to a brain tumor in July of 2020. We welcomed our mini goldendoodle 7, almost seven years ago. We just added the amazing Hazel! Of course, I am always posting tons and tons of photos! Be sure to check out my recipe for Pet Bone Broth! This broth is super rich in nutrients and will provide your pet with a multitude of health benefits!
In addition, I’m so very excited to announce I have published my first e-book and paperback, “Mastering Thanksgiving – A Guide to Perfecting Your Thanksgiving Dinner.” Your support would mean the world to me.
Let’s Get Social!
Be sure to follow me on social media! I’m always talking food, fashion, and family! I also love sharing some of my favorite Amazon Finds too. Click here to check out my Amazon page! Facebook, Instagram, TikTok, X, Pinterest and YouTube! Check out my LTK to find out what I’m wearing! THANK YOU!


7 Comments
[…] your littleneck, middleneck or cherrystone clams at The Carolina Meat & Fish Co. Also, click here to learn how to clean your clams prior to using them in your favorite recipe. In addition, I give […]
[…] be sure to check out my blog on how to properly clean clams and mussels. This is a must prior to adding them in this […]
[…] with enough water to just to the fill line. Leave enough room to add in the clam juice and lemon. Clean the clams and mussels. Toss your clams and mussels into the steaming tray and steam until opened. […]
[…] oven to 450 degrees. Want to know how to properly clean clams prior to cooking? Click here. Lay the cleaned and rinsed clams on a baking sheet. Bake for about two to three minutes. Just long […]
[…] other ingredients. In a large bowl, combine the flour with enough water to cover the clams. Click here to learn how to clean clams properly. Be sure to discard any clams that are open prior to […]
[…] along with any dirt/grit. Let them soak for about five minutes. Rinse and set back in fridge. Click here to read all about the appropriate way to clean […]
[…] sure to properly clean the clams prior to cooking. Click here to found out how. Grit and dirt do not belong in this […]