Grated Egg Salad Recipe

two halves of an avocado filled with grated egg salad garnished with fresh parsley and sitting on a butterfly plate

Who knew grating an egg would lead to such an incredible recipe for Egg Salad? First and foremost, I cannot take credit for this incredible egg hack. Grating eggs on avocado toast videos have gone viral on TikTok. So, I knew I had to try creating a Grated Egg Salad Recipe. Of course, adding a little spin, of my own.

Admittedly, I am not a huge fan of the chunking egg whites in traditional egg salad recipes. Grating the eggs did the trick. No more chunky egg whites. The creamy combination of mayo, dijon and hot sauce was the perfect compliment to the texture of the grated eggs and crunch from the onions and fresh jalapeños.

Naturally, I created a short “how-to” video on TikTok. Be sure to watch in the recipe below. If you have not yet signed up for this social media platform, use my code 5SSIS800K0H06 to create an account.

two halves of an avocado filled with grated egg salad garnished with fresh parsley and sitting on a butterfly plate

BEST METHOD FOR HARD BOILING EGGS

Ask around and you may find everyone has a different technique for hard boiling eggs. Honestly, it’s not really about cooking the eggs, it’s about the peeling! For this grated egg salad recipe, the eggs must be hard boiled, not jammy. Plan on ten minutes to firm up the yolk and egg whites.

PERFECTLY PEELED HARD BOILED EGGS

Some say use older eggs as opposed to “fresher” eggs. Maybe, maybe not. In my opinion, peeling a hard boiled egg perfectly, is all about technique!

Do you find that every time you peel a hard boiled egg, the shell manages to destroy the white part of the egg? If so, try submerging the cooked eggs into a cold ice bath. Allow the eggs to sit in the cold water for a few minutes. Peel under cold, running water. The eggshell should peel away, perfectly. Well, most of the time!

Honestly, for this Grated Egg Salad Recipe, you do not need perfectly peeled hard boiled eggs. The presentation comes from the egg grating process.

HOW TO GRATE HARD BOILED EGGS

Grate hard boiled eggs using either a box, or hand held cheese grater. I prefer using this flat, handheld grater. Using a back and forth motion, slide the cooked egg up and down on the grater. Separately, grate any larger pieces of egg white that may fall off during the grating process.

a bowl filled with six grated hard boiled eggs

GRATED EGG SALAD INGREDIENTS

The creaminess from the eggs and mayo from my recipe for Grated Egg Salad paired extremely well with the crunchiness from the diced red onion and spicy jalapeños. Feel free to change up the egg salad ingredients using any or all of the following suggestions:

  • diced celery
  • bell peppers
  • pickles and/or relish
  • replace mayo with yogurt
  • add additional spices (onion powder, garlic powder, paprika, etc.)
  • fresh herbs
  • diced avocado
  • bacon pieces
a display of Grated egg salad ingredients, hardboiled eggs on a plate, diced jalapeños and red onion, jar of dijon, jar of mayo, an avocado, jar of tabasco, salt and pepper

HOW TO SERVE GRATED EGG SALAD

The possibilities are endless when it comes to serving this fabulous Grated Egg Salad. If you can refrain from eating this delish salad right out of the bowl, do as I did and fill the inside of creamy halved avocados. Alternatively, here are few more serving suggestions:

  • serve on bread, toast or crackers
  • as the filling for deviled eggs
  • on a croissant, toasted bagel or muffin
  • inside lettuce leaves or bell peppers for a low-carb option
  • as part of a BLT

STORING EGG SALAD

Place leftover egg salad in an air-tight container. This incredible, creamy egg salad will last up to two days in the fridge. Freezing egg salad is NOT recommended.

Print
clock clock iconcutlery cutlery iconflag flag iconfolder folder iconinstagram instagram iconpinterest pinterest iconfacebook facebook iconprint print iconsquares squares iconheart heart iconheart solid heart solid icon
two halves of an avocado filled with grated egg salad garnished with fresh parsley and sitting on a butterfly plate

Grated Egg Salad Recipe


5 Stars 4 Stars 3 Stars 2 Stars 1 Star

No reviews

Description

This Grated Egg Salad Recipe is a WINNER! No more chunky egg whites. The creamy combination of mayo, dijon and hot sauce was the perfect compliment to the texture of the grated eggs and crunch from the onions and fresh jalapeños. Serve inside an avocado, or use one of the suggested serving options!


Ingredients

Scale
  • 6 hard boiled eggs
  • 3 avocados, for serving
  • 1 tablespoon diced red onion
  • 1 tablespoon diced jalapeño 
  • 1 teaspoon kosher salt
  • 1 teaspoon black pepper
  • 1/2 cup mayo (adjust to your preferred creaminess)
  • 1 tablespoon dijon
  • 3 dashes hot sauce
  • 1 teaspoon lemon juice

Instructions

  1. Hard boil the eggs to a 10-minute mark and peel. 
  2. Grate the eggs inside of a bowl.
  3. Add the remaining ingredients except the avocado.
  4. Mix well. 
  5. Add more mayo depending on your preferred creaminess.
  6. Cut the avocados in half.
  7. Spoon in the grated egg salad.
  8. ENJOY!

Notes

SEE POST FOR TIPS AND NOTES!

  • Prep Time: 10 minutes
  • Cook Time: 10 minutes

Nutrition

  • Serving Size: 1/2 filled avocado

LET’S GET SOCIAL!

I am more than just recipes. I love fashion and style too! Most importantly, I love my Family (my Hubby and my Fur Babies). My Husband (aka my “Kitchen Bitch”) means the world to me. He’s pretty damn cool too. Not only is he one of the nicest guys you will ever meet, he also has had a lengthy career in professional hockey. Not only winning two Stanley Cups with the Pittsburgh Penguins in the early ’90’s, but most recently winning the Calder Cup with the Charlotte Checkers, amongst many other accolades. If you live in Charlotte and play hockey, or have a family member who plays, be sure to contact him!

Our life has changed dramatically in the past few years with the passing of our two goldendoodles, Vegas and Viva. We were lucky enough to have Vegas for five years (totally wish it was longer). Most recently, losing our Viva to a brain tumor in July of 2020. We welcomed our mini goldendoodle 7, almost seven years ago. We just added the amazing Hazel! Of course, I am always posting tons and tons of photos! Be sure to check out my recipe for Pet Bone Broth! This broth is super rich in nutrients and will provide your pet with a multitude of health benefits!

FOLLOW ME!

Be sure to follow me on social media! I’m always talking food, fashion, and family! I also love sharing some of my favorite Amazon Finds too. Click here to check out my Amazon page! FacebookInstagramTikTokTwitter and Pinterest! THANK YOU!

Homemade Creamy Mushroom Soup

A small white bowl filled with Homemade Creamy Mushroom Soup garnished with olive oil, fresh thyme, black pepper and crispy mushrooms.

Homemade Creamy Mushroom Soup is a rich, velvety soup made from fresh, wholesome ingredients. It is known for its comforting, earthy flavor profile. This mushroom soup’s simplicity in preparation is a testament to its versatility. It’s a perfect starter for a dinner party, or as a quick and easy weeknight meal. Say goodbye to store-bought soups filled with preservatives and additives, and embrace a homemade, healthier alternative.

A small white bowl filled with Homemade Creamy Mushroom Soup garnished with olive oil, fresh thyme, black pepper and crispy mushrooms.

BEST MUSHROOMS FOR SOUP

Food markets currently offer a wide variety of mushrooms. So, how do you know what type of mushrooms are best for Creamy Mushroom Soup?

  • BUTTON MUSHROOMS are great as far as texture, but may not have as much flavor as other varieties of mushrooms.
  • CREMINI OR BABY BELLA MUSHROOMS are brown in color and due to their age, have more flavor than button mushrooms. Cremini mushrooms are always a great substitute for button mushrooms, and vice-versa.
  • SHIITAKE AND OYSTER MUSHROOMS can also be used for this hearty, Creamy Mushroom Soup. However, the chewiness of these mushroom varieties will alter the texture of the soup.

How to clean mushrooms:

  1. Inspect the Mushrooms: Examine each mushroom individually. Look for any visible dirt, blemishes, or dark spots. If you find damaged areas, cut them off with a knife.
  2. Avoid Soaking: Mushrooms are porous and can absorb water, which affects the texture and flavor. Avoid soaking them in water.
  3. Use a Brush: Instead of rinsing, use a mushroom brush to gently sweep away dirt and debris.
  4. Damp Cloth Method: If the mushrooms are not heavily soiled, you can use a damp paper towel or a clean kitchen towel to gently wipe the mushrooms, removing any dirt.
  5. Trim Stems (Optional): If the stems are tough or dirty, you can trim them slightly.
  6. Dry Thoroughly: After cleaning, place the mushrooms on a clean, dry towel to air dry for a few minutes. Pat them gently with a paper towel to remove excess moisture.
  7. Use Immediately: Once cleaned and dried, the mushrooms are ready to use in your favorite recipes. If you don’t plan to use them immediately, store them in a paper bag in the refrigerator. Avoid storing them in airtight containers as it can promote moisture and lead to spoilage.

HOW TO MAKE CREAMY MUSHROOM SOUP

  • Clean the mushrooms and slice.
  • Sauté the minced celery and shallots in the butter in a soup pot.
  • Add the mushrooms and fresh thyme. Season with salt and pepper. Allow to sweat down for about 15 minutes.
  • Dust with the flour. Cook off the raw flour taste for a few minutes.
  • Pour in the chicken stock. Simmer for 10-15 minutes.
  • Incorporate the heavy whipping cream and fresh chopped parsley. Simmer for another 5 minutes.
  • Crisp the reserved sliced mushrooms in a non-stick pan (optional).
  • Serve hot garnished with fresh thyme and a drizzle of olive oil.

TIPS FOR MAKING THE BEST HOMEMADE CREAMY MUSHROOM SOUP

As mentioned above, this delicious Mushroom Soup recipe is super quick and easy-to-prepare. The finished consistency would remind you of a Mushroom Chowder or Mushroom Bisque. Here are few tips to ensure this Cream of Mushroom Soup comes out perfectly, every single time:

  • To save time, purchase pre-sliced mushrooms
  • If you have time, slice on your own (be consistent with knife cuts)
  • Clean the mushrooms thoroughly
  • Allow the mushrooms to sweat down to at least half their size prior to dusting with flour
  • White or yellow onions can be substituted for shallots
  • Substitute the chicken stock with vegetable stock to create a vegetarian mushroom soup
  • Alternatively, use beef stock instead of chicken stock for a heartier soup
  • Once the stock has been incorporated, simmer until the soup has thickened
  • Half-and-half, coconut milk, sour cream, soy milk or a non-dairy heavy cream are great substitutes for heavy whipping cream (substitutes may alter the thickness of the soup)
  • Fresh thyme is best, but dried thyme can be used instead
  • For a creamier soup, blend prior to serving
  • Taste for salt throughout the cooking process
  • Optionally, garnish with a nice finishing oil and fresh chopped parsley

WHAT TO SERVE WITH CREAMY MUSHROOM SOUP

Creamy Mushroom Soup can be enjoyed as a meal, starter, or as a side dish. Here are some great ways to serve up this delicious and hearty soup:

  • with a sandwich
  • enjoyed with crusty bread
  • serve garnished with croutons (see below how I made my cheesy puff pastry croutons)
  • pair with a side salad or roasted vegetables
  • enjoy a cup as a start to a meal
  • pour inside a crispy puff pastry shell

How to make my cheesy puff pastry croutons

Grab a sheet of puff pastry. Cover half with shredded Gruyère cheese. Fold over. Press to seal the edges. Cut the pastry into small squares (the size of a crouton). Place on a parchment lined baking sheet. Brush the squares with an egg wash. Bake at 400° for about 15 minutes.

How to make a crispy puff pastry topping for Creamy Mushroom Soup!

Creating this crispy puff pastry topping looks difficult, but it’s really easy. Leave the mushroom soup as is, or pulse the soup with an immersion blender. (NOTE: Nutrition info does not include the puff pastry topping!)

Here’s what to do next:

  • Heat oven to 425°
  • Use only oven-safe soup bowls
  • Grab a sheet of cold puff pastry and turn out on a lightly dusted, flat surface
  • Turn the bowl upside down onto the dough
  • Using a knife, cut the dough about 3″ all around the bowl
  • Fill the soup bowls and place on a parchment lined baking pan
  • Brush the top of the puff pastry with an egg wash
  • Place dough (egg wash side up) on top of the bowl…do NOT allow the dough to touch the surface of the mushroom soup
  • Fold the dough around the edges of the bowl
  • Bake for 15 minutes, or until golden brown
creamy mushroom soup in a white bowl baked with a puff pastry topping

STORING LEFTOVER CREAMY MUSHROOM SOUP

As for storing this heavenly mushroom soup, simply transfer any leftovers into an airtight container and refrigerate for up to 3 days. Alternatively, freeze it in individual portions for a quick, reheatable meal.

To reheat, gently warm the soup on the stovetop over low heat, stirring occasionally to maintain its creamy consistency. A dollop of sour cream or a sprinkle of grated Parmesan cheese can revive its flavors, making it taste just as good as the day you made it.

MORE MUSHROOM RECIPE TO LOVE

Looking for more mushroom recipes? Check these out:

Print
clock clock iconcutlery cutlery iconflag flag iconfolder folder iconinstagram instagram iconpinterest pinterest iconfacebook facebook iconprint print iconsquares squares iconheart heart iconheart solid heart solid icon
A small white bowl filled with Homemade Creamy Mushroom Soup garnished with olive oil, fresh thyme, black pepper and crispy mushrooms.

Homemade Creamy Mushroom Soup


5 Stars 4 Stars 3 Stars 2 Stars 1 Star

No reviews

Description

Homemade Creamy Mushroom Soup is a rich, velvety soup made from fresh, wholesome ingredients. It is known for its comforting, earthy flavor profile. This mushroom soup’s simplicity in preparation is a testament to its versatility. It’s a perfect starter for a dinner party, or as a quick and easy weeknight meal.


Ingredients

Scale
  • 1 1/2 to 2 pounds baby bella (cremini) mushrooms, sliced (reserve about 1/2 cup)
  • 6 tablespoons butter
  • 1 shallot, minced
  • 1 stalk celery minced
  • 1 teaspoon kosher salt
  • 1 teaspoon black pepper
  • 1 tablespoon fresh thyme leaves, plus more for garnish
  • 6 tablespoons flour
  • 4 cups chicken stock
  • 1 cup heavy whipping cream
  • 2 tablespoons fresh parsley, chopped
  • 1 tablespoon olive oil
  • 1 teaspoon finishing oil, for garnish (optional)

Instructions

  1. Clean mushrooms and slice. Be sure to reserve about 1/2 cup to crisp up and use as a garnish.
  2. Melt the butter in a soup pot with the minced shallots and celery.
  3. Allow the vegetables to soften for a few minutes.
  4. Add the sliced mushrooms.
  5. Season with kosher salt, black pepper and fresh thyme.
  6. Allow the mushrooms to cook down for about 10 to 15 minutes.
  7. Dust the mushrooms with flour. Stir.
  8. Allow the raw flour taste to cook off for about two minutes.
  9. Pour in the stock. Scrape up the bits from the bottom.
  10. Simmer on medium-low for another 15 minutes.
  11. Incorporate the heavy whipping cream. 
  12. Simmer another 5 minutes. 
  13. Taste for salt.
  14. As the soup is in its final simmer, crisp up the reserved mushrooms in a pan with the oil. 
  15. Stir in the fresh chopped parsley.
  16. Pour into individual cups or bowls. 
  17. Garnish with fresh thyme, fresh parsley, drizzle of finishing oil, a few crispy mushrooms and croutons (optional).
  18. ENJOY!

Notes

  • To save time, purchase pre-sliced mushrooms.
  • Button mushrooms are a great alternative to cremini mushrooms.
  • If slicing, be consistent with knife cuts.
  • White or yellow onions can be used instead of shallots.
  • Use vegetable stock and a non-dairy heavy cream to make this a Vegan Mushroom Soup.
  • Half and half, coconut milk, sour cream and or soy milk can be used instead of heavy whipping cream.
  • Blend prior to serving for a creamier mushroom soup.
  • Taste for salt throughout the cooking process.
  • See post for additional notes/tips.
  • Leftovers can be stored in the fridge for up to 3 days, or frozen for up to 3 months.
  • Reheat gently on the stove.
  • Prep Time: 5 minutes
  • Cook Time: 35 minutes
  • Category: Soup, Bisque
  • Method: Easy
  • Cuisine: American

Nutrition

  • Serving Size: 1 serving

GET TO KNOW ME!

A photo of me in a black floral dress cooking at the stovetop at Williams-Sonoma

WELCOME! My name is Melissa Latin aka. Charlotte Fashion Plate. Happy to meet you! I am more than just recipes. I love fashion and style too! Most importantly, I love my Family (my Hubby and my Fur Babies). My Husband (aka my “Kitchen Bitch”) means the world to me. He’s pretty damn cool too. Not only is he one of the nicest guys you will ever meet, he also has had a lengthy career in professional hockey. Not only winning two Stanley Cups with the Pittsburgh Penguins in the early ’90’s, but most recently winning the Calder Cup with the Charlotte Checkers, amongst many other accolades. If you live in Charlotte and play hockey, or have a family member who plays, be sure to contact him!

Our life has changed dramatically in the past few years with the passing of our two goldendoodles, Vegas and Viva. We were lucky enough to have Vegas for five years (totally wish it was longer). Most recently, losing our Viva to a brain tumor in July of 2020. We welcomed our mini goldendoodle 7, almost seven years ago. We just added the amazing Hazel! Of course, I am always posting tons and tons of photos! Be sure to check out my recipe for Pet Bone Broth! This broth is super rich in nutrients and will provide your pet with a multitude of health benefits!

Let’s Get Social!

Be sure to follow me on social media! I’m always talking food, fashion, and family! I also love sharing some of my favorite Amazon Finds too. Click here to check out my Amazon page! FacebookInstagramTikTokTwitter and Pinterest! THANK YOU!

EASY CHICKEN AND MUSHROOMS

a cast iron pan of easy chicken and mushrooms
*This post may contain affiliate links. See my privacy statement for details.

So, it’s another weeknight and you are searching for a quick, and easy meal. Look no further than to this recipe for Easy Chicken and Mushrooms. As mentioned in a few of my recent blogs, my Hubby is currently on the keto diet. In the past few months, I have had to become very creative in the kitchen. See, I love pasta and potatoes. Well, so does he. However, he is doing great and has more willpower than I ever thought he did. This recipe was perfect for him. For me, one pan and dinner was DONE!

Of course, I created a short TikTok video making this recipe for Easy Chicken and Mushrooms. Click here to view. If you have not yet signed up for this social media platform, use my code 5SSIS800K0H06 to create an account.

a cast iron pan of easy chicken and mushrooms

TIPS FOR MAKING EASY CHICKEN WITH MUSHROOMS

CHICKEN

You may know by now that I am not much of a fan of dark meat. So, with that being said, I decided to use large, boneless chicken breasts. To make this recipe super quick to prepare, cut the chicken breasts in half, lengthwise. Yes, you can replace the breasts with boneless chicken thighs.

Additionally, if you have one, use a cast iron pan. The sear you will achieve on the chicken and mushrooms will provide for incredible flavor. In keeping this recipe keto friendly, I just coated the chicken breasts with a light dusting of freshly grated Parmesan cheese. If you are not concerned with keeping this recipe for Easy Chicken and Mushrooms keto, I would suggest coating the chicken with seasoned flour.

MUSHROOMS

In my opinion, variety is key. For this dish, I used both white (button), and baby bella (cremini) mushrooms. Once you have removed the chicken from the pan, add the mushrooms. Allow the mushrooms to cook down for a few minutes prior to seasoning with the kosher salt and black pepper. Turn up the heat to medium-high. This will allow the liquid to cook off and brown the mushrooms. Feel free to experiment with other types of mushrooms.

WHAT SIDE DISH TO SERVE WITH CHICKEN AND MUSHROOMS

If you plan on keeping this meal keto friendly, I would suggest serving it up, like I did with steamed broccoli. My Mashed Cauliflower, or a side salad would be great alternatives. However, if you do not care about adhering to keto, my Homemade Mashed Potatoes will be the most perfect side. Honestly, that is how I enjoyed mine. If you do not want to take the time to make your own mashed potatoes, Bob Evans are a really great substitute. ENJOY!

Print
clock clock iconcutlery cutlery iconflag flag iconfolder folder iconinstagram instagram iconpinterest pinterest iconfacebook facebook iconprint print iconsquares squares iconheart heart iconheart solid heart solid icon
a cast iron pan of easy chicken and mushrooms

EASY CHICKEN AND MUSHROOMS


5 Stars 4 Stars 3 Stars 2 Stars 1 Star

No reviews

Description

This Easy Chicken and Mushrooms is a perfect weeknight meal that is not only quick to prepare, but also keto friendly!


Ingredients

Scale
  • 2 boneless chicken breasts, sliced in half (horizontally)
  • 1/2 Cup Parmesan cheese, freshly grated
  • 1 Tablespoon olive oil
  • 8 ounces baby bella mushrooms, sliced
  • 10 ounces white mushrooms, sliced
  • 1 teaspoon kosher salt
  • 1/2 teaspoon black pepper
  • 1 shallot, minced
  • 2 garlic cloves, minced
  • 1/3 Cup white wine
  • 2 sprigs fresh thyme
  • 2 sprigs fresh rosemary
  • 1/2 Cup chicken stock
  • 1/2 Cup heavy whipping cream
  • 12 Tablespoons sun dried tomatoes (chopped)
  • fresh chopped parsley, garnish

Instructions

  1. Cut chicken breasts in half, horizontally.
  2. Heat the olive oil in a cast iron pan.
  3. Coat each breast with a light dusting of the Parmesan cheese.
  4. Brown the chicken on both sides. Plan on about four minutes per side. Remove from pan.
  5. Add the mushrooms to the pan and allow to cook down for a few minutes before seasoning them with kosher salt and black pepper.
  6. Turn up the heat to allow the moisture to cook off and brown the mushrooms.
  7. Turn the heat back down and add in the shallots and garlic. Cook for just a minute.
  8. Deglaze the pan with the white wine. Loosen up any browned bits from the bottom of the pan.
  9. Toss in the fresh herbs.
  10. Pour in the chicken stock and heavy whipping cream.
  11. Add in the sun dried tomatoes. Cook for another minute or two.
  12. Add back the chicken. Cook long enough to heat up the chicken.
  13. Plate. Garnish with fresh chopped parsley.
  14. See post for side dish recommendations. 

Notes

SEE POST FOR RECIPE TIPS

  • Prep Time: 5 minutes
  • Cook Time: 20

LET’S GET SOCIAL!

I am more than just recipes. I love fashion and style too! Most importantly, I love my Family (my Hubby and my Fur Babies). My Husband (aka my “Kitchen Bitch”) means the world to me. He’s pretty damn cool too. Not only is he one of the nicest guys you will ever meet, he also has had a lengthy career in professional hockey. Not only winning two Stanley Cups with the Pittsburgh Penguins in the early ’90’s, but most recently winning the Calder Cup with the Charlotte Checkers, amongst many other accolades. If you live in Charlotte and play hockey, or have a family member who plays, be sure to contact him. He is known as one of the best skate sharpeners in the world!

Our life has changed dramatically in the past few years with the passing of our two goldendoodles, Vegas and Viva. We were lucky enough to have Vegas for five years (totally wish it was longer). Most recently, losing our Viva to a brain tumor in July of 2020. We welcomed our mini goldendoodle 7, almost seven years ago. We just added the amazing Hazel! Of course, I am always posting tons and tons of photos! Be sure to check out my recipe for Pet Bone Broth! This broth is super rich in nutrients and will provide your pet with a multitude of health benefits!

Be sure to follow me on social media! I’m always talking food, fashion, and family! I also love sharing some of my favorite Amazon Finds too. Click here to check out my Amazon page! FacebookInstagramTikTokTwitter and Pinterest!

CROQUE MADAME

Croque Madam

Took a trip to France today. Well, in my mind, and in my kitchen. For the longest time, I have been wanting to create a recipe for a Croque Madame. Must admit, I am so glad I did! They were beyond amazing. Use a good quality French bread, or sourdough. In my opinion, go with sourdough. You must use shredded Gruyère cheese and great quality slices of ham. Want to make even a bit more fancier? Top with a perfect, sunny-side up duck egg.

This recipe will also work as a Croque Monsieur. Just leave out the egg! Click here to watch a short video I created on TikTok making this fabulous Croque Madame. If you have not yet signed up for this social media platform, use my code 5SSIS800K0H06 to create an account!

Croque Madame

BÉCHAMEL SAUCE FOR CROQUE MADAME

Prepare the bechamel sauce. Heat the heavy whipping cream in the microwave until warm. Pulse in thirty second increments. In a saucepan, add the butter. Allow to melt and foam. Whisk in the flour to create a roux. Cook off the flour taste. Slowly incorporate the warm cream with a whisk. Season with nutmeg, garlic powder, kosher salt and black pepper. Reserve.

HOW TO PREPARE A CROQUE MADAME

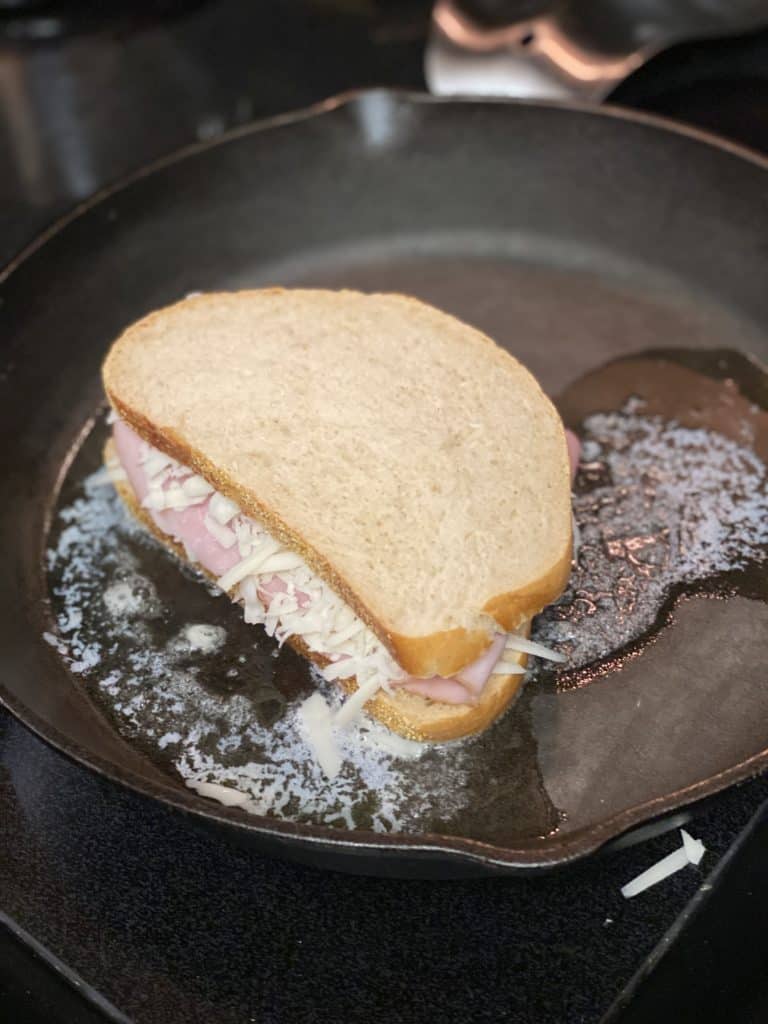
Lay four slices of bread on a flat surface. Cover two of the slices with a touch of dijon (side facing up). Add a layer of shredded Gruyère cheese on top of the dijon. Place two slices of ham on each. Follow with another layer of shredded Gruyère cheese. If you wish, you can add a layer of dijon to the top slice (inside).

You will not be buttering the outside of the bread as you normally would with a grilled cheese. They will brown up in the pan with the melted butter. Heat up two tablespoons of butter in a cast iron or non-stick pan.

Place sandwiches in pan. Allow to brown on both sides. If needed, grill in batches. Just be sure to add another tablespoon of butter to the cast iron pan before grilling the second sandwich. Remove the grilled sandwiches from pan. Place on a parchment lined baking pan. Turn the oven to broil.

Spoon the reserved béchamel sauce on the top of each sandwich. Add another generous layer of shredded Gruyère cheese on top of the béchamel. Place under broiler for about 4 to 5 minutes. You just want the cheese to melt and brown. While the sandwiches are broiling, fry the eggs to sunny side up. For this preparation, I used duck eggs. Honestly, I just love the color and size of the yolk. Feel free to substitute with regular eggs.

Remove the Croque Madame from the oven. Top each with the egg. Serve with a side salad, these roasted potatoes (recipe below), or with my Creamy Tomato Basil Soup.

Croque Madame

ROASTED POTATOES

Cut baking potatoes in half, lengthwise. Follow by cutting each half into three or four pieces. Place in a bowl. Coat with olive oil, kosher salt and black pepper. Bake at 410 degrees until crispy on the outside and tender on the inside.

LET’S GET SOCIAL!

I am more than just recipes. I love fashion and style too! Most importantly, I love my Family (my Hubby and my Fur Babies). My Husband (aka my “Kitchen Bitch”) means the world to me. He’s pretty damn cool too. Not only is he one of the nicest guys you will ever meet, he also has had a lengthy career in professional hockey. Not only winning two Stanley Cups with the Pittsburgh Penguins in the early ’90’s, but most recently winning the Calder Cup with the Charlotte Checkers, amongst many other accolades. If you live in Charlotte and play hockey, or have a family member who plays, be sure to contact him!

Our life has changed dramatically in the past few years with the passing of our two goldendoodles, Vegas and Viva. We were lucky enough to have Vegas for five years (totally wish it was longer). Most recently, losing our Viva to a brain tumor in July of 2020. We welcomed our mini goldendoodle 7, almost seven years ago. We just added the amazing Hazel! Of course, I am always posting tons and tons of photos! Be sure to check out my recipe for Pet Bone Broth! This broth is super rich in nutrients and will provide your pet with a multitude of health benefits!

FOLLOW ME!

Be sure to follow me on social media! I’m always talking food, fashion, and family! I also love sharing some of my favorite Amazon Finds too. Click here to check out my Amazon page! FacebookInstagramTikTokTwitter and Pinterest! THANK YOU!

LEMON CHICKEN

I have been making this Lemon Chicken recipe for almost 14 years. For me, it is one of those menu items that you probably thought you could never replicate at home…well you CAN! It’s one of my no-fail, go-to recipes that is super quick, and so easy to prepare. From start to finish you can have a fabulous meal for four in about a half hour and under $20. You will probably never order Lemon Chicken at a restaurant ever again. Want this dish using fish? Try my Grouper Piccata!

lemon chicken

Heat a pan to medium-high with a touch of olive oil (I would NOT recommend using a non-stick pan). If I am not cooking in cast iron, you will see me using All-Clad! Pound each chicken breast very thin. Season the chicken with salt/pepper. Dredge each piece in flour. Add to pan and allow the chicken to brown on both sides and cook thoroughly. Start preparing your pasta…you will be transferring it directly to the pan once it is al dente.

Transfer chicken to a platter and reserve. Add the shallots to pan along with the chicken broth. Scrape the brown bits to create thickness. Add the mushrooms and allow to cook just until they are soft. Add rosemary sprigs and heavy whipping cream.

Allow to simmer for just a few minutes to allow the sauce to thicken. Stir the juice of one lemon into the sauce. Fold in the pasta and coat with the sauce. Add the chicken back to the pan and allow to reheat just a minute in the sauce. Garnish the Lemon Chicken with capers. Add additional lemon to each serving if so desired. ENJOY!!!

a white bowl of lemon chicken

RIGATONI WITH CHICKEN IN A GORGONZOLA CREAM SAUCE

a bowl of rigatoni with chicken in a gorgonzola cream sauce

You will want to curl up on the couch with this comforting pasta dish. My recipe for Rigatoni with Chicken in a Gorgonzola Cream Sauce is super rich and decadent, yet simple to make. This pasta dish can be done in just about thirty minutes! Additionally, it is relatively inexpensive. You can feed your entire family tonight and still have leftovers for the next day!

Rigatoni with Chicken in a Gorgonzola Cream Sauce

HOW TO MAKE RIGATONI WITH CHICKEN IN A GORGONZOLA CREAM SAUCE

Start boiling a pot of water for the pasta. Do not forget to salt the water. Heat up one tablespoon olive oil in a deep pan. I love, love, love cooking with All-Clad. I have this set, and love every single piece.

Cut the chicken tenders into pieces about the size of the rigatoni. Season the chicken with kosher salt and black pepper. Add to the pan and allow to cook through. Try not to overcook. You want tender pieces of chicken in the finished dish. Once the chicken is cooked, transfer to a plate and reserve.

In the same pan, on medium-high heat, add the mushrooms. I like to cook mushrooms at a high temperature so that any water that is released, cooks off quickly. When the mushrooms are just about done, add in the garlic and continue cooking for just a few minutes. Do NOT allow the garlic to turn brown!

Start boiling the pasta. I’m in love with DeCecco. Their pasta turns out perfectly every single time. Cook to al dente! In a separate pan, toast up the walnuts. Be sure to keep a watchful eye on the nuts as they can burn easily!

Add about 10 ounces of the heavy whipping cream to the mushroom/garlic mixture Keep heat at medium-high and allow the cream to simmer and thicken. This should take about 8 to 10 minutes.

TO FINISH AND SERVE

The pasta should be just about done at this point. Drain. Do NOT rinse! Once thickened ,remove pan from heat and stir in the Parmesan cheese, very slowly. Mix in the Gorgonzola cheese. Add the chicken, toasted walnuts and fresh parsley. Toss to coat. If the sauce is too thick, add in the remaining few ounces of heavy whipping cream. I think I ended up using almost all of the 12 ounces, and maybe a little more.

Place cooked rigatoni in a bowl and pour sauce on top! Gently toss the pasta. Garnish individual servings with a few toasted walnuts and a touch of fresh parley. ENJOY this fabulous Rigatoni with Chicken in a Gorgonzola Cream Sauce!

Rigatoni with Chicken in a Gorgonzola Cream Sauce

There is something about pasta with chicken and cream. I also love this Garlic Mushroom Chicken with Tomato Pesto Cream.

garlic mushroom chicken in a cast iron pan with pasta

LET’S GET SOCIAL!

I am more than just recipes. I love fashion and style too! Most importantly, I love my Family (my Hubby and my Fur Babies). My Husband (aka my “Kitchen Bitch”) means the world to me. He’s pretty damn cool too. Not only is he one of the nicest guys you will ever meet, he also has had a lengthy career in professional hockey. Not only winning two Stanley Cups with the Pittsburgh Penguins in the early ’90’s, but most recently winning the Calder Cup with the Charlotte Checkers, amongst many other accolades. If you live in Charlotte and play hockey, or have a family member who plays, be sure to contact him. He is known as one of the best skate sharpeners in the world!

Our life has changed dramatically in the past few years with the passing of our two goldendoodles, Vegas and Viva. We were lucky enough to have Vegas for five years (totally wish it was longer). Most recently, losing our Viva to a brain tumor in July of 2020. We welcomed our mini goldendoodle 7, almost seven years ago. We just added the amazing Hazel! Of course, I am always posting tons and tons of photos! Be sure to check out my recipe for Pet Bone Broth! This broth is super rich in nutrients and will provide your pet with a multitude of health benefits!

Be sure to follow me on social media! I’m always talking food, fashion, and family! I also love sharing some of my favorite Amazon Finds too. Click here to check out my Amazon page! FacebookInstagramTikTokTwitter and Pinterest!

CHICKEN CORDON BLEU

Chicken Cordon Bleu with pasta

I cannot believe I waited this long to create a recipe for Chicken Cordon Bleu. Crispy outside with melty goodness inside. What more could you want? I have to admit though, am not much of a fan of Swiss cheese. So, I substituted with Gruyère cheese. In my opinion, the substitution only made this recipe better!

Yes, there are definitely a few more steps to this recipe than my usual. However, it is relatively easy. Make a few extra. Leftovers are a blessing and can be enjoyed for up to two days in the fridge. Plan on at least one piece of chicken per person. This recipe will yield two servings.

a wooden platter of chicken cordon bleu cut in half

HOW TO PREPARE CHICKEN CORDON BLEU

PREPARING AND STUFFING THE CHICKEN

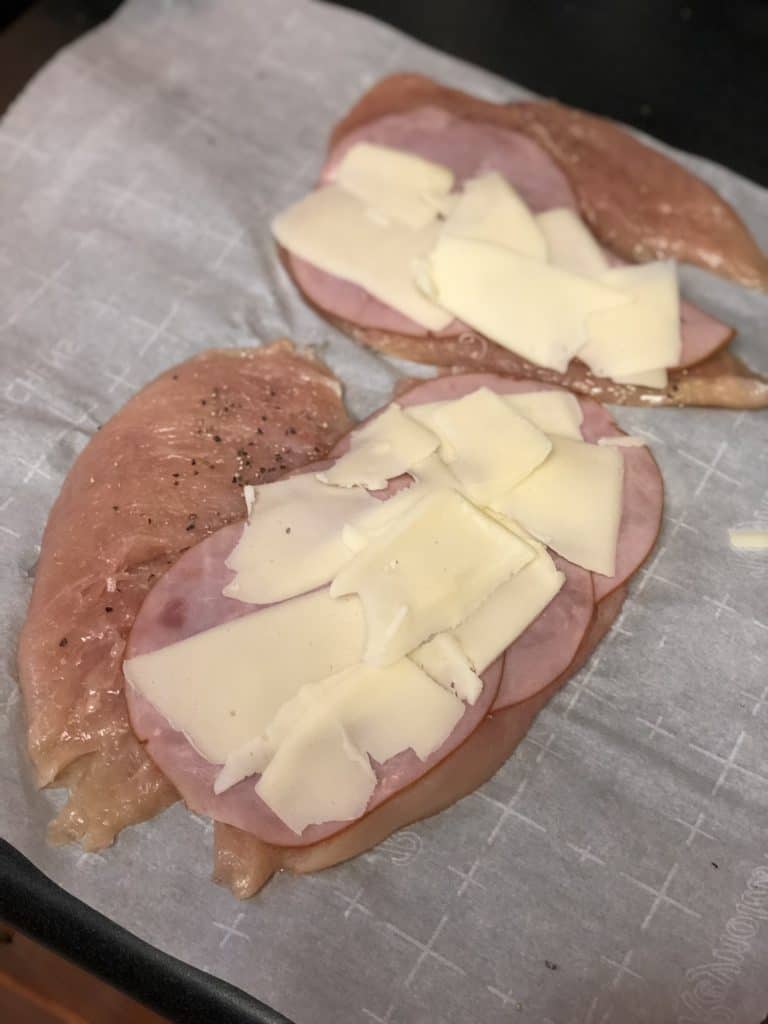
Cut each chicken breast in half. Be mindful not to cut all the way through. Leave the breast attached at one side. Lay each split breast between sheets of parchment paper and pound as thin as you can get without breaking the flesh. Season both sides with kosher salt and black pepper.

Top one side of the inside of each chicken breasts with the deli ham and Gruyère cheese.

Fold the other side of the chicken breast over and tuck in the ham and cheese. Secure tightly with long toothpicks (do not forget to remove before serving). Try to seal as much as the edges as you can with the toothpicks. You will need about six for each breast.

DREDGING AND FRYING THE CHICKEN

Heat oven to 350 degrees. Prepare a dredging station. Add enough flour in a bowl for both breasts. Season with kosher salt, black pepper and a few dashes of paprika. In a separate bowl, whisk the eggs with the heavy cream. In a third bowl, mix well, both types of breadcrumbs.

dredging station for chicken cordon bleu

Heat up canola oil in a frying or cast iron pan. You just want enough oil in the pan to cover the chicken breast about halfway. Dredge each piece of chicken in the flour, then the egg, then coat with the breadcrumbs. Be sure that the entire piece is fully coated. This will help to secure the cheese/ham inside.

Place chicken in hot oil and brown on both sides.

Once browned, remove chicken and drain any excess grease. Salt. Place chicken on parchment lined baking sheet. Bake in oven for at least 20 to 25 minutes. I did turn my halfway through baking.

DIJON SAUCE FOR CHICKEN CORDON BLEU

While the chicken is baking, and close to being finished, prepare the dijon sauce. In a saucepan, melt a tablespoon of butter. Add a tablespoon of flour and cook for about a minute or so just to get rid of the raw flour taste. Whisk in the heavy whipping cream, Dijon mustard and nutmeg. Allow to thicken to a sauce-like consistency. If you notice that the sauce is a little too thick, add a touch more heavy cream. I kind of sucked at photographing the sauce on the finished chicken, but the taste was amazing! See photo below!

TO FINISH AND SERVE THE CHICKEN CORDON BLEU

Remove chicken from oven and allow to rest for a few minutes.

Be sure to remove all toothpicks. Plate the chicken. Top with the Dijon cream sauce, or on the side. Serve up this fabulous Chicken Cordon Bleu with a side of my Broccoli Pasta. ENJOY!!!

LET’S GET SOCIAL!

I am more than just recipes. I love fashion and style too! Most importantly, I love my Family (my Hubby and my Fur Babies). My Husband (aka my “Kitchen Bitch”) means the world to me. He’s pretty damn cool too. Not only is he one of the nicest guys you will ever meet, he also has had a lengthy career in professional hockey. Not only winning two Stanley Cups with the Pittsburgh Penguins in the early ’90’s, but most recently winning the Calder Cup with the Charlotte Checkers, amongst many other accolades. If you live in Charlotte and play hockey, or have a family member who plays, be sure to contact him. He is known as one of the best skate sharpeners in the world!

Our life has changed dramatically in the past few years with the passing of our two goldendoodles, Vegas and Viva. We were lucky enough to have Vegas for five years (totally wish it was longer). Most recently, losing our Viva to a brain tumor in July of 2020. We welcomed our mini goldendoodle 7, almost seven years ago. We just added the amazing Hazel! Of course, I am always posting tons and tons of photos! Be sure to check out my recipe for Pet Bone Broth! This broth is super rich in nutrients and will provide your pet with a multitude of health benefits!

Be sure to follow me on social media! I’m always talking food, fashion, and family! I also love sharing some of my favorite Amazon Finds too. Click here to check out my Amazon page! FacebookInstagramTikTokTwitter and Pinterest!