NUT ROLLS

two nut rolls on a pan

Nut rolls have been a tradition in my Family for as long as I can remember. My Baba made them…my Mom still makes them…I however, never did until today. As I have said so many times before…I am not much of a baker…don’t really like to measure and baking is an exact science. However, I thought I would give it a whirl…they actually turned out pretty darn good. I used an old recipe from a Serbian cookbook that my Mom bought from the church many, many moons ago. She updated just a bit by using rapid rise yeast. The incorporation of sour cream makes this dough so easy to work with.

My update included tons and tons of filling…maybe just a bit too much. May or may not scale that back next time. So…here it is…one of my Family’s Serbian traditions. They are actually not that difficult to make…just a bit time consuming…think I may tackle mini-sized the next go round…what do you think?

two nut rolls in a pan

I filled these with ground walnuts, but I equally like them filled with apricot. You can also fill with poppyseed. Be sure to have something handy to grind the nuts. I actually used a mini-chopper like this one. You really want a fine grind on the nuts. My Mom, still to this day, uses a hand grinder! This recipe will make about six rolls. NOTE: The ingredients for the nut filling is for one roll.

Be sure that all of the ingredients are at room temperature. Grind the nuts in a chopper, hand grinder or food processor. You want the consistency of the nuts to be fine. I ground about 30 ounces of whole walnuts to get close to eight cups of ground.

After you have ground all of the nuts, place four cups in a bowl with the granulated sugar. Heat up a few tablespoons of milk and add to the nut/sugar mixture, a little bit at a time. You are just looking for a paste-like consistency that you can spread easily. You do NOT want the mixture to be watery. You may or may not use all of the milk. Set aside and prepare your dough.

In a large bowl, sift together the flour, salt and sugar. Incorporate the butter. You will notice it is a little crumbly at this point…that is ok. work in the sour cream. Add in the eggs. Combine. Do all of this by hand. You never want this dough to over mix. In a separate bowl, warm up the milk in the microwave. Stir the yeast into the warm milk. Allow to dissolve. Incorporate the milk/yeast mixture into the dough. Mix just until everything is combined. Do NOT overwork your dough.

You do not need to allow the dough to rise at this point. Cut dough into 6 equal portions. Roll one portion of dough on lightly floured surface. I like mine thin…but would probably roll just a little thicker next time due to the amount of nut mixture I filled them with. Place a thin layer of butter on dough surface.

Place enough of the nut mixture to cover the dough. I used almost all of the mixture. I would probably cut back just a little next time. Roll from the longest side and place on parchment lined baking sheet, seam side down. You can typically fit two rolls in a pan. Cover the nuts rolls. Place in a warm area and allow to rise for at least two hours.

Once the nut rolls have risen, heat oven to 350 degrees. Bake until golden brown. This will take about 25 to 30 minutes. In the last few minutes of baking, rub the tops of the rolls with butter. This will make them nice and golden brown. Remove from oven and allow to cool a bit before cutting. ENJOY!!!

two nut rolls in a pan

Click here for more of my baking ideas!

LET’S GET SOCIAL!

I am more than just recipes. I love fashion and style too! Most importantly, I love my Family (my Hubby and my Fur Babies). My Husband (aka my “Kitchen Bitch”) means the world to me. He’s pretty damn cool too. Not only is he one of the nicest guys you will ever meet, he also has had a lengthy career in professional hockey. Not only winning two Stanley Cups with the Pittsburgh Penguins in the early ’90’s, but most recently winning the Calder Cup with the Charlotte Checkers, amongst many other accolades. If you live in Charlotte and play hockey, or have a family member who plays, be sure to contact him!

Our life has changed dramatically in the past few years with the passing of our two goldendoodles, Vegas and Viva. We were lucky enough to have Vegas for five years (totally wish it was longer). Most recently, losing our Viva to a brain tumor in July of 2020. We welcomed our mini goldendoodle 7, almost seven years ago. We just added the amazing Hazel! Of course, I am always posting tons and tons of photos! Be sure to check out my recipe for Pet Bone Broth! This broth is super rich in nutrients and will provide your pet with a multitude of health benefits!

FOLLOW ME!

Be sure to follow me on social media! I’m always talking food, fashion, and family! I also love sharing some of my favorite Amazon Finds too. Click here to check out my Amazon page! Facebook, Instagram, TikTok, Twitter and Pinterest! THANK YOU!

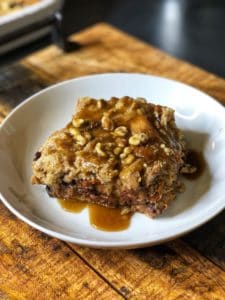
BANANA CHOCOLATE BREAD PUDDING

Banana Chocolate Bread Pudding

In a former life, I used to have this special Friend who would pick me up once a week in a stretch limo. No kidding! It was about an hours drive to downtown Pittsburgh, where he loved to have lunch at one of his favorite spots, Ruth’s Chris. Not only do I have the fondest memories of those weekly trips, but also the amazing Chocolate Bread Pudding we always had for dessert! As much as I am a self-proclaimed NON-BAKER. I have been getting into it a lot more lately. I just had to try this fabulous recipe for Banana Chocolate Bread Pudding. See, I love FALL. FALL everything. It may still be the last dog days of Summer, but my mind is already thinking about Fall and Winter recipes! The original version of this recipe I found on Pinterest and can be viewed by clicking here! I just made a few slight changes. So grab four ripe bananas and a loaf of challah. I found this amazing one at Harris Teeter from Zaro’s Bakery!

A piece of Banana Chocolate Bread Pudding with Caramel Sauce

Let’s talk bread. The original recipe called for french bread. You can definitely use that, if you wish. However, I was strolling the bakery aisle in my local Harris Teeter trying to find french bread for this recipe and I came across this lovely Challah bread and decided to use this instead. So very glad I did! Cut the bread into one inch cubes and place in a large bowl. I used this huge stainless steel bowl. Grab one for yourself by clicking here! I use this bowl quite often. Definitely worth the investment.

Mash your bananas in a plate or bowl. In a separate bowl, combine and mix well the eggs, cream, milk, condensed milk, brown sugar, vanilla, cinnamon, nutmeg, allspice, and salt.

Add in the mashed bananas, one cup of the chopped walnuts, and the chocolate chips. Stir to combine. I tried this recipe using regular sized chocolate chips and mini…use the mini…the larger chips have a tendency to create a bitter taste…not the case with the mini chocolate chips! Pour custard mixture onto the cubed bread and fold well so as to coat every single piece of bread.

Heat oven to 350 degrees. Allow the bread to soak and absorb the custard for at least 20 minutes. Mix a few times during the soak.

Prepare a baking dish (9×13), by spraying with non-stick spray. Spread the bread pudding mixture evenly and allow to bake for about an hour. At about the 40-minute mark…top with the remaining chopped walnuts. The Chocolate Banana Bread pudding is done when the middle is set. I have made this twice and the first time it took the entire hour and the second, it was done in 50 minutes. Check often after 45 minutes by placing a knife in middle. If it comes out clean, it’s done. Try hard NOT over bake. Remove from oven and allow to cool for a few minutes in the baking dish while your prepare the caramel sauce.

Banana Chocolate Bread Pudding

In a microwave safe bowl, combine all of the ingredients for the caramel sauce. Microwave for thirty seconds…remove and stir…continue this in thirty second intervals until the sauce is bubbling…should take about a minute and a half to two minutes.

Cut the Chocolate Banana Bread Pudding into squares and top with the caramel sauce and ENJOY!!! Get creative. Use this basic custard mixture and create your own version! Please leave comments below!!! If you like to sous vide, check out my recipe for Sous Vide Bread Pudding.

A piece of Banana Chocolate Bread Pudding with Caramel Sauce

LET’S GET SOCIAL!

I am more than just recipes. I love fashion and style too! Most importantly, I love my Family (my Hubby and my Fur Babies). My Husband (aka my “Kitchen Bitch”) means the world to me. He’s pretty damn cool too. Not only is he one of the nicest guys you will ever meet, he also has had a lengthy career in professional hockey. Not only winning two Stanley Cups with the Pittsburgh Penguins in the early ’90’s, but most recently winning the Calder Cup with the Charlotte Checkers, amongst many other accolades. If you live in Charlotte and play hockey, or have a family member who plays, be sure to contact him!

Our life has changed dramatically in the past few years with the passing of our two goldendoodles, Vegas and Viva. We were lucky enough to have Vegas for five years (totally wish it was longer). Most recently, losing our Viva to a brain tumor in July of 2020. We welcomed our mini goldendoodle 7, almost seven years ago. We just added the amazing Hazel! Of course, I am always posting tons and tons of photos! Be sure to check out my recipe for Pet Bone Broth! This broth is super rich in nutrients and will provide your pet with a multitude of health benefits!

FOLLOW ME!

Be sure to follow me on social media! I’m always talking food, fashion, and family! I also love sharing some of my favorite Amazon Finds too. Click here to check out my Amazon page! Facebook, Instagram, TikTok, Twitter and Pinterest! THANK YOU!

SPICY HONEY WALNUT CHICKEN

I’m typically not much of a honey lover. However, I happened upon this spicy version of honey at Magnolia Emporium a few months ago, Mike’s Hot Honey So, I created this recipe for Spicy Honey Walnut Chicken.

I used it in a shrimp recipe that received rave reviews. Click here to check out my recipe for Spicy Shrimp with Brussels Sprouts. I decided to see what I could create with chicken. Keep in mind you can substitute the chicken with shrimp, pork, salmon or even beef.

a bowl of spicy honey walnut chicken

In a bowl, combine the hot honey, olive oil, paprika, crushed red pepper, garlic, orange blossom honey, lemon juice, salt and pepper. Cut the chicken into bite size pieces. Add to the bowl with the marinade.

Allow the chicken to marinate for at least an hour. Overnight is fine too.

Chicken with Marinade

Prepare you favorite rice while the chicken is marinating. I used jasmine rice. For a quick alternative to making your own rice, I often use the Basmati or Thai Jasmine rice from Veetee.

Cut the green beans into one inch pieces. Heat a cast iron skillet to medium high with the coconut oil. Add the green beans and sear for about four minutes. They should turn slightly golden brown, but still have that snap. Remove green beans and reserve.

green beans searing in a cast iron pan

To the same pan, add about the walnuts and brown for about a minute. Be sure to watch these carefully and keep stirring. Nuts can burn easily. Remove nuts from pan and reserve with the green beans.

walnuts toasting in a cast iron pan

Add the chicken with the marinade to the cast iron pan. Brown until the chicken is fully cooked and marinade has caramelized. This should take about 6 to 8 minutes.

chicken cooking in a cast iron pan

Add the green beans and walnuts to the pan with the chicken. Toss to heat through. Serve on top of your cooked rice. ENJOY this easy weeknight meal of Spicy Honey Walnut Chicken.

LEMON CHICKEN

I have been making this Lemon Chicken recipe for almost 14 years. For me, it is one of those menu items that you probably thought you could never replicate at home…well you CAN! It’s one of my no-fail, go-to recipes that is super quick, and so easy to prepare. From start to finish you can have a fabulous meal for four in about a half hour and under $20. You will probably never order Lemon Chicken at a restaurant ever again. Want this dish using fish? Try my Grouper Piccata!

lemon chicken

Heat a pan to medium-high with a touch of olive oil (I would NOT recommend using a non-stick pan). If I am not cooking in cast iron, you will see me using All-Clad! Pound each chicken breast very thin. Season the chicken with salt/pepper. Dredge each piece in flour. Add to pan and allow the chicken to brown on both sides and cook thoroughly. Start preparing your pasta…you will be transferring it directly to the pan once it is al dente.

Transfer chicken to a platter and reserve. Add the shallots to pan along with the chicken broth. Scrape the brown bits to create thickness. Add the mushrooms and allow to cook just until they are soft. Add rosemary sprigs and heavy whipping cream.

Allow to simmer for just a few minutes to allow the sauce to thicken. Stir the juice of one lemon into the sauce. Fold in the pasta and coat with the sauce. Add the chicken back to the pan and allow to reheat just a minute in the sauce. Garnish the Lemon Chicken with capers. Add additional lemon to each serving if so desired. ENJOY!!!

a white bowl of lemon chicken

RIGATONI WITH CHICKEN IN A GORGONZOLA CREAM SAUCE

a bowl of rigatoni with chicken in a gorgonzola cream sauce

You will want to curl up on the couch with this comforting pasta dish. My recipe for Rigatoni with Chicken in a Gorgonzola Cream Sauce is super rich and decadent, yet simple to make. This pasta dish can be done in just about thirty minutes! Additionally, it is relatively inexpensive. You can feed your entire family tonight and still have leftovers for the next day!

Rigatoni with Chicken in a Gorgonzola Cream Sauce

HOW TO MAKE RIGATONI WITH CHICKEN IN A GORGONZOLA CREAM SAUCE

Start boiling a pot of water for the pasta. Do not forget to salt the water. Heat up one tablespoon olive oil in a deep pan. I love, love, love cooking with All-Clad. I have this set, and love every single piece.

Cut the chicken tenders into pieces about the size of the rigatoni. Season the chicken with kosher salt and black pepper. Add to the pan and allow to cook through. Try not to overcook. You want tender pieces of chicken in the finished dish. Once the chicken is cooked, transfer to a plate and reserve.

In the same pan, on medium-high heat, add the mushrooms. I like to cook mushrooms at a high temperature so that any water that is released, cooks off quickly. When the mushrooms are just about done, add in the garlic and continue cooking for just a few minutes. Do NOT allow the garlic to turn brown!

Start boiling the pasta. I’m in love with DeCecco. Their pasta turns out perfectly every single time. Cook to al dente! In a separate pan, toast up the walnuts. Be sure to keep a watchful eye on the nuts as they can burn easily!

Add about 10 ounces of the heavy whipping cream to the mushroom/garlic mixture Keep heat at medium-high and allow the cream to simmer and thicken. This should take about 8 to 10 minutes.

TO FINISH AND SERVE

The pasta should be just about done at this point. Drain. Do NOT rinse! Once thickened ,remove pan from heat and stir in the Parmesan cheese, very slowly. Mix in the Gorgonzola cheese. Add the chicken, toasted walnuts and fresh parsley. Toss to coat. If the sauce is too thick, add in the remaining few ounces of heavy whipping cream. I think I ended up using almost all of the 12 ounces, and maybe a little more.

Place cooked rigatoni in a bowl and pour sauce on top! Gently toss the pasta. Garnish individual servings with a few toasted walnuts and a touch of fresh parley. ENJOY this fabulous Rigatoni with Chicken in a Gorgonzola Cream Sauce!

Rigatoni with Chicken in a Gorgonzola Cream Sauce

There is something about pasta with chicken and cream. I also love this Garlic Mushroom Chicken with Tomato Pesto Cream.

garlic mushroom chicken in a cast iron pan with pasta

LET’S GET SOCIAL!

I am more than just recipes. I love fashion and style too! Most importantly, I love my Family (my Hubby and my Fur Babies). My Husband (aka my “Kitchen Bitch”) means the world to me. He’s pretty damn cool too. Not only is he one of the nicest guys you will ever meet, he also has had a lengthy career in professional hockey. Not only winning two Stanley Cups with the Pittsburgh Penguins in the early ’90’s, but most recently winning the Calder Cup with the Charlotte Checkers, amongst many other accolades. If you live in Charlotte and play hockey, or have a family member who plays, be sure to contact him. He is known as one of the best skate sharpeners in the world!

Our life has changed dramatically in the past few years with the passing of our two goldendoodles, Vegas and Viva. We were lucky enough to have Vegas for five years (totally wish it was longer). Most recently, losing our Viva to a brain tumor in July of 2020. We welcomed our mini goldendoodle 7, almost seven years ago. We just added the amazing Hazel! Of course, I am always posting tons and tons of photos! Be sure to check out my recipe for Pet Bone Broth! This broth is super rich in nutrients and will provide your pet with a multitude of health benefits!

Be sure to follow me on social media! I’m always talking food, fashion, and family! I also love sharing some of my favorite Amazon Finds too. Click here to check out my Amazon page! FacebookInstagramTikTokTwitter and Pinterest!