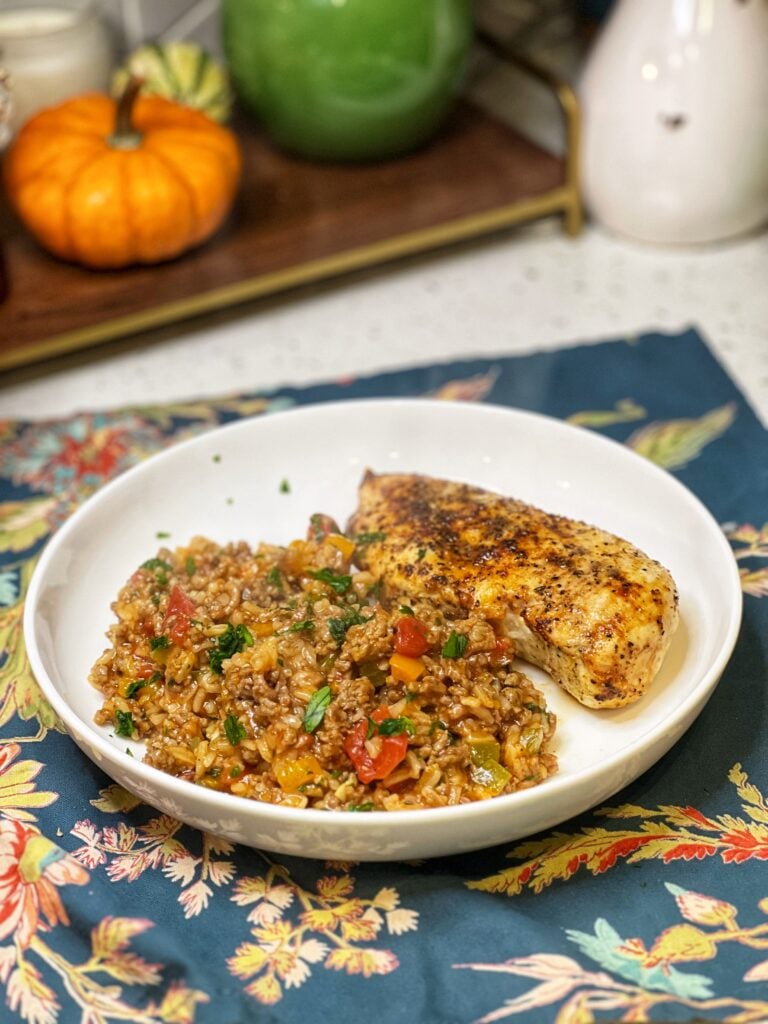
Ground Beef and Rice Skillet

Ground Beef and Rice Skillet in a pan with bell peppers, ground beef and rice in a tomatoey sauce.

You can always use another great ground beef recipe in your weeknight rotation, and this Ground Beef and Rice Skillet is one to save. It’s hearty, filling, and made with simple ingredients you probably already have on hand. The peppers, onions, garlic, and fire-roasted tomatoes bring depth and flavor, while the rice cooks right in the same pan, making this a true one-pan dinner with minimal cleanup.

This one-pan beef and rice dish is the kind of cozy, satisfying meal that comes together easily, tastes like comfort, and makes great leftovers, too.

Why You Will Love This Beef and Rice Recipe

  • One Pan, Less Mess: Everything cooks in the same skillet, meaning no extra pots and pans to clean.
  • Budget-Friendly: This ground beef and rice skillet uses everyday ingredients like ground beef, rice, and canned tomatoes.
  • Customizable: Easy to adjust seasonings, spice level, and even protein based on what you have on hand.
  • Comforting and Flavorful: The toasted tomato paste, fire-roasted tomatoes, and Italian seasoning give deep, rich flavor to this Ground Beef and Rice Skillet.

Ingredient Substitutions

  • Ground Beef: Easily substitute with ground turkey, chicken, pork, or sausage all work well.
  • Rice: Jasmine or basmati rice may be used (same measurement). Avoid instant rice.
  • Bell Peppers: Use your favorite color.
  • Fire Roasted Tomatoes: Regular diced tomatoes work, if fire-roasted aren’t available.
  • Chicken Stock: Beef stock can be used for a deeper flavor.

How to Prepare Ground Beef and Rice

  1. Heat a large, deep skillet over medium-high heat. Add the ground beef and season with the salt, black pepper, and garlic powder. Brown the beef, breaking it up as it cooks.
  2. Add the onion, green bell pepper, orange bell pepper, and garlic. Sauté for 3–4 minutes, or until the vegetables soften.
  3. Stir in the tomato paste and cook for 2 minutes, allowing it to toast and deepen in flavor.
  4. Add the rice and stir to coat the grains in the tomato mixture for 30–60 seconds.
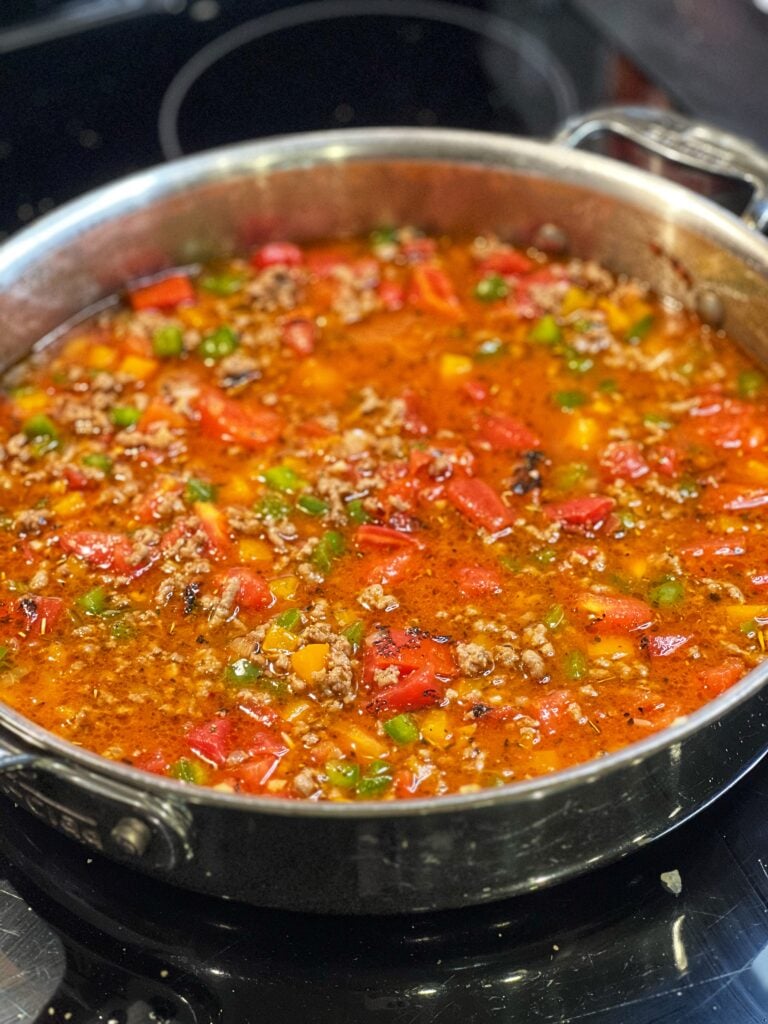
  5. Add the fire-roasted tomatoes (including the liquid), then season with a pinch of salt, Italian seasoning, and crushed red pepper flakes. Stir well.
  6. Pour in the chicken stock and bring the mixture just to a gentle boil.
  7. Reduce heat to low, cover, and simmer for 15–20 minutes, stirring occasionally to ensure the rice does not stick to the bottom of the skillet. Cook until the liquid has absorbed and the rice is tender. Add a splash more broth, if needed.
  8. Stir in fresh parsley just before serving. Taste and adjust salt, if needed.
How to Serve and Store

  • Serve this ground beef and rice skillet on its own for a complete meal, or pair with a side salad or air fryer chicken breast.
  • Top with shredded cheese and let it melt before serving (optional, but delicious).
  • Store leftovers in an airtight container in the fridge for up to 3 days.
  • Reheat gently in a skillet with a splash of broth or water to loosen.
  • This ground beef and rice skillet freezes well up to 2 months. Thaw overnight in the fridge before reheating.

Frequently Asked Questions

  • Can I use brown rice instead of white rice? You can, but the cooking time and liquid amount will change. Brown rice requires nearly double the liquid and 45–50 minutes to become tender. For a true one-pan quick dinner, long-grain white rice is best.
  • What if the rice isn’t fully cooked when the liquid is gone? Just add a splash of broth (or water), cover, and continue to simmer. Stir occasionally to prevent sticking.
  • Can I add more vegetables? Absolutely. Mushrooms, zucchini, corn, diced carrots, or spinach work well. Add heartier vegetables (like mushrooms and carrots) with the peppers. Stir tender greens (like spinach) in at the very end.
  • How can I make it spicier? Increase the crushed red pepper flakes, add cayenne, or stir in a little hot sauce before serving.
  • Can I make this cheesy? Definitely. Stir in shredded Monterey Jack, cheddar, or mozzarella at the end and let it melt before serving. It turns the dish creamy and comforting.

More Easy Ground Beef Recipes to Love

Print
clock clock iconcutlery cutlery iconflag flag iconfolder folder iconinstagram instagram iconpinterest pinterest iconfacebook facebook iconprint print iconsquares squares iconheart heart iconheart solid heart solid icon
Ground Beef and Rice Skillet in a pan with bell peppers, ground beef and rice in a tomatoey sauce.

Ground Beef and Rice Skillet


5 Stars 4 Stars 3 Stars 2 Stars 1 Star

No reviews

Description

You can always use another great ground beef recipe in your weeknight rotation, and this one-pan Ground Beef and Rice Skillet is one to save. It’s hearty, filling, and made with simple ingredients you probably already have on hand.


Ingredients

Units Scale
  • 1 lb ground beef (80/20 is best)
  • 1/2 teaspoon salt (plus a pinch more later)
  • 1 teaspoon black pepper
  • 1 teaspoon garlic powder
  • 1 small yellow onion, diced
  • 1 green bell pepper, diced
  • 1 orange or red bell pepper, diced
  • 3 cloves garlic, minced
  • 1 1/2 tablespoons tomato paste
  • 1 1/4 cups long-grain white rice (uncooked)
  • 1 (14.5 oz) can fire-roasted diced tomatoes, undrained
  • 1 teaspoon Italian seasoning
  • 1/2 teaspoon crushed red pepper flakes (optional)
  • 1 3/4 cups chicken stock
  • Fresh parsley, chopped (for finishing)

Instructions

  1. Heat a large, deep skillet over medium-high heat. Add the ground beef and season with the salt, black pepper, and garlic powder. Brown the beef, breaking it up as it cooks. Remove any excess grease, if needed.
  2. Add the onion, green bell pepper, orange bell pepper, and garlic. Sauté for 3–4 minutes, or until the vegetables soften.
  3. Stir in the tomato paste and cook for 2 minutes, allowing it to toast and deepen in flavor.
  4. Add the rice and stir to coat the grains in the tomato mixture for 30–60 seconds.
  5. Add the fire-roasted tomatoes (including the liquid), then season with a pinch of salt, Italian seasoning, and crushed red pepper flakes. Stir well.
  6. Pour in the chicken stock and bring the mixture just to a gentle boil.
  7. Reduce heat to low, cover, and simmer for 15–20 minutes, stirring occasionally to ensure the rice does not stick to the bottom of the skillet. Cook until the liquid has absorbed and the rice is tender. Add a splash more broth, if needed.
  8. Stir in fresh parsley just before serving. Taste and adjust salt, if needed.
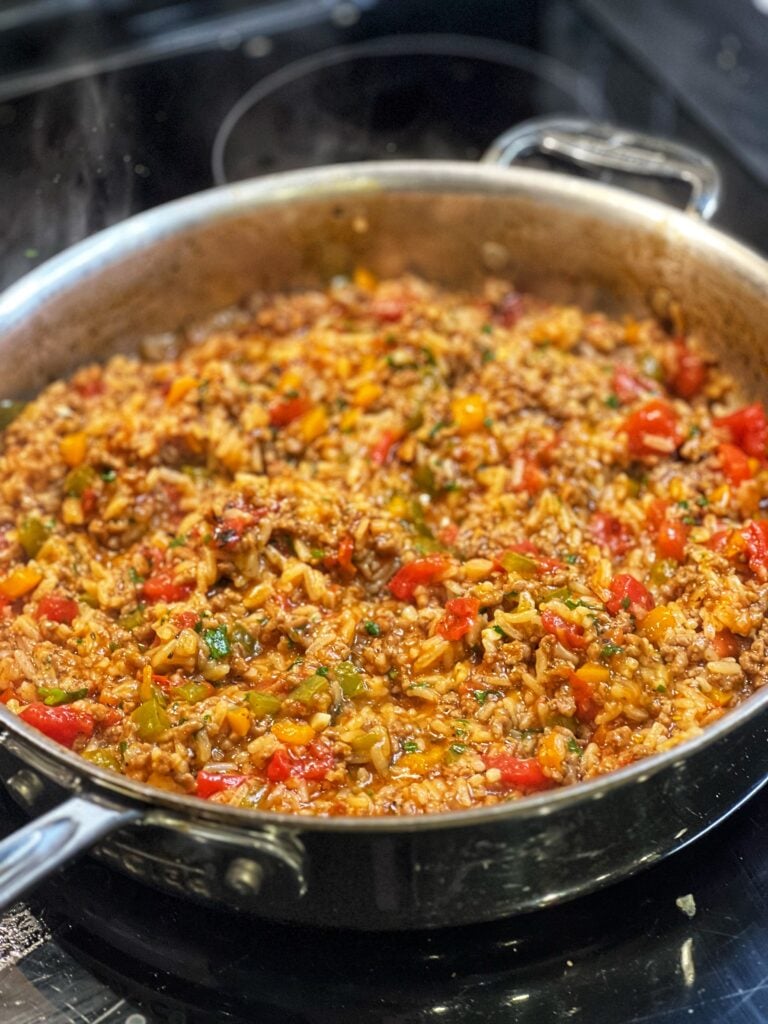
  9. ENJOY!

Notes

  • Letting the tomato paste cook for a minute or two deepens the flavor and adds richness to the dish.
  • Stir occasionally to prevent the rice from sticking to the bottom of the skillet while it simmers.
  • If the rice needs just a bit longer, add a splash of stock and continue to simmer covered.
  • Taste once the rice is cooked — the flavors develop as it simmers, and you may want to add another pinch of salt.
  • Stir shredded cheddar or Monterey Jack into the skillet before serving for a creamy finish.
  • Add a splash of broth when reheating to bring back moisture.
  • Prep Time: 5 minutes
  • Cook Time: 25 minutes
  • Category: Side Dish, Dinner
  • Method: Easy
  • Cuisine: American

GET TO KNOW ME!

A photo of me in a black floral dress cooking at the stovetop at Williams-Sonoma

WELCOME! My name is Melissa Latin aka. Charlotte Fashion Plate. Happy to meet you! I am more than just recipes. I love fashion and style too! Most importantly, I love my Family (my Hubby and my Fur Babies). My Husband (aka my “Kitchen Bitch”) means the world to me. He’s pretty damn cool too. Not only is he one of the nicest guys you will ever meet, he also has had a lengthy career in professional hockey. Not only winning two Stanley Cups with the Pittsburgh Penguins in the early ’90’s, but most recently winning the Calder Cup with the Charlotte Checkers, amongst many other accolades. If you live in Charlotte and play hockey, or have a family member who plays, be sure to contact him!

Our life has changed dramatically in the past few years with the passing of our two goldendoodles, Vegas and Viva. We were lucky enough to have Vegas for five years (totally wish it was longer). Most recently, losing our Viva to a brain tumor in July of 2020. We welcomed our mini goldendoodle 7, almost seven years ago. We just added the amazing Hazel! Of course, I am always posting tons and tons of photos! Be sure to check out my recipe for Pet Bone Broth! This broth is super rich in nutrients and will provide your pet with a multitude of health benefits!

In addition, I’m so very excited to announce I have published my first e-book and paperback, “Mastering Thanksgiving – A Guide to Perfecting Your Thanksgiving Dinner.” Your support would mean the world to me.

Let’s Get Social!

Be sure to follow me on social media! I’m always talking food, fashion, and family! I also love sharing some of my favorite Amazon Finds too. Click here to check out my Amazon page! FacebookInstagramTikTokX, Pinterest and YouTube! Check out my LTK to find out what I’m wearing! THANK YOU!

Spinach and Mushroom Lasagna

A piece of spinach and mushroom lasagna in a white bowl with a cherry tomato salad behind the lasagna.

This hearty and comforting vegetarian Spinach and Mushroom Lasagna is a delicious twist on the classic Italian dish. Packed with rich layers of a spinach mushroom ricotta mixture, melty cheese and a creamy béchamel sauce, this dish is perfect for a meatless weeknight meal.

With a combination of mozzarella, ricotta, and Parmesan cheeses, this lasagna delivers a satisfying and creamy texture that will leave everyone asking for seconds.

Why You Should Make this Spinach and Mushroom Lasagna

  • Deliciously Creamy and Flavorful: The combination of spinach, mushrooms, ricotta, and mozzarella creates a rich and creamy lasagna with layers of flavor.
  • Perfect for Vegetarians: This lasagna is a wonderful option for those who prefer a meatless meal, without sacrificing taste or heartiness.
  • Make Ahead and Freezer-Friendly: This vegetarian lasagna dish can be made in advance and stored in the fridge or freezer for an easy meal later.
  • Customizable: Feel free to swap out ingredients like adding more vegetables or using gluten-free lasagna sheets for those with dietary preferences.

Ingredients

  • Lasagna Sheets: Can use traditional lasagna noodles or no-cook lasagna sheets. For a gluten-free version, use gluten-free lasagna sheets, or sautéed slices of zucchini or eggplant.
  • Mozzarella: Use fresh mozzarella for a creamier texture, or substitute with a dairy-free mozzarella for a vegan version.
  • Ricotta: For a lighter version, use part-skim ricotta or substitute with cottage cheese.
  • Mushrooms: Any variety of mushrooms works, but cremini or button mushrooms are ideal. You can also add other vegetables like zucchini or eggplant.
  • Spinach: Frozen spinach can be used in place of fresh spinach, just be sure to thaw and drain excess water.
  • Butter: For a dairy-free version, substitute with olive oil or vegan butter.
  • Flour: Use a gluten-free flour alternative to make a gluten-free béchamel sauce.

How to Prepare Spinach and Mushroom Lasagna

  1. Preheat the oven to 375°F (190°C).
  2. Prepare the lasagna noodles: If using traditional lasagna noodles, cook them according to the package instructions. Drain and lay them on paper towels to dry.
  3. Prepare the filling: In a large pan, melt the butter. Add the minced shallots, garlic, and crushed red pepper flakes. Sauté for a few minutes until fragrant.
  4. Add the mushrooms to the pan and cook for about 6 minutes until they start to brown and soften.
  5. Stir in the fresh spinach and season with salt and pepper. Allow the spinach to wilt for about 2 minutes.
  6. Transfer the mixture to a bowl to cool slightly.
  7. Add the ricotta cheese to a bowl. Season. Stir in the spinach mushroom mixture. Reserve.
  8. In a saucepan, melt the butter over medium heat. Add the flour and cook for about 2 minutes.
  9. Gradually whisk in the milk, a little at a time, stirring constantly until the sauce thickens, about 8-10 minutes.
  10. Season the béchamel with a pinch of salt and ground nutmeg.
  11. In a 9×13-inch casserole dish, start with a thin layer of béchamel sauce. Add a layer of lasagna noodles, followed by a layer of the ricotta spinach mixture. Pour on a layer of béchamel sauce and sprinkle with mozzarella cheese.
  12. Repeat the layers: noodles, ricotta mixture, béchamel sauce, and mozzarella cheese.
  13. Top the final layer with the remaining mozzarella and grated Parmesan cheese.
  14. Bake covered with aluminum foil for 25-30 minutes, or until bubbly.
  15. Broil for 2-3 minutes to brown the cheese, then remove from the oven.
  16. Let the lasagna rest for about 10 minutes before slicing and serving.

How to Serve and Store Leftovers

  • Serve this spinach and mushroom lasagna with a light side salad and/or garlic bread.
  • Store leftover lasagna in an airtight container in the refrigerator for up to 3 days.
  • For longer storage, freeze individual portions for up to 3 months.
  • Reheat in the oven at 350°F (175°C) until heated through.

Frequently Asked Questions

  • Can I make this lasagna ahead of time? Yes, you can prepare the lasagna up to the baking point, cover it, and refrigerate it for up to 24 hours. Bake it as directed when you’re ready to serve.
  • Can I freeze spinach and mushroom lasagna? Yes, this lasagna freezes well. Just be sure to cool it completely before wrapping it tightly and storing it in the freezer for up to 3 months.
  • Can I use a different type of cheese? Absolutely! Feel free to swap out mozzarella for provolone or gouda, or try using different combinations of cheeses like asiago or fontina for a unique twist.
  • How long do leftovers last? Leftover lasagna can be stored in the fridge for up to 3 days. Reheat in the oven or microwave until heated through.
  • Can I make the béchamel sauce gluten-free? Yes, you can make a gluten-free béchamel sauce! The key to making it gluten-free is to substitute the regular flour with a gluten-free flour alternative.

More Lasagna Recipes to Love

Print
clock clock iconcutlery cutlery iconflag flag iconfolder folder iconinstagram instagram iconpinterest pinterest iconfacebook facebook iconprint print iconsquares squares iconheart heart iconheart solid heart solid icon
A piece of spinach and mushroom lasagna in a white bowl with a cherry tomato salad behind the lasagna.

Spinach and Mushroom Lasagna


5 Stars 4 Stars 3 Stars 2 Stars 1 Star

No reviews

Description

This hearty and comforting vegetarian Spinach and Mushroom Lasagna is a delicious twist on the classic Italian dish. Packed with rich layers of a spinach mushroom ricotta mixture, melty cheese and a creamy béchamel sauce, this dish is perfect for a meatless weeknight meal.


Ingredients

Units Scale
  • 1012 cooked lasagna or no-cook lasagna sheets
  • 2 cups mozzarella cheese, shredded
  • 3/4 cup freshly grated Parmesan cheese

For the Filling:

  • 16 ounces ricotta cheese
  • 12 ounces mushrooms, sliced
  • 10 ounces fresh baby spinach
  • 2 tablespoons butter
  • 1 small shallot, minced
  • 4 garlic cloves, minced
  • 1/4 teaspoon crushed red pepper flakes
  • 1/2 teaspoon salt
  • 1/2 teaspoon black pepper
  • 1/2 teaspoon ground nutmeg

For the Béchamel Sauce:

  • 4 tablespoons butter
  • 4 tablespoons flour
  • 4 cups milk
  • Pinch of salt
  • 1/2 teaspoon ground nutmeg

Instructions

  1. Preheat the oven to 375°F (190°C).
  2. Prepare the lasagna noodles: If using traditional lasagna noodles, cook them according to the package instructions. Drain and lay them on paper towels to dry.
  3. Prepare the filling: In a large pan, melt the butter. Add the minced shallots, garlic, and crushed red pepper flakes. Sauté for a few minutes until fragrant.
  4. Add the mushrooms to the pan and cook for about 6 minutes until they start to brown and soften.
  5. Stir in the fresh spinach and season with salt and pepper. Allow the spinach to wilt for about 2 minutes.
  6. Transfer the mixture to a bowl to cool slightly.
  7. Add the ricotta cheese to a bowl and season with a pinch of salt, and a dash of ground nutmeg.
  8. Stir in the spinach mushroom mixture.
  9. Make the béchamel sauce: In a saucepan, melt the butter over medium heat. Add the flour and cook for about 2 minutes.
  10. Gradually whisk in the milk, a little at a time, stirring constantly until the sauce thickens, about 8-10 minutes.
  11. Season the béchamel with a pinch of salt and ground nutmeg.
  12. Assemble the lasagna: In a 9×13-inch casserole dish, start with a thin layer of béchamel sauce. Add a layer of lasagna noodles, followed by a layer of the ricotta spinach mixture. Pour on a layer of béchamel sauce and sprinkle with mozzarella cheese.
  13. Repeat the layers: noodles, ricotta mixture, béchamel sauce, and mozzarella cheese.
  14. Top the final layer with the remaining mozzarella and grated Parmesan cheese.
  15. Bake covered with aluminum foil for 25-30 minutes or until bubbly.
  16. Broil for 2-3 minutes to brown the cheese, then remove from the oven.
  17. Let the lasagna rest for about 10 minutes before slicing and serving.
  18. ENJOY!

Notes

  • Cook lasagna noodles or use no-cook lasagna sheets (the no-cook worked really well in this recipe).
  • For a gluten-free spinach and mushroom lasagna, substitute the pasta with slightly sautéed zucchini and/or eggplant.
  • Make a gluten-free béchamel sauce! The key to making it gluten-free is to substitute the regular flour with a gluten-free flour alternative.
  • Easily add more of your favorite sautéed vegetables to the ricotta mixture.
  • Substitute the mozzarella with provolone or fresh mozzarella.
  • Once baked, broil for a few minutes to brown the cheese.
  • Allow the lasagna to rest for about 10 minutes before cutting.
  • Serve with a light salad.
  • Prep Time: 15 minutes
  • Cook Time: 30 minutes
  • Category: Dinner
  • Method: Easy
  • Cuisine: American

GET TO KNOW ME!

A photo of me in a black floral dress cooking at the stovetop at Williams-Sonoma

WELCOME! My name is Melissa Latin aka. Charlotte Fashion Plate. Happy to meet you! I am more than just recipes. I love fashion and style too! Most importantly, I love my Family (my Hubby and my Fur Babies). My Husband (aka my “Kitchen Bitch”) means the world to me. He’s pretty damn cool too. Not only is he one of the nicest guys you will ever meet, he also has had a lengthy career in professional hockey. Not only winning two Stanley Cups with the Pittsburgh Penguins in the early ’90’s, but most recently winning the Calder Cup with the Charlotte Checkers, amongst many other accolades. If you live in Charlotte and play hockey, or have a family member who plays, be sure to contact him!

Our life has changed dramatically in the past few years with the passing of our two goldendoodles, Vegas and Viva. We were lucky enough to have Vegas for five years (totally wish it was longer). Most recently, losing our Viva to a brain tumor in July of 2020. We welcomed our mini goldendoodle 7, almost seven years ago. We just added the amazing Hazel! Of course, I am always posting tons and tons of photos! Be sure to check out my recipe for Pet Bone Broth! This broth is super rich in nutrients and will provide your pet with a multitude of health benefits!

In addition, I’m so very excited to announce I have published my first e-book and paperback, “Mastering Thanksgiving – A Guide to Perfecting Your Thanksgiving Dinner.” Your support would mean the world to me.

Let’s Get Social!

Be sure to follow me on social media! I’m always talking food, fashion, and family! I also love sharing some of my favorite Amazon Finds too. Click here to check out my Amazon page! FacebookInstagramTikTokX, Pinterest and YouTube! Check out my LTK to find out what I’m wearing! THANK YOU!

Homemade Cream of Mushroom Soup

Holding a black spoon full of homemade cream of mushroom soup over a pan of soup.

There’s no comparison between Homemade Cream of Mushroom Soup and the canned version. Making this soup from scratch gives you full control over the ingredients, ensuring a rich, creamy texture and deep mushroom flavor, without unnecessary preservatives or additives.

This simple cream of mushroom soup recipe comes together quickly, making it perfect as an ingredient in casseroles and sauces. It works great in this recipe for Homemade Green Bean Casserole.

Why You Should Make This Homemade Cream of Mushroom Soup

  • Better Flavor – Fresh mushrooms give this soup a deep, earthy taste that canned, cream of mushroom soup versions, can’t match.
  • No Unwanted Additives – Skip the artificial flavors, excessive sodium, and preservatives.
  • Versatile – Enjoy this cream of mushroom soup on its own, or use it in recipes calling for condensed cream of mushroom soup.
  • Customizable – Easily adjust the thickness and seasoning to suit your preference.
  • Simple Ingredients – Made with pantry staples and fresh mushrooms for a wholesome dish.

Ingredients

  • Button or Cremini Mushrooms – Substitute with a blend of shiitake, portobello, or oyster mushrooms for a deeper flavor.
  • Heavy Whipping Cream – Swap with half-and-half for a lighter version, or use whole milk.
  • Butter – Use olive oil or ghee for a different depth of flavor.
  • Flour – Replace with cornstarch or a gluten-free flour blend for gluten-free cream of mushroom soup.
  • Garlic and Onion Powder – Use fresh minced garlic or onion, for a stronger garlic flavor.

How to Prepare Homemade Cream of Mushroom Soup

  1. Clean the mushrooms with a damp paper towel and dice them small.
  2. Heat a sauté pan over medium heat. Add the mushrooms and cook until all moisture has evaporated.
  3. Season with salt, pepper, and garlic powder, and onion powder.
  4. Add the butter and let it melt. Sauté for another two minutes.
  5. Sprinkle the flour over the mushrooms, stirring to coat. Let it cook for a few minutes to remove the raw flour taste.
  6. Slowly whisk in the heavy cream until the desired consistency is reached. You may not use it all.
  7. Taste and adjust seasoning, as needed.

How to Serve and Store Leftovers

Serving Suggestions

  • Enjoy as a comforting bowl of soup with crusty bread.
  • Use in casseroles, pasta bakes, or as a base for creamy sauces.
  • Drizzle over grilled chicken or pork for extra flavor.

Storage

  • Store leftovers in an airtight container in the refrigerator for up to 3 days.
  • Reheat the cream of mushroom soup gently over low heat, adding a splash of cream or broth if needed.
  • Freeze in portioned containers for up to 2 months. Thaw in the fridge before reheating.

FAQs

  • Can I use different types of mushrooms? Yes! While button or cremini mushrooms work well, you can also use shiitake, portobello, or a mix for a more complex flavor.
  • How can I make this soup dairy-free? Substitute the heavy whipping cream with dairy-free heavy cream, full-fat coconut milk or a blend of unsweetened almond milk and cashew cream. Replace butter with olive oil or vegan butter.
  • Can I make this soup gluten-free? Yes! Replace the flour with cornstarch or a gluten-free flour blend. If using cornstarch, mix it with a little cold water before adding it to the soup to prevent clumping.
  • How do I make this a condensed version for recipes? Use less cream (about 1 to 1 1/4 cups) and let the soup thicken more while cooking. This will give you a texture closer to canned condensed soup.
  • Can I freeze homemade cream of mushroom soup? Yes! Let the soup cool completely, then store it in an airtight container for up to 2 months. Keep in mind that dairy-based soups may slightly separate when reheated—stir well after thawing.
  • What can I use this soup for besides eating it as a soup? It’s perfect for casseroles, creamy pasta sauces, as a base for gravy, or even as a topping for grilled meats and vegetables.
  • How do I thicken the soup if it’s too thin? Let it simmer longer to reduce, or whisk in a small slurry of cornstarch and cold water to thicken it quickly.
  • What if my soup is too thick? Simply stir in more cream, milk, or even chicken or vegetable broth until it reaches your desired consistency.

More Creamy Soup Recipes to Love

Print
clock clock iconcutlery cutlery iconflag flag iconfolder folder iconinstagram instagram iconpinterest pinterest iconfacebook facebook iconprint print iconsquares squares iconheart heart iconheart solid heart solid icon
Holding a black spoon full of homemade cream of mushroom soup over a pan of soup.

Homemade Cream of Mushroom Soup


5 Stars 4 Stars 3 Stars 2 Stars 1 Star

No reviews

Description

This simple, Homemade Cream of Mushroom Soup recipe comes together quickly, making it perfect as an ingredient in casseroles and sauces.


Ingredients

Scale
  • 8 ounces button or cremini mushrooms, diced small
  • 1 to 1 1/2 cups heavy whipping cream
  • 2 tablespoons butter
  • 2 tablespoons flour
  • 1/2 teaspoon garlic powder
  • 1/2 teaspoon onion powder
  • 1/2 teaspoon salt
  • 1/2 teaspoon black pepper

Instructions

  1. Clean the mushrooms with a damp paper towel and dice them small.
  2. Heat a sauté pan over medium heat. Add the mushrooms and cook until all moisture has evaporated.
  3. Season with salt, pepper, and garlic powder.
  4. Add the butter and let it melt. Sauté for another two minutes.
  5. Sprinkle the flour over the mushrooms, stirring to coat. Let it cook for a few minutes to remove the raw flour taste.
  6. Slowly whisk in the heavy cream, until the desired consistency is reached. You may not use it all.
  7. Taste and adjust seasoning as needed.
  8. ENJOY as an ingredient in your favorite dishes, or sauces.

Notes

  • Clean the mushrooms with a damp paper towel.
  • Dice as small as you can.
  • Allow the mushrooms to sauté in a dry, hot pan to release their liquid.
  • Slowly incorporate the heavy cream to your desired consistency.
  • If using as an ingredient, you may want a thicker consistency. If enjoying as a soup, a thinner consistency may be desired.
  • Taste for salt. 
  • Prep Time: 5 minutes
  • Cook Time: 15 minutes
  • Category: Soup
  • Method: Easy
  • Cuisine: American

GET TO KNOW ME!

A photo of me in a black floral dress cooking at the stovetop at Williams-Sonoma

WELCOME! My name is Melissa Latin aka. Charlotte Fashion Plate. Happy to meet you! I am more than just recipes. I love fashion and style too! Most importantly, I love my Family (my Hubby and my Fur Babies). My Husband (aka my “Kitchen Bitch”) means the world to me. He’s pretty damn cool too. Not only is he one of the nicest guys you will ever meet, he also has had a lengthy career in professional hockey. Not only winning two Stanley Cups with the Pittsburgh Penguins in the early ’90’s, but most recently winning the Calder Cup with the Charlotte Checkers, amongst many other accolades. If you live in Charlotte and play hockey, or have a family member who plays, be sure to contact him!

Our life has changed dramatically in the past few years with the passing of our two goldendoodles, Vegas and Viva. We were lucky enough to have Vegas for five years (totally wish it was longer). Most recently, losing our Viva to a brain tumor in July of 2020. We welcomed our mini goldendoodle 7, almost seven years ago. We just added the amazing Hazel! Of course, I am always posting tons and tons of photos! Be sure to check out my recipe for Pet Bone Broth! This broth is super rich in nutrients and will provide your pet with a multitude of health benefits!

In addition, I’m so very excited to announce I have published my first e-book and paperback, “Mastering Thanksgiving – A Guide to Perfecting Your Thanksgiving Dinner.” Your support would mean the world to me.

Let’s Get Social!

Be sure to follow me on social media! I’m always talking food, fashion, and family! I also love sharing some of my favorite Amazon Finds too. Click here to check out my Amazon page! FacebookInstagramTikTokX, Pinterest and YouTube! Check out my LTK to find out what I’m wearing! THANK YOU!

Creole Chicken Pot Pie

A white soup crock overflowing with Creole Chicken Pot Pie. The top crust of the pot pie is a baked, browned biscuit crust. There is a wooden spoon in the individual pie showing the inside contents. The bowl is sitting on a small wooden board.

Creole Chicken Pot Pie is the ultimate comfort food, packed with bold flavors and a rich, creamy filling. This hearty dish brings together tender diced chicken, sweet corn, and perfectly seasoned vegetables in a velvety Creole-spiced sauce.

Topped with a buttery, cheesy Cheddar Bay biscuit crust, each bite delivers the perfect balance of warmth and spice. This Creole-inspired twist on classic chicken pot pie is sure to become a family favorite.

Why You Should Make this Creole Chicken Pot Pie Recipe

  • Bold Creole Flavors – The combination of Creole seasoning, paprika, and fresh garlic infuses the filling with a deep, savory taste that’s both comforting and exciting.
  • Rich and Creamy Texture – With heavy cream and chicken stock, the Creole sauce becomes irresistibly smooth and indulgent, coating every ingredient perfectly.
  • Buttery Cheddar Bay Biscuit Topping – The cheesy, flaky topping bakes to golden perfection, making each spoonful of this pot pie dish, even more satisfying.
  • Perfect for Meal Prep – Make individual portions in ramekins for easy reheating or bake this Creole Chicken Pot Pie as a casserole to serve a crowd.
  • Great Way to Use Leftover Chicken – If you have leftover roasted or rotisserie chicken, this is an excellent way to transform it into something new and delicious.

Ingredients

  • Rotisserie Chicken Breast – Substitute rotisserie chicken with leftover chicken, or cook your own boneless breasts. Easily substitute chicken breast meat with chicken thighs, turkey, or even shrimp or crab for a seafood twist.
  • Bell Peppers – Swap with orange or yellow bell pepper for a slightly sweeter taste.
  • Green Bell Pepper – Can replace with a jalapeño pepper, for added heat.
  • Yellow Onion – White onion or shallots work well as alternatives.
  • Celery – If unavailable, use extra bell pepper.
  • Garlic Cloves – Garlic powder can be used in a pinch.
  • Russet Potato – Yukon Gold or sweet potatoes add a different texture and flavor.
  • Creole Seasoning – Cajun seasoning or a mix of paprika, garlic powder, and cayenne pepper can work.
  • Paprika – Smoked paprika adds a deeper, richer taste.
  • Flour – Cornstarch can be used for a gluten-free thickening option.
  • Chicken Stock – Vegetable stock can be used as an alternative.
  • Heavy Whipping Cream – Half-and-half or coconut milk can be used for a lighter or dairy-free option.
  • Sweet Corn – Fresh, frozen, or canned corn all work well.
  • Red Lobster Cheddar Bay Biscuit Mix – Any cheddar biscuit mix or homemade biscuit dough can be substituted.

How to Prepare Creole Chicken Pot Pie

  1. Preheat the oven to 415°F (213°C).
  2. Sauté the bell peppers, onion, celery, and garlic. Season with salt, black pepper, Creole seasoning, and paprika. Sauté for about five minutes, to soften.
  3. Add in the diced potatoes. Season with the remaining salt and pepper. Stir to coat the potatoes in the butter.
  4. Sprinkle on the flour and stir to coat. Cook for a few minutes to remove the raw flour taste.
  5. Pour in the chicken stock. Bring the heat up to just under a boil, then reduce and simmer until the potatoes are softened, about 10 minutes.
  6. While the mixture simmers, add the biscuit mix to a large bowl, along with the cold water and shredded cheese. Mix just to combine without over-mixing. Set aside.
  7. Once the potatoes are softened, pour in the heavy cream and allow to heat through and slightly thicken.
  8. Stir in the diced chicken and corn. Cook for another few minutes until heated through.
  9. Fill oven-safe ramekins with the Creole chicken mixture. Top each with the biscuit mixture and brush with a touch of melted butter.
  10. Bake for 15-20 minutes, or until the biscuit topping is golden brown and cooked through.
  11. With a few minutes left of baking time, melt the remaining butter. Stir in the seasoning packet and fresh parsley.
  12. Once the pot pies are out of the oven, brush the tops with the buttery mixture and serve hot.

How to Serve and Store

Serve these Creole Chicken Pot Pies alone, or pair with any of the following:

  • Side Salad – A simple green salad with a light vinaigrette helps balance out the richness of the dish.
  • Steamed Green Beans – A fresh, crisp vegetable side complements the creamy filling.
  • Roasted Brussels Sprouts – Their slight bitterness and caramelization pair well with the savory flavors of the pie.

How to Store and Reheat Leftovers

  • Refrigerate: Store leftovers in an airtight container in the refrigerator for up to 3 days.
  • Freeze: For longer storage, wrap individual portions tightly and freeze for up to 2 months.
  • Reheat: Warm in a 350°F (177°C) oven until heated through, or microwave in short intervals for a quick meal.

More Pot Pie Recipes to Love

Print
clock clock iconcutlery cutlery iconflag flag iconfolder folder iconinstagram instagram iconpinterest pinterest iconfacebook facebook iconprint print iconsquares squares iconheart heart iconheart solid heart solid icon
A baked, Creole chicken pot pie in a white crock sitting on top of a small wooden board. The top of the pie is a biscuit crust.

Creole Chicken Pot Pie


5 Stars 4 Stars 3 Stars 2 Stars 1 Star

No reviews

Description

Creole Chicken Pot Pie is packed with flavor and a rich, creamy filling. This twist on classic chicken pot pie is sure to become a family favorite.


Ingredients

Scale
  • 1 1/4 cup diced rotisserie chicken breast
  • 3 tablespoons butter
  • 1 red bell pepper, diced
  • 1/2 green bell pepper, diced
  • 1/4 yellow onion, minced
  • 1 stalk celery, minced
  • 3 garlic cloves, minced
  • 1 russet potato, peeled and tiny diced
  • 1 tablespoon Creole seasoning
  • 1 teaspoon paprika
  • 1 teaspoon salt, divided
  • 1 teaspoon black pepper, divided
  • 3 tablespoons flour
  • 2 cups chicken stock
  • 1 cup heavy whipping cream
  • 1 cup frozen or fresh sweet corn

For the cheddar bay topping:

  • 1 package Red Lobster Cheddar Bay biscuit mix
  • 3/4 cup cold water
  • 3/4 cup sharp cheddar cheese, shredded
  • 1/4 cup butter, melted
  • 1 package seasoning mix (included with the biscuit mix)
  • 1 tablespoon fresh chopped parsley

Instructions

  1. Preheat the oven to 415°F (213°C).
  2. Melt three tablespoons of butter in a deep sauté pan. Add the bell peppers, onion, celery, and garlic. Season with 1/2 teaspoon salt, 1/2 teaspoon black pepper, Creole seasoning, and paprika. Sauté for about five minutes to soften.
  3. Add in the diced potatoes. Season with the remaining salt and pepper. Stir to coat the potatoes in the butter.
  4. Sprinkle on the flour and stir to coat. Cook for a few minutes to remove the raw flour taste.
  5. Pour in the chicken stock. Bring the heat up to just under a boil, then reduce and simmer until the potatoes are softened, about 10 minutes.
  6. While the mixture simmers, add the biscuit mix to a large bowl along with the cold water and shredded cheese. Mix just to combine without over-mixing. Set aside.
  7. Once the potatoes are softened, pour in the heavy cream and allow to heat through and slightly thicken.
  8. Stir in the diced chicken and corn. Cook for another few minutes until heated through.
  9. Fill oven-safe ramekins with the Creole chicken mixture. Top each with the biscuit mixture and brush with a touch of melted butter.
  10. Bake for 15-20 minutes, or until the biscuit topping is golden brown and cooked through.
  11. With a few minutes left of baking time, melt the remaining butter. Stir in the seasoning packet and fresh parsley.
  12. Once the pot pies are out of the oven, brush the tops with the buttery mixture and serve hot.

Notes

  • For ease, use rotisserie chicken, or cook your own and dice. 
  • Chicken thighs can also be used in replacement of chicken breast.
  • A tiny dice on the potatoes with allow for a quicker cooking time.
  • Easily replace the biscuit mix with homemade. 
  • Spread the biscuit mix evenly over the pot pie filling.
  • Line the pan with parchment paper for easy clean up.
  • Use oven-safe soup crocks or ramekins.
  • Prep Time: 10 minutes
  • Cook Time: 35 minutes
  • Category: Dinner
  • Method: Easy
  • Cuisine: American

GET TO KNOW ME!

A photo of me in a black floral dress cooking at the stovetop at Williams-Sonoma

WELCOME! My name is Melissa Latin aka. Charlotte Fashion Plate. Happy to meet you! I am more than just recipes. I love fashion and style too! Most importantly, I love my Family (my Hubby and my Fur Babies). My Husband (aka my “Kitchen Bitch”) means the world to me. He’s pretty damn cool too. Not only is he one of the nicest guys you will ever meet, he also has had a lengthy career in professional hockey. Not only winning two Stanley Cups with the Pittsburgh Penguins in the early ’90’s, but most recently winning the Calder Cup with the Charlotte Checkers, amongst many other accolades. If you live in Charlotte and play hockey, or have a family member who plays, be sure to contact him!

Our life has changed dramatically in the past few years with the passing of our two goldendoodles, Vegas and Viva. We were lucky enough to have Vegas for five years (totally wish it was longer). Most recently, losing our Viva to a brain tumor in July of 2020. We welcomed our mini goldendoodle 7, almost seven years ago. We just added the amazing Hazel! Of course, I am always posting tons and tons of photos! Be sure to check out my recipe for Pet Bone Broth! This broth is super rich in nutrients and will provide your pet with a multitude of health benefits!

In addition, I’m so very excited to announce I have published my first e-book and paperback, “Mastering Thanksgiving – A Guide to Perfecting Your Thanksgiving Dinner.” Your support would mean the world to me.

Let’s Get Social!

Be sure to follow me on social media! I’m always talking food, fashion, and family! I also love sharing some of my favorite Amazon Finds too. Click here to check out my Amazon page! FacebookInstagramTikTokX, Pinterest and YouTube! Check out my LTK to find out what I’m wearing! THANK YOU!

Tender Meatloaf Meatballs with Onion-Ketchup Gravy

Three tender meatloaf meatballs with onion-ketchup gravy sitting on top of creamy mashed potatoes with corn on the side

These Tender Meatloaf Meatballs with Onion-Ketchup Gravy recipe is a delightful twist on the timeless classic of meatloaf. While traditional meatloaf is baked in a loaf shape, this meatloaf recipe takes the familiar flavors and transforms them into savory, bite-sized meatballs. This adaptation not only adds a fun and visually appealing twist, but also allows for faster cooking and even more surface area to soak up the rich, flavorful gravy. This comfort food recipe is sure to become your new family favorite!

Three tender meatloaf meatballs with onion-ketchup gravy sitting on top of creamy mashed potatoes with corn on the side

WHY MAKE THESE TENDER MEATLOAF MEATBALLS

Comfort food has a unique ability to evoke feelings of warmth, nostalgia, and contentment. These Tender Meatloaf Meatballs with Onion-Ketchup Gravy recipe captures these sentiments perfectly. As you savor each juicy, homemade meatball smothered in the luscious onion-ketchup gravy, you’ll be transported back to the comforting embrace of home-cooked meals.

One of the key advantages of making meatloaf into tender meatballs is that it significantly cuts down on cooking time, while still delivering the same delicious flavors. Here’s why this approach is a time-saving culinary hack:

  • Faster Cooking: Meatloaf traditionally takes a longer time to cook due to its loaf shape, which requires thorough baking or roasting. By shaping the meat mixture into meatballs, you decrease the cooking time significantly. Meatballs cook evenly and more quickly, thanks to their smaller size.
  • Increased Surface Area: Meatballs have a greater surface area compared to a single large meatloaf. This means they cook faster because more of the meat is in direct contact with heat. It also allows for a delicious sear when frying, adding an extra layer of flavor.
  • Even Cooking: With meatballs, you can ensure that each bite is cooked to perfection. There’s no need to worry about the center being undercooked or overcooked as can sometimes happen with classic meatloaf.
  • Versatile Cooking Methods: These savory, homemade meatballs can be cooked in various ways, such as frying, baking, or simmering in sauce. This versatility means you can choose the method that suits your schedule or preference, making them adaptable to busy weeknight dinners or leisurely weekend meals.

TIPS ON MAKING THE BEST MEATLOAF MEATBALLS

Here are some tips to help you make the perfect Tender Meatloaf Meatballs with Onion-Ketchup Gravy:

  • Soak Bread Thoroughly: Ensure the bread pieces are soaked in heavy cream until they are fully saturated. This step adds moisture to the meat mixture, keeping the meatballs tender and juicy (no need for an egg!)
  • Mince: Mincing the carrots and onions will avoid an additional step of sautéing prior to adding to the meat mixture.
  • Evenly Sized Meatballs: When shaping the meatballs, try to make them as uniform in size as possible. This ensures that they cook evenly and finish at the same time.
  • Use a Meat Thermometer: To guarantee the meatballs are cooked to perfection, use a meat thermometer. They are safe to eat at an internal temperature of 160°F (71°C).
  • Don’t Overmix: When combining the meat mixture, avoid overmixing as it can make the meatballs tough. Mix until the ingredients are just combined.
  • Preheat the Skillet: Ensure your skillet is adequately preheated before adding the meatballs. This helps achieve a nice sear on the outside, locking in the juices.
  • Baking: You only need to fry about half of the meatballs to achieve those browned bits for the onion-ketchup gravy. As half of them are frying, place the remaining meatballs on a baking sheet and bake at 375° for about 10 minutes.
  • Deglaze the Pan: Scrape up any browned bits from the bottom of the skillet when deglazing with chicken stock or water. These bits are packed with flavor and will enhance the gravy.
  • Simmer for Flavor: Let the gravy simmer for the full 10 minutes suggested in the recipe. This allows the flavors to meld and intensify, resulting in a more delicious sauce.

HOW TO SERVE AND STORE MEATLOAF MEATBALLS IN ONION GRAVY

Serve these meatballs and gravy on top of a pile of creamy, warm mashed potatoes, or even rice. Add a side of steamed vegetables, or a fresh salad to balance the richness of the meatballs and gravy.

How to Store Leftovers:

  • If you have leftovers, store them in an airtight container in the refrigerator for up to 3 days. Reheat in the microwave or on the stovetop for a quick and satisfying meal.
  • Transform meatloaf leftovers into a classic TV dinner, like I did with Salisbury Steak. Pack them up in portioned aluminum containers and freeze for up to three months!

MORE TO LOVE

Here are a few comfort food dishes you may also enjoy:

Print
clock clock iconcutlery cutlery iconflag flag iconfolder folder iconinstagram instagram iconpinterest pinterest iconfacebook facebook iconprint print iconsquares squares iconheart heart iconheart solid heart solid icon
Three tender meatloaf meatballs with onion-ketchup gravy sitting on top of creamy mashed potatoes with corn on the side

Tender Meatloaf Meatballs with Onion-Ketchup Gravy


5 Stars 4 Stars 3 Stars 2 Stars 1 Star

No reviews

Description

These Tender Meatloaf Meatballs with Onion-Ketchup Gravy recipe is a delightful twist on the timeless classic of meatloaf. While traditional meatloaf is baked in a loaf shape, this meatloaf recipe takes the familiar flavors and transforms them into savory, bite-sized meatballs. This adaptation not only adds a fun and visually appealing twist, but also allows for faster cooking and even more surface area to soak up the rich, flavorful gravy.


Ingredients

Scale
  • 1 pound ground meatloaf mix (beef, veal and pork)
  • 1 pound 80/20 ground beef
  • 3 slices bread
  • 1/2 cup heavy whipping cream
  • 1/4 onion, minced
  • 1 carrot, minced
  • 1 teaspoon salt
  • 1 teaspoon black pepper
  • 1/3 cup ketchup
  • 1 tablespoon yellow mustard
  • 2 teaspoons Worcestershire sauce
  • 1 tablespoon olive oil

FOR THE ONION-KETCHUP GRAVY:

  • 1 small white or yellow onion, sliced thin
  • 2 tablespoons flour
  • 3/4 cup chicken stock or water
  • 2 cups ketchup
  • 1/2 cup water

Instructions

  1. Tear the bread into pieces and add to a large mixing bowl.
  2. Pour in the heavy cream. Mix. Soak the bread for about 5 minutes.
  3. Add in the minced onion, carrots, meatloaf mix, ground beef, salt, pepper, ketchup, mustard and Worcestershire sauce. 
  4. Gently mix with your hands to combine. Try not to over mix.
  5. Form the meat mixture into meatballs.
  6. Heat up the olive oil in a pot.
  7. Fry the meatballs until they are cooked through and seared perfectly. Do this in batches. Transfer the meatballs to a plate as they finish.
  8. Once all meatballs have been cooked, drain all but 2 tablespoons of the grease. Try to leave those browned bits.
  9. Add in the onions. Sauté for a few minutes to soften.
  10. Sprinkle with the flour. Allow the raw flour taste to cook off for a few minutes.
  11. Deglaze with chicken stock or water. Scraping up the bits on the bottom.
  12. Turn up the heat.
  13. Add in the ketchup and water. Mix. If they gravy seems too thick, add a touch more water.
  14. Bring to just under a boil then turn down the heat to a simmer.
  15. Simmer for 10 minutes.
  16. Add the meatballs back to the pot along with any juices.
  17. Allow them to heat through a few minutes.
  18. Serve on top of creamy mashed potatoes.
  19. ENJOY!
@charlottefashionplate

Classic Meatloaf Meatballs Recipe! A fun twist on traditional comfort food that allows for shorter cooking time with that same incredible flavor! #meatloaf #meatballs #meatloafrecipe #comfortfood #foodtiktok #dinnerideas #fallfood #cookinghacks #gravy #ketchup

♬ In Love With You – BLVKSHP

Notes

  • 1/2 cup breadcrumbs and 1 egg can be substituted for the bread soaked cream (although I highly recommend the cream-soaked bread)
  • replace the cream with milk
  • mincing the onions and carrots allows you to directly add them to the meat mixture without sautéing to soften first
  • do not overmix the meat mixture so as to avoid dense meatballs
  • make sure the oil is hot prior to adding the meatballs
  • fry at least half of the meatballs to make the gravy
  • sear the meatballs in batches (I fried half of them and baked the other half in a 375° oven for 10 minutes)
  • simmer the gravy for at least 10 minutes
  • see post for additional notes and tips
  • Prep Time: 10 minutes
  • Cook Time: 30 minutes
  • Category: Dinner
  • Method: Moderate
  • Cuisine: American, Comfort Food

GET TO KNOW ME!

a photo of me leaning against a brick wall with my logo, "Charlotte Fashion Plate" to the left of me

I am more than just recipes. I love fashion and style too! Most importantly, I love my Family (my Hubby and my Fur Babies). My Husband (aka my “Kitchen Bitch”) means the world to me. He’s pretty damn cool too. Not only is he one of the nicest guys you will ever meet, he also has had a lengthy career in professional hockey. Not only winning two Stanley Cups with the Pittsburgh Penguins in the early ’90’s, but most recently winning the Calder Cup with the Charlotte Checkers, amongst many other accolades. If you live in Charlotte and play hockey, or have a family member who plays, be sure to contact him!

Our life has changed dramatically in the past few years with the passing of our two goldendoodles, Vegas and Viva. We were lucky enough to have Vegas for five years (totally wish it was longer). Most recently, losing our Viva to a brain tumor in July of 2020. We welcomed our mini goldendoodle 7, almost seven years ago. We just added the amazing Hazel! Of course, I am always posting tons and tons of photos! Be sure to check out my recipe for Pet Bone Broth! This broth is super rich in nutrients and will provide your pet with a multitude of health benefits!

Let’s Get Social!

Be sure to follow me on social media! I’m always talking food, fashion, and family! I also love sharing some of my favorite Amazon Finds too. Click here to check out my Amazon page! FacebookInstagramTikTokTwitter and Pinterest! THANK YOU!

Ground Lamb Cabbage Rolls

A white bowl filled with two ground lamb cabbage rolls with potatoes.

Take a classic comfort dish for a spin with this recipe for Ground Lamb Cabbage Rolls. These Mediterranean-Style Stuffed Cabbage Rolls are a hearty and flavorful meal that’s perfect for any occasion. With the health benefits of ground lamb and cabbage, this slow cooked recipe is not only delicious but also nutritious. Whether you’re a seasoned cook or just starting out, this one-pot recipe is sure to become a new favorite in your kitchen.

A white bowl filled with two ground lamb cabbage rolls with potatoes.

WHAT DOES GROUND LAMB TASTE LIKE?

If you’ve never tried ground lamb before, it’s worth giving it a try to see if you enjoy its rich, savory taste. Eating lamb is part of my Serbian heritage. In fact, I’m quite sure lamb was given to me in my baby bottle.

Ground lamb has a distinct flavor that sets it apart from other types of ground meat. The taste of ground lamb can be described as rich, slightly gamey, and savory. It has a strong, earthy flavor that is similar to that of lamb chops or other lamb cuts. Some people may find the taste of lamb to be a bit too strong, while others enjoy it as a flavorful alternative to beef or pork.

TIPS ON MAKING THE BEST GROUND LAMB CABBAGE ROLLS

Although not traditional, I loved changing up a classic Cabbage Roll recipe by substituting ground beef with ground lamb. In addition, the use of lamb called for a variety of spices that would not normally be used when making the traditional recipe.

Here are a few tips to use when making these Lamb Stuffed Cabbage Rolls:

  • Salt the water for wilting the cabbage
  • Do NOT boil the leaves…a simmer is all you need to wilt the cabbage leaves (this will only take a few minutes)
  • Boiling the delicate leaves will make them fall apart
  • Drain the leaves on paper towels to soak up any excess water
  • Add the seasonings to the ground lamb, first
  • Do NOT over mix the meat mixture
  • Add the leftover raw, inner cabbage leaves to the bottom of the oven-safe pot to ensure the potatoes do not burn
  • Season every layer with a touch of salt and pepper (including the chopped tomatoes)
  • You can use whole tomatoes…just crush with your hands prior to adding them to the pot
  • Roll the stuffed cabbage rolls as tight as you can
  • Add enough stock to the pot to at least cover the cabbage rolls by half
  • Form meatballs with any leftover meat and add them to the pot

HOW TO SERVE AND STORE LEFTOVER CABBAGE ROLLS

This Ground Lamb Cabbage dish is a hearty, one-pot meal. Serve the stuffed cabbage and potatoes with crusty bread, and/or a side salad. If you desire, top with sour cream or a yogurt sauce.

How to Store Cabbage Rolls

After making a delicious batch of Ground Lamb Cabbage Rolls, you may be wondering how to store them properly. Fortunately, cabbage rolls are easy to store and can be kept in the fridge or freezer for later consumption.

To store cabbage rolls in the fridge, place them in an airtight container. Make sure the cabbage rolls are completely cooled down before storing them in the fridge. Cabbage rolls can be stored in the fridge for up to 3-4 days. To reheat, place the cabbage rolls in a baking dish and cover with foil. Bake in the oven at 350°F for 15-20 minutes, or until heated through.

Freezing Cabbage Rolls

If you want to store cabbage rolls for a longer period of time, freezing them is a great option. To freeze cabbage rolls, place them in an airtight container, or freezer-safe bag. Cabbage rolls can be stored in the freezer for up to 2-3 months.

When reheating frozen cabbage rolls, it’s important to thaw them first. You can do this by placing them in the fridge overnight. Once thawed, place the cabbage rolls in a baking dish and cover with foil. Bake in the oven at 350°F for 25-30 minutes, or until heated through.

When storing and reheating cabbage rolls, it’s important to keep food safety in mind. Always make sure that the cabbage rolls are heated to an internal temperature of 165°F before consuming. This will help prevent any food-born illnesses and ensure that your cabbage rolls are safe to eat.

Print
clock clock iconcutlery cutlery iconflag flag iconfolder folder iconinstagram instagram iconpinterest pinterest iconfacebook facebook iconprint print iconsquares squares iconheart heart iconheart solid heart solid icon
A white bowl filled with two ground lamb cabbage rolls with potatoes.

Ground Lamb Cabbage Rolls


5 Stars 4 Stars 3 Stars 2 Stars 1 Star

No reviews

Description

Take a classic comfort dish for a spin with this recipe for Ground Lamb Cabbage Rolls. These Mediterranean-Style Stuffed Cabbage Rolls are a hearty and flavorful meal that’s perfect for any occasion. With the health benefits of ground lamb and cabbage, this slow cooked recipe is not only delicious but also nutritious. Whether you’re a seasoned cook or just starting out, this one-pot recipe is sure to become a new favorite in your kitchen.


Ingredients

Scale
  • 1 1/2 pounds ground lamb
  • 1 large head Napa cabbage
  • 1 28-ounce can whole or chopped tomatoes
  • 2 russet potatoes, peeled and thick-sliced
  • 2 1/2 teaspoons salt, divided
  • 1 teaspoon black pepper
  • 2 teaspoons cumin
  • 2 teaspoons ground coriander
  • 1 1/2 teaspoons dried oregano
  • 1/2 teaspoon crushed red pepper
  • 2 teaspoons lemon zest
  • 3 garlic cloves, minced
  • 1/4 white onion, minced
  • 3/4 cup cooked rice
  • 2 tablespoons fresh chopped parsley, plus more for garnish
  • 1 egg
  • 3 1/2 to 4 cups chicken stock

Instructions

  1. Preheat oven to 350°.
  2. Bring a pot or deep pan of water almost to a boil.
  3. Trim the bottom core of the Napa cabbage to release the leaves (you should get about 8 large leaves).
  4. Salt the water. Add the cabbage leaves and cook for about 2 minutes to wilt.
  5. Transfer onto paper towels to dry.
  6. Add the ground lamb to a large bowl. Sprinkle the meat with 1 teaspoon salt, the black pepper, cumin, coriander, and oregano. 
  7. Add the lemon zest, minced garlic and onions, cooked rice, fresh parsley and egg.
  8. Mix just until fully incorporated (Do NOT over mix). 
  9. Lay down one wilted cabbage leave onto a flat surface.
  10. Trim away any hard core.
  11. Grab some of the meat mixture and place on the core end. 
  12. Roll once, grab the sides and fold them on the top. Continue rolling to form.
  13. Finish the remaining. 
  14. Form meatballs with any of the remaining meat mixture.
  15. Line the bottom of an oven-safe, heavy bottom pot with the leftover raw cabbage leaves.
  16. Add the sliced potatoes in a single layer. Season with a touch of salt and pepper.
  17. Spoon on about 3/4 of the chopped tomatoes. Season with a sprinkling of salt.
  18. Place the cabbage rolls. Top with the remaining tomatoes. 
  19. Pour in the stock (Enough to cover the cabbage rolls by half).
  20. Cover and bake for 2 hours. 
  21. Serve the cabbage rolls with the melty potatoes. Garnish with fresh chopped parsley and cracked black pepper.
  22. ENJOY!

Notes

  • salt the water used to wilt the cabbage
  • do NOT boil the leaves as this may cause them to fall apart
  • one large head of Napa cabbage should yield about 8 usable leaves
  • do NOT over mix the ground lamb mixture
  • recipe will yield about 4 to 5 servings
  • see post for additional tips and notes
  • Prep Time: 15 minutes
  • Cook Time: 2 hours
  • Category: Dinner
  • Method: Moderate
  • Cuisine: Polish/Serbian

Nutrition

  • Serving Size: 2 rolls

GET TO KNOW ME!

A photo of me in a black floral dress cooking at the stovetop at Williams-Sonoma

I am more than just recipes. I love fashion and style too! Most importantly, I love my Family (my Hubby and my Fur Babies). My Husband (aka my “Kitchen Bitch”) means the world to me. He’s pretty damn cool too. Not only is he one of the nicest guys you will ever meet, he also has had a lengthy career in professional hockey. Not only winning two Stanley Cups with the Pittsburgh Penguins in the early ’90’s, but most recently winning the Calder Cup with the Charlotte Checkers, amongst many other accolades. If you live in Charlotte and play hockey, or have a family member who plays, be sure to contact him!

Our life has changed dramatically in the past few years with the passing of our two goldendoodles, Vegas and Viva. We were lucky enough to have Vegas for five years (totally wish it was longer). Most recently, losing our Viva to a brain tumor in July of 2020. We welcomed our mini goldendoodle 7, almost seven years ago. We just added the amazing Hazel! Of course, I am always posting tons and tons of photos! Be sure to check out my recipe for Pet Bone Broth! This broth is super rich in nutrients and will provide your pet with a multitude of health benefits!

Let’s Get Social!

Be sure to follow me on social media! I’m always talking food, fashion, and family! I also love sharing some of my favorite Amazon Finds too. Click here to check out my Amazon page! FacebookInstagramTikTokTwitter and Pinterest! THANK YOU!

Braised Beef Short Ribs

A white, flat bowl filled with potato purée and two braised short ribs with demi-glacé poured on top and garnished with a sprig of fresh thyme. A plate of green beans are in the background.

In the realm of comfort food, Red Wine Braised Beef Short Ribs are a number one contender! Honestly, few dishes compare when it comes to capturing the essence of warmth and indulgence. Investing time in this slow cooker recipe rewards you with melt-in-your-mouth short ribs and a luxurious sauce that’s restaurant-quality.

Ultimately, the slow braising process infuses the short ribs with rich, hearty flavors making it perfect to cozy up to on a chilly fall, or winter evening.

This slow-cooked beef recipe will yield approximately 8 servings. If making for a smaller crowd, use only half of the required short ribs. However, keep the remaining ingredients amounts the same.

Why Make Braised Beef Short Ribs

  • Fall-off-the-bone tenderness: Slow-cooked to perfection, these beef short ribs become incredibly tender and flavorful.
  • Rich, savory flavor: Braising the ribs in red wine and herbs creates a deep, rich sauce that’s perfect for any occasion.
  • Comfort food: This dish is the ultimate comfort food, with hearty, warming flavors that satisfy on a cold day.
  • Versatile pairing: Braised beef short ribs pair wonderfully with mashed potatoes, vegetables, or a simple salad.
  • Easy to prepare: Despite their gourmet taste, braised beef short ribs are simple to make, requiring minimal active cooking time.
  • Dutch oven convenience: Cooking these ribs in a Dutch oven ensures even heat distribution and perfectly braised meat.
  • Leftovers store well: The flavors of the braised beef short ribs only improve with time, making leftovers just as delicious, if not more, the next day.

Ingredients

  • Beef Short Ribs (Bone-In): Bone-in short ribs add rich flavor and are ideal for slow cooking. If you prefer, you can use boneless short ribs, though bone-in generally provides better flavor and tenderness.
  • Celery: Celery adds aromatic flavor to the dish. You can substitute with leeks or parsnips if celery isn’t available.
  • Flour: Flour is used for thickening the sauce. You can substitute with cornstarch or arrowroot powder for a gluten-free option, though the thickening process will differ.
  • Tomato Paste: Tomato paste enhances the depth of flavor. You can substitute with tomato sauce or crushed tomatoes if tomato paste is unavailable.
  • Cabernet Sauvignon: This red wine adds richness and complexity to the sauce. You can use any dry red wine, such as Merlot or Pinot Noir, as an alternative. Substitute with beef stock for a non-alcoholic dish.
  • Beef Stock: Beef stock provides a rich base for the sauce. You can substitute with chicken stock or vegetable broth if needed.
  • Demi-Glacé: Demi-glacé is a rich, concentrated sauce. If you don’t have demi-glacé or beef base, you can use a mixture of beef broth with a splash of soy sauce for umami depth.

How to Prepare Short Ribs

Easily, transform a humble cut of beef into one elegant, comforting dish. While this short rib recipes exudes sophistication, the preparation is surprisingly manageable:

  1. Pat the short ribs dry and season on all sides with salt and pepper.
  2. Heat the oil to medium-high, in a deep, oven-safe pot. 
  3. Sear the meat, in batches, to form a golden crust on all sides.
  4. Reserve on a plate.
  5. Remove all but three tablespoons of the fat. Lower the heat to medium.
  6. Add in the vegetables. Season with salt and pepper. Sauté for a few minutes.
  7. Dust the vegetables with the flour. Cook off the raw flour taste for a few minutes.
  8. Add in the tomato paste. Cook for another minute.
  9. Pour in the red wine.
  10. Add back the meat. Reduce for about 20-30 minutes.
  11. Pour in the beef stock. Add the fresh herbs. 
  12. Bring back to a heavy simmer. Cover.
  13. Bake at 325°F (163°C) for three hours. 
  14. Once tender, remove the ribs onto an oven-safe platter. Keep warm in the oven (oven should be turned off). 
  15. Strain the braising liquid into the same pot. 
  16. Turn up the heat and allow to simmer and reduce. 
  17. For added flavor, spoon in a packet of store-bought demi-glacé. 
  18. Plate the ribs on a bed of warm, puréed mashed potatoes. Ladle on the rich demi-glacé.

Tips on Making the Best Braised Beef Short Ribs

  • Prepare the Meat: If time warrants, allow the meat to come to room temperature for a better sear.
  • Patience is Key: Low and slow cooking at a consistent temperature allows the flavors to meld, and the meat becomes incredibly tender.
  • Sear for Flavor: A good sear on the beef short ribs creates a flavorful crust. Next, pat the ribs dry before searing to achieve a perfect golden-brown surface.
  • Balanced Seasoning: Season the ribs liberally with salt and pepper, ensuring the seasoning reaches all sides. Proper seasoning is essential for enhancing the taste of the dish.
  • Carrots: Feel free to add carrots to the mirepoix.
  • Use Fresh Herbs: Fresh parsley, thyme, and rosemary infuse the sauce with vibrant flavors.
  • Quality Wine Matters: Choose a good-quality Cabernet Sauvignon, or any red wine you enjoy drinking. In fact, the wine you use greatly impacts the overall taste of the dish.
  • Be Patient with Reduction: Allow the wine to reduce adequately before adding the beef broth. This intensifies the wine’s flavor and creates a concentrated base for the sauce.
  • Don’t Rush Braising: Let the short ribs braise for the full 3 hours. The slow cooking process ensures the meat becomes fall off the bone, and absorbs the flavors of the sauce.
  • Optional Demi-Glacé: Optionally, add a packet of store-bought demi-glacé to enhance the richness of the sauce. It’s an easy way to add depth of flavor.

Serving Suggestions and Leftovers

Typically, serving these delicious braised short ribs with puréed mashed potatoes and sautéed, fresh green beans is my go-to. However, here are a few other fabulous pairing options:

  • Creamy Risotto: The creamy texture of risotto complements the richness of the short ribs.
  • Roasted Vegetables: Add a healthy touch with a side of seasonal roasted vegetables.
  • Crusty Bread: Serve with crusty bread to soak up the flavorful sauce.
  • Homemade Ricotta Gnocchi

Storing and Leftovers

  • Store any leftover short ribs and sauce in an airtight container in the refrigerator for up to 4 days.
  • Reheat gently on the stove, ensuring not to boil.
  • Alternatively, freeze the leftovers for up to 2 months.

Repurposing Leftovers:

  • Short Rib Sandwiches: Shred the leftover meat and serve in sandwiches with caramelized onions and cheese.
  • Short Rib Pasta: Toss the shredded meat with pasta and the reduced sauce for a luxurious pasta dish.
  • Short Rib Tacos: Fill taco shells with shredded meat, salsa, and your favorite toppings for a unique twist.
Print
clock clock iconcutlery cutlery iconflag flag iconfolder folder iconinstagram instagram iconpinterest pinterest iconfacebook facebook iconprint print iconsquares squares iconheart heart iconheart solid heart solid icon
A pot of braised short ribs.

Red Wine Braised Beef Short Ribs


5 Stars 4 Stars 3 Stars 2 Stars 1 Star

No reviews

Description

In the realm of comfort food, Red Wine Braised Beef Short Ribs are a number one contender! Few dishes compare when it comes to capturing the essence of warmth and indulgence. Investing time in this slow cooker recipe rewards you with melt-in-your-mouth short ribs and a luxurious sauce that’s restaurant-quality. The slow braising process infuses the meat with rich, hearty flavors making it perfect to cozy up to on a chilly fall or winter evening.


Ingredients

Scale
  • 5 pounds, beef short ribs (bone-in)
  • 1 teaspoon salt
  • 1 teaspoon black pepper
  • 2 tablespoons high smoke-point oil (avocado or canola oil)
  • 2 stalks celery, roughly chopped
  • 1 small white or yellow onion, roughly chopped
  • 6 whole garlic cloves
  • 3 tablespoons flour
  • 3 tablespoons tomato paste
  • 3/4 bottle Cabernet Sauvignon
  • 4 cups beef stock
  • 2 sprigs rosemary
  • 4 sprigs fresh thyme
  • 4 sprigs fresh parsley
  • 2 bay leaves
  • 1 packet demi-glacé or 1 tablespoon Better Than Bouillon Beef Base

Instructions

  1. If possible, allow the short ribs to come to room temperature. Pat dry. Season on all sides with salt and pepper.
  2. Heat the oil to medium-high, in a deep, oven-safe pot. 
  3. Sear the meat to form a golden crust on all sides. Do this in batches.
  4. Remove the ribs and reserve on a plate, or platter.
  5. In the same pot, remove all but 3 tablespoons of the fat. Lower the heat to medium.
  6. Add in the celery, onions and garlic. Season with salt and pepper. Sauté for a few minutes to soften.
  7. Dust the vegetables with the flour. Cook off the raw flour taste for a few minutes.
  8. Add in the tomato paste. Cook for another minute.
  9. Pour in the red wine. Scrape up any bits from the bottom. 
  10. Add back the meat. Allow the wine to reduce for about 30 minutes.
  11. After the wine has reduced by almost half, pour in the beef stock. Add in the fresh herbs. 
  12. Allow to come back to a heavy simmer. Cover.
  13. Place in a preheated 325°F (163°C) oven for 3 hours. 
  14. After 3 hours, gently remove the ribs onto a sheet pan or oven-safe platter. Keep warm in the oven (oven should be turned off). 
  15. Strain the braising liquid into the same pot. 
  16. Turn up the heat and allow to simmer and reduce. 
  17. Optionally, for added flavor, spoon in a packet of store-bought demi-glacé. 
  18. Plate the ribs on a bed of warm, puréed mashed potatoes. Ladle on the rich demi-glacé.
  19. Garnish with fresh herbs.
  20. ENJOY!

Notes

  • To achieve a perfect sear, allow the short ribs to come to room temperature and pat dry. After seasoning well, sear in a high smoke point on medium-high, in batches, until a golden crust forms on all sides. 
  • Do not rush the process. Keep the oven temperature at 325°F (163°C) for the entire 3 hours.
  • Feel free to add roughly chopped carrots to the mirepoix.
  • Choose a Cabernet you enjoy drinking. A Pinot Noir is a great alternative.
  • Allow the wine to reduce prior to adding in the broth. This will intensify the flavors and provide for a more concentrated base for braising.
  • Optionally, for added flavor, add in a packet of French demi-glacé when reducing the strained braising liquid.
  • Leftovers can be stored in the fridge for up to 4 days and easily repurposed as another meal.
  • Prep Time: 10 minutes
  • Cook Time: 3 hours, 20 minutes
  • Category: Dinner
  • Method: Moderate
  • Cuisine: American

GET TO KNOW ME!

A photo of me in a black floral dress cooking at the stovetop at Williams-Sonoma

WELCOME! My name is Melissa Latin aka. Charlotte Fashion Plate. Happy to meet you! I am more than just recipes. I love fashion and style too! Most importantly, I love my Family (my Hubby and my Fur Babies). My Husband (aka my “Kitchen Bitch”) means the world to me. He’s pretty damn cool too. Not only is he one of the nicest guys you will ever meet, he also has had a lengthy career in professional hockey. Not only winning two Stanley Cups with the Pittsburgh Penguins in the early ’90’s, but most recently winning the Calder Cup with the Charlotte Checkers, amongst many other accolades. If you live in Charlotte and play hockey, or have a family member who plays, be sure to contact him!

Our life has changed dramatically in the past few years with the passing of our two goldendoodles, Vegas and Viva. We were lucky enough to have Vegas for five years (totally wish it was longer). Most recently, losing our Viva to a brain tumor in July of 2020. We welcomed our mini goldendoodle 7, almost seven years ago. We just added the amazing Hazel! Of course, I am always posting tons and tons of photos! Be sure to check out my recipe for Pet Bone Broth! This broth is super rich in nutrients and will provide your pet with a multitude of health benefits!

Let’s Get Social!

Be sure to follow me on social media! I’m always talking food, fashion, and family! Also, I love sharing some of my favorite Amazon Finds too. Click here to check out my Amazon page! FacebookInstagramTikTokTwitter and Pinterest! THANK YOU!