Roasted Spatchcock Chicken is one of the easiest ways to cook a whole chicken while getting juicy meat, deeply flavored vegetables, and crispy skin every single time. By flattening the chicken before roasting, it cooks more evenly and faster than a traditional roast chicken, all while soaking up flavor from an herb butter and a simple seasoning blend.
Roasting the chicken directly over potatoes, carrots, onion, lemon, and garlic turns this into a complete one-pan dinner that’s perfect for any night of the week.
Why You’ll Love This Roasted Spatchcock Chicken Recipe
- One-pan dinner – Chicken and vegetables roast together for easy cleanup.
- Great for entertaining – This roasted spatchcock chicken provides an impressive presentation, with minimal effort.
- Evenly cooked chicken – Spatchcocking helps the breast and thighs roast at the same rate.
- Crispy skin – High heat at the start delivers golden, crackly skin on the chicken.
- Flavor-packed – Herb butter under the skin keeps the chicken juicy and aromatic.
Ingredient Substitutions
- Herb Butter: Use your favorite fresh herbs instead of rosemary. Thyme, sage, parsley, or a mix of herbs all work well.
- Seasoning Blend: Swap the seasoning blend for your favorite all-purpose chicken seasoning or poultry seasoning.
- Vegetables: Carrots, potatoes, and onion can be replaced with other roasting vegetables like parsnips, sweet potatoes, Brussels sprouts, fennel, turnips, and/or squash.
How to Prepare Roasted Spatchcock Chicken
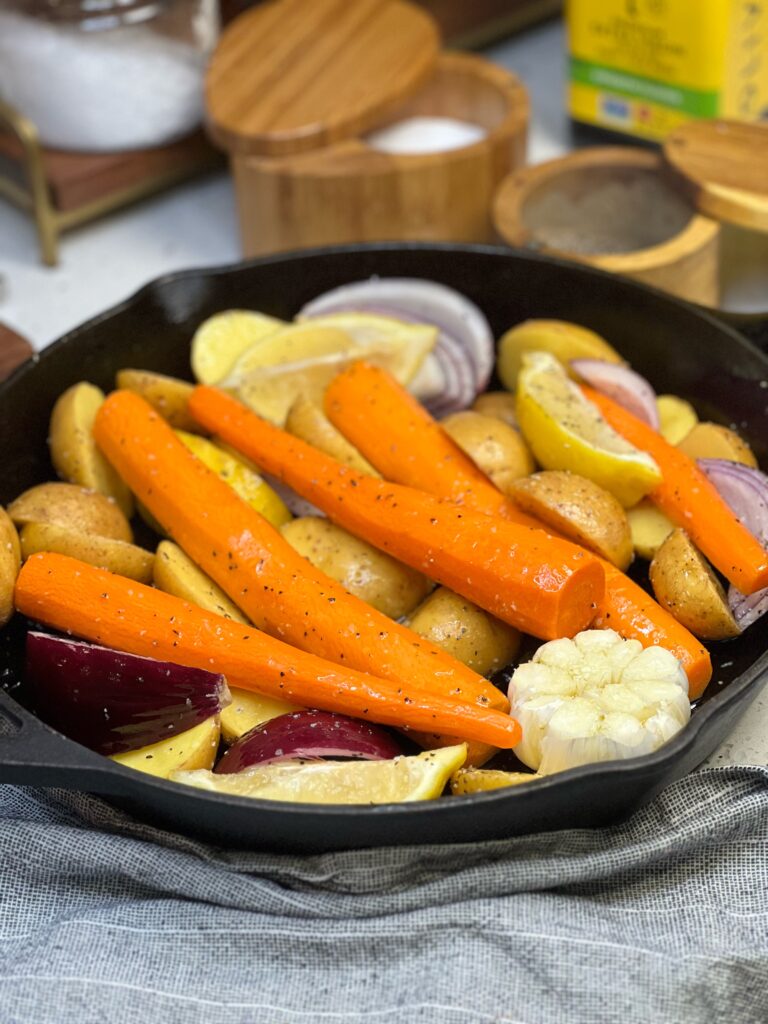
- Add the carrots, halved potatoes, red onion, and lemon to a large cast iron skillet or roasting pan.
- Drizzle with 2 tablespoons olive oil and season with a teaspoon salt and a teaspoon black pepper. Toss to coat and arrange the vegetables into an even layer to create a bed for the chicken.
- Nestle the garlic bulb into the vegetables. Drizzle lightly with olive oil and sprinkle with a pinch of salt. Set aside.
- In a small bowl, mix together the herb butter ingredients until fully combined. In a separate bowl, mix the chicken seasoning blend.
- Preheat the oven to 450°F (232°C).
- Spatchcock the chicken, if not already done.
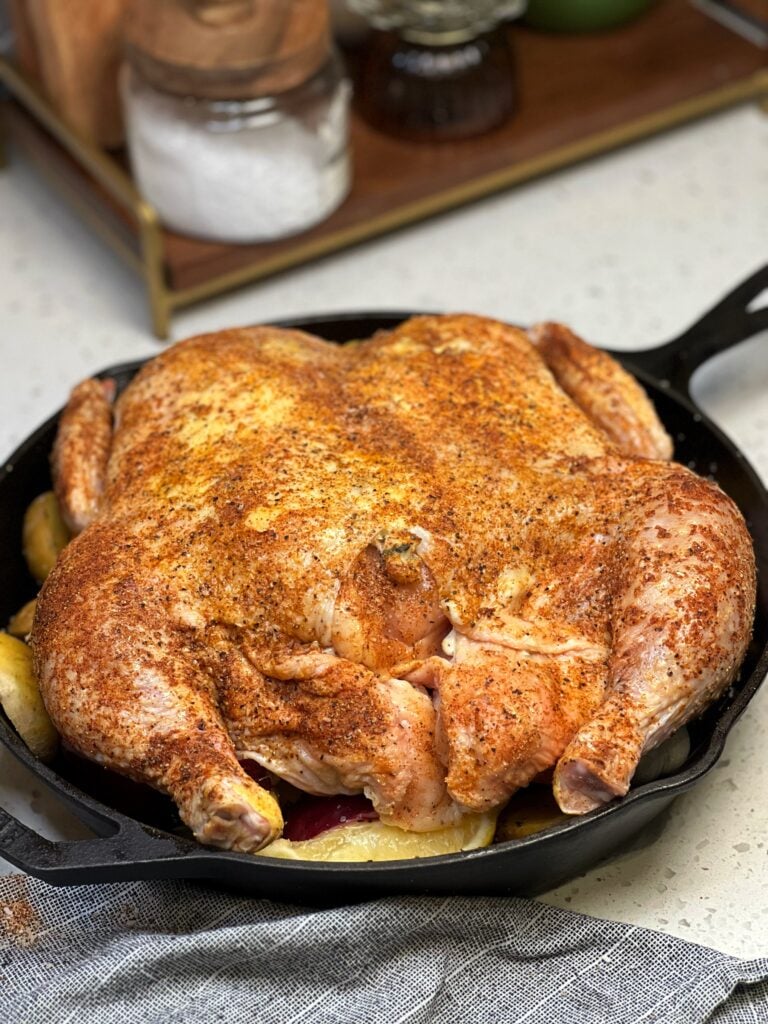
- Carefully lift the skin and spread the herb butter evenly between the skin and the flesh.
- Pat the chicken completely dry with paper towels. Brush all over with a tablespoon olive oil and season generously with the seasoning blend.
- Place the chicken on top of the vegetables, skin-side up.
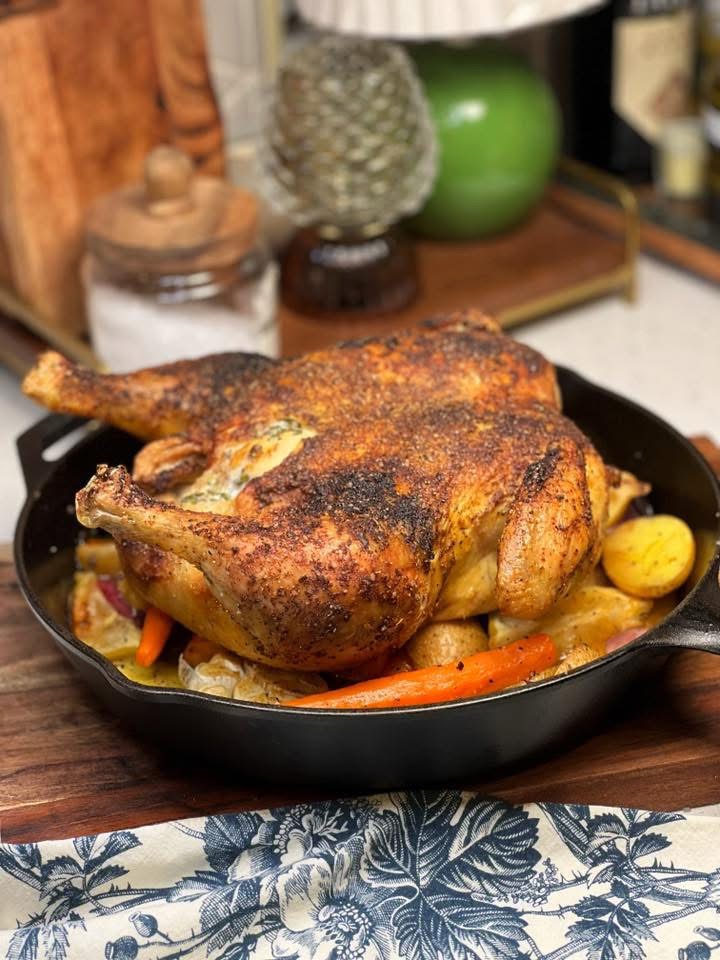
- Roast at 450°F (232°C) for 10–12 minutes to start crisping the skin.
- Reduce the oven temperature to 375°F (190°C) and continue roasting until the internal temperature at the thickest part of the thigh reaches 162°F (72°C). This can take 50–70 minutes depending on the size of the chicken. Always go by temperature, not time.
- Transfer the chicken to a cutting board and let it rest for at least 10 minutes. Return the vegetables to the oven while the chicken rests to continue roasting.
How to Serve and Store
- Serve this roasted spatchcock chicken carved with the roasted vegetables and pan juices spooned over the top.
- Store leftovers in an airtight container in the refrigerator for up to 4 days.
- Reheat gently in the oven at 325°F (163°C) to avoid drying out the chicken.
Frequently Asked Questions
- Why roast a spatchcock chicken instead of a whole chicken? Spatchcocking allows the chicken to cook more evenly and reduces overall cooking time, helping prevent dry breast meat.
- What internal temperature should spatchcock chicken reach? The chicken is done when the thickest part of the thigh reaches 162°F (72°C). It will continue to rise slightly as it rests.
- Can I prep this ahead of time? Yes. The chicken can be spatchcocked and seasoned up to 24 hours in advance. Store uncovered in the refrigerator for crispier skin.
- What pan works best for roasted spatchcock chicken? A large cast iron skillet or heavy roasting pan works best to retain heat and promote browning.
- Can I change the vegetables? Absolutely. Root vegetables like parsnips, sweet potatoes, or Brussels sprouts work well with this method.

Roasted Spatchcock Chicken
- Total Time: 1 hour, 20 minutes
- Yield: 4 to 6 servings 1x
Description
Roasted spatchcock chicken with crispy skin, herb butter, and roasted vegetables. An easy one-pan oven dinner cooked evenly every time.
Ingredients
For the Chicken and Vegetables
- 1 spatchcocked chicken
- 1 tablespoon olive oil, for brushing the chicken
- 5 carrots, peeled and halved, if large
- 1 pound baby potatoes, halved
- 1/2 red onion, quartered
- 1 lemon, quartered
- 1 bulb garlic, top cut off
- 2 tablespoons olive oil
- 1 teaspoon salt
- 1 teaspoon black pepper
Herb Butter:
- 1 stick salted butter, softened
- 2 tablespoons fresh rosemary, finely chopped
- 3 garlic cloves, pressed
Chicken Seasoning Blend:
- 1 teaspoon salt
- 1 teaspoon black pepper
- 2 teaspoons garlic powder
- 1 tablespoon paprika
Instructions
- Add the carrots, halved potatoes, red onion, and lemon to a large cast iron skillet or roasting pan.
- Drizzle with 2 tablespoons olive oil and season with a teaspoon salt and a teaspoon black pepper. Toss to coat and arrange the vegetables into an even layer to create a bed for the chicken.
- Nestle the garlic bulb into the vegetables. Drizzle lightly with olive oil and sprinkle with a pinch of salt. Set aside.
- In a small bowl, mix together the herb butter ingredients until fully combined. In a separate bowl, mix the chicken seasoning blend.
- Preheat the oven to 450°F (232°C).
- Spatchcock the chicken if not already done.
- Carefully lift the skin and spread the herb butter evenly between the skin and the flesh.
- Pat the chicken completely dry with paper towels. Brush all over with a tablespoon olive oil and season generously with the seasoning blend.
- Place the chicken on top of the vegetables, skin-side up.
- Roast at 450°F (232°C) for 10–12 minutes to start crisping the skin.
- Reduce the oven temperature to 375°F (190°C) and continue roasting until the internal temperature at the thickest part of the thigh reaches 162°F (72°C). This can take 50–70 minutes depending on the size of the chicken. Always go by temperature, not time.
- Transfer the chicken to a cutting board and let it rest for at least 10 minutes. Return the vegetables to the oven while the chicken rests to continue roasting.
- Carve the chicken and serve with the roasted vegetables.
- ENJOY!
Notes
- Prep all of the ingredients, mix the herb butter and seasonings prior to spatchcocking the chicken.
- Use disposable gloves when handling the chicken and clean up any surface areas.
- Pat the chicken dry before brushing with olive oil and seasoning.
- Starting the chicken at a higher temperature will help render the fat and create a crispier skin.
- Use a meat thermometer to check for doneness. The chicken is done when the thickest part of the thigh reaches 162°F (72°C). It will continue to rise slightly as it rests.
- Let the chicken rest for at least 10 minutes before carving. Place the vegetables back in the oven to continue roasting while the chicken rests.
- Prep Time: 20 minutes
- Cook Time: 1 hour
- Category: Lunch, Dinner, Meal Prep
- Method: Moderate
- Cuisine: American
GET TO KNOW ME!

WELCOME! My name is Melissa Latin aka. Charlotte Fashion Plate. Happy to meet you! I am more than just recipes. I love fashion and style too! Most importantly, I love my Family (my Hubby and my Fur Babies). My Husband (aka my “Kitchen Bitch”) means the world to me. He’s pretty damn cool too. Not only is he one of the nicest guys you will ever meet, he also has had a lengthy career in professional hockey. Not only winning two Stanley Cups with the Pittsburgh Penguins in the early ’90’s, but most recently winning the Calder Cup with the Charlotte Checkers, amongst many other accolades. If you live in Charlotte and play hockey, or have a family member who plays, be sure to contact him!
Our life has changed dramatically in the past few years with the passing of our two goldendoodles, Vegas and Viva. We were lucky enough to have Vegas for five years (totally wish it was longer). Most recently, losing our Viva to a brain tumor in July of 2020. We welcomed our mini goldendoodle 7, almost seven years ago. We just added the amazing Hazel! Of course, I am always posting tons and tons of photos! Be sure to check out my recipe for Pet Bone Broth! This broth is super rich in nutrients and will provide your pet with a multitude of health benefits!
In addition, I’m so very excited to announce I have published my first e-book and paperback, “Mastering Thanksgiving – A Guide to Perfecting Your Thanksgiving Dinner.” Your support would mean the world to me.
Let’s Get Social!
Be sure to follow me on social media! I’m always talking food, fashion, and family! I also love sharing some of my favorite Amazon Finds too. Click here to check out my Amazon page! Facebook, Instagram, TikTok, X, Pinterest and YouTube! Check out my LTK to find out what I’m wearing! THANK YOU!


2 Comments
[…] blends. I have used in a few other recipes, but could not wait to add her amazing blends to my Spatchcock Chicken. I watched her make a recipe for Jollof rice (never even heard of this before I met her). I was […]
[…] SPATCHCOCK CHICKEN […]