Crispy Skin Salmon is one of those back-pocket recipes every home cook should master. When done right, the skin is golden and shatteringly crisp, while the inside stays tender, flaky, and perfectly cooked. This is a simple pan seared salmon method using just salt, pepper, and olive oil, but the real focus is technique. I’m sharing how to make crispy skin salmon in a beginner-friendly non-stick pan, and also how to achieve restaurant-style results using stainless steel for those who love that classic chef approach.
If you’ve ever wondered how to get crispy salmon skin at home without overcooking the fish, this step-by-step tutorial will walk you through it.
Why You Will Love This Crispy Skin Salmon Recipe
- Golden, crispy salmon skin every time – The key technique ensures perfectly crisp skin, without sticking.
- Simple ingredients, big flavor – Just salt, pepper, and olive oil let the salmon shine.
- Beginner-friendly method – A non-stick pan like my Caraway pan makes this nearly foolproof.
- Restaurant-style option included – Learn how to cook salmon in stainless steel for that classic chef-level sear.
- Versatile for any meal – Serve with rice, risotto, farratto, roasted vegetables, salads, pasta, or creamy sauces.
Method 1: Using a Non-Stick Pan (Beginner-Friendly)
If you’re new to pan seared salmon, a high-quality non-stick pan makes this incredibly approachable. I love using my Caraway Home non-stick pan because:
- The salmon skin releases easily
- You use less oil
- Cleanup is simple
- It’s very forgiving for beginners
With non-stick, medium heat is usually perfect. You don’t need extreme heat to get crispy salmon skin. Patience and dryness matter more than high temperature.
This is a great option if you’re teaching yourself how to cook salmon on the stovetop or want consistent results, without stress.
Method 2: Restaurant-Style Stainless Steel Pan
Many seasoned cooks prefer stainless steel because it creates a deeper, more dramatic sear.
Here’s how to make it work without sticking:
- Preheat the stainless steel pan over medium heat for several minutes before adding oil.
- Add the oil and allow it to heat until shimmering.
- Make sure the salmon is very dry.
- Place the salmon skin side down and do not move it.
At first, it may seem like it’s sticking, but once the crust forms, it will naturally release from the pan. Resist the urge to flip too early.
Stainless steel gives you that classic restaurant-quality crispy skin salmon with beautifully rendered fat and deep golden color.
How To Prepare Crispy Skin Salmon
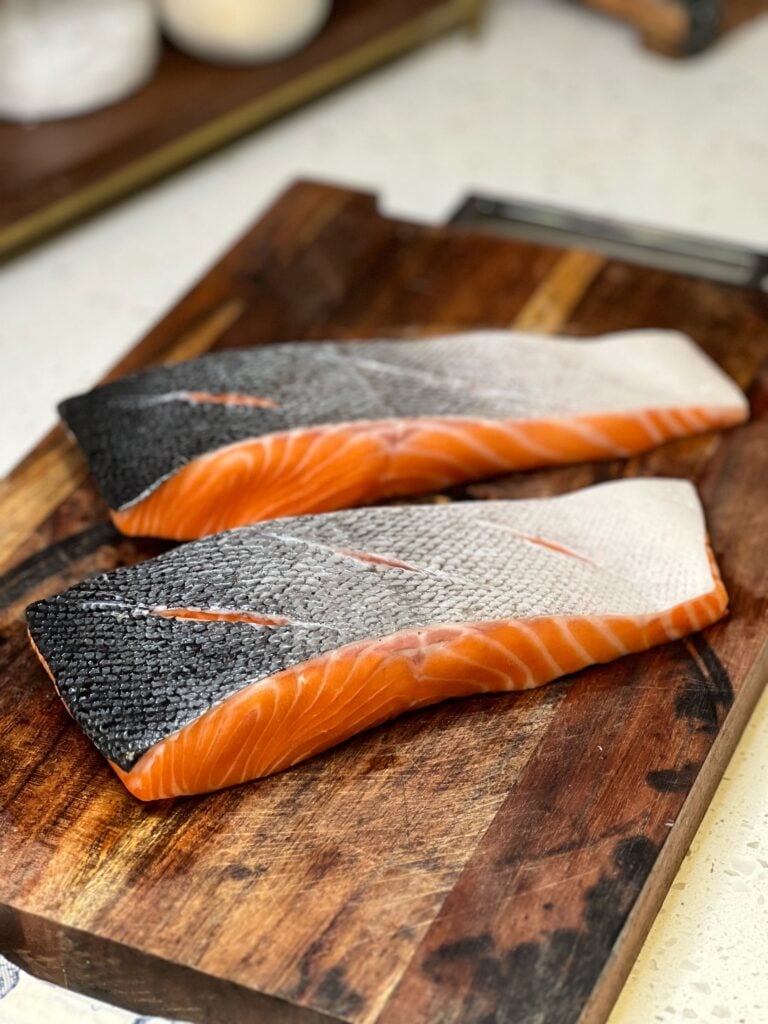
- Remove the salmon from the refrigerator about 10–15 minutes before cooking to take the chill off. Pat the salmon completely dry on both sides using paper towels. This is critical for crispy skin. Moisture is the enemy of a good sear.
- Season the flesh side with salt and pepper. Lightly season the skin side as well.
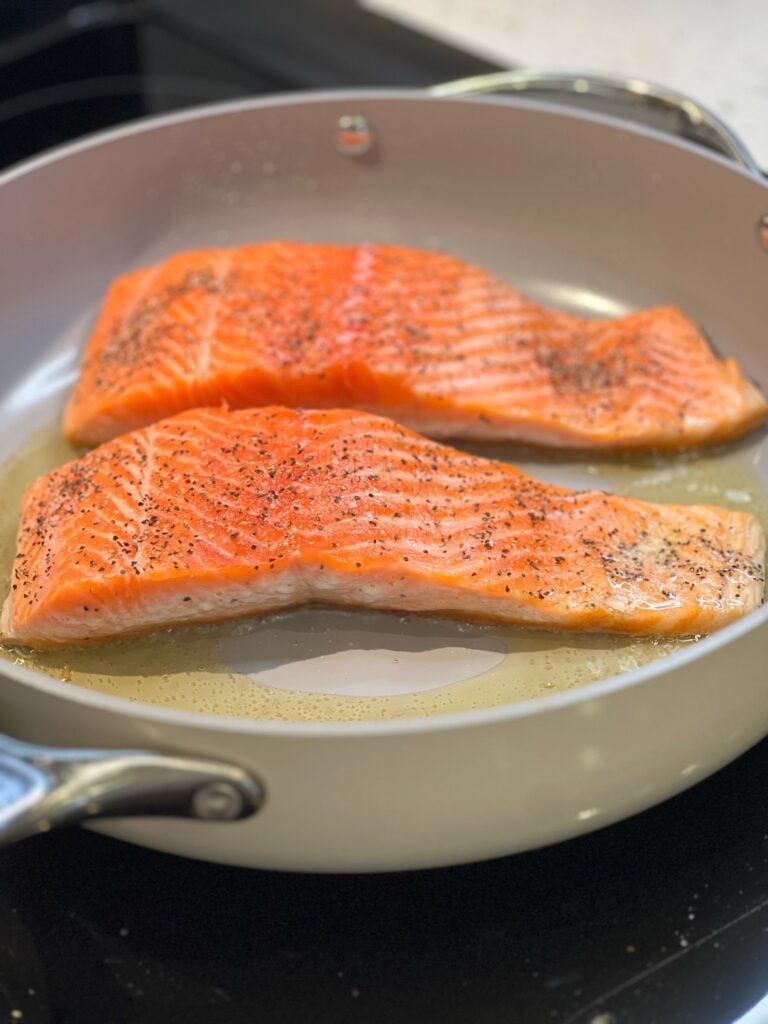
- Heat 1–2 tablespoons olive oil in your non-stick pan over medium to medium-high heat, until the oil shimmers.
- Using a sharp knife, lightly score the salmon skin with 3–4 shallow cuts across the skin (do not cut into the flesh). This helps prevent the skin from curling and allows the fat to render evenly for ultra crispy salmon skin.
- Let the salmon cook undisturbed. The fish will cook about 3/4 of the way up from the skin side. This usually takes 4–6 minutes depending on thickness.
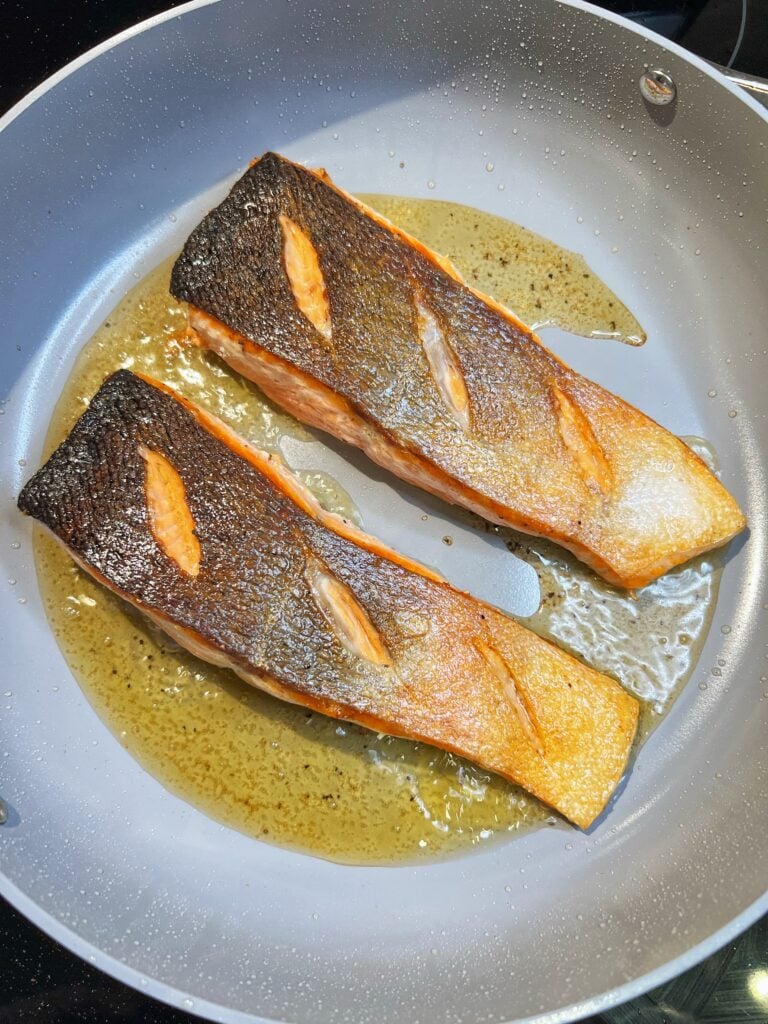
- Once you see the color change moving up the sides and the skin is deeply golden and crisp, carefully flip the salmon.
- Cook for another 2–3 minutes on the flesh side, just until the center is cooked to your liking.
- Remove from the pan and let rest for a minute before serving.
How to Serve and Store
- Serve immediately to preserve the crispy salmon skin texture.
- Pair with steamed rice, risotto, farro risotto, roasted vegetables, mashed potatoes, mashed cauliflower, or a simple green salad.
- Store leftover crispy skin salmon in an airtight container in the refrigerator for up to 3 days.
- Reheat gently in a skillet over low heat to avoid drying out the fish, or in a 300°F (150°C) oven for 8–10 minutes until warmed through.
- Avoid microwaving if possible, as it softens the crispy skin and can overcook the salmon.
- Leftovers are perfect for salads, grain bowls, lettuce wraps, tacos, or flaking into pasta the next day.
Frequently Asked Questions
- How do you get salmon skin really crispy? The key is removing moisture, using enough oil, and cooking skin-side down long enough without flipping too early. Let it cook 3/4 of the way through before turning.
- Should I cook salmon skin side down first? Yes. Always start skin side down. This protects the delicate flesh and allows the skin to crisp properly.
- How long does it take to pan sear salmon? For a 6–8 ounce filet, about 4–6 minutes on the skin side and 1–3 minutes after flipping.
- Why is my salmon sticking to stainless steel? The pan likely wasn’t preheated properly, or the fish wasn’t dry enough. Proper heat and patience allow the crust to form and release naturally.
- What internal temperature should salmon be? USDA recommends 145°F, but many prefer removing it around 125–130°F for medium and allowing carryover cooking.
- Should I score the salmon skin? Scoring the salmon skin with shallow cuts helps prevent curling and allows the fat beneath the skin to render more evenly. This promotes extra crispy salmon skin without needing to press the fish down with a spatula. Just be careful not to cut into the flesh — you only want to score the skin.
- Do I have to press the salmon down in the pan? If you score the skin first, you typically won’t need to press it down. However, if you skip scoring and notice curling, gently pressing the salmon with a spatula for 10–15 seconds at the beginning can help it lay flat.
More Easy Salmon Recipes to Love
Print
Crispy Skin Salmon
- Total Time: 20 minutes
- Yield: 2 servings 1x
Description
How to make Crispy Skin Salmon with this easy pan seared tutorial. Learn how to get golden, crispy salmon skin every time.
Ingredients
- 2 (6–8 ounce) salmon filets, skin on
- 1/2 teaspoon salt
- 1/2 teaspoon black pepper
- 1–2 tablespoons olive oil
Instructions
- Remove the salmon from the refrigerator about 10–15 minutes before cooking to take the chill off. Pat the salmon completely dry on both sides using paper towels. This is critical for crispy skin. Moisture is the enemy of a good sear.
- Season the flesh side with salt and pepper. Lightly season the skin side as well.
- Heat 1–2 tablespoons olive oil in your non-stick pan over medium to medium-high heat, until the oil shimmers.
- Using a sharp knife, lightly score the salmon skin with 3–4 shallow cuts across the skin (do not cut into the flesh). This helps prevent the skin from curling and allows the fat to render evenly for ultra crispy salmon skin.
- Let the salmon cook undisturbed. The fish will cook about 3/4 of the way up from the skin side. This usually takes 4–6 minutes depending on thickness.
- Once you see the color change moving up the sides and the skin is deeply golden and crisp, carefully flip the salmon.
- Cook for another 2–3 minutes on the flesh side, just until the center is cooked to your liking.
- Remove from the pan and let rest for a minute before serving.
- ENJOY!
Notes
- Thicker salmon filets will require slightly more time.
- Wild salmon cooks faster than farm-raised salmon due to lower fat content.
- If your salmon has been previously frozen, be sure it is fully thawed and very dry before cooking.
- You can finish with a squeeze of fresh lemon juice or a pat of butter for extra richness.
- Adjust seasoning based on how you plan to serve the salmon.
- Prep Time: 2 minutes
- Room Temp Time: 10 minutes
- Cook Time: 8 minutes
- Category: Lunch, Dinner, Meal Prep
- Method: Easy
- Cuisine: Fish and Seafood
GET TO KNOW ME!

WELCOME! My name is Melissa Latin aka. Charlotte Fashion Plate. Happy to meet you! I am more than just recipes. I love fashion and style too! Most importantly, I love my Family (my Hubby and my Fur Babies). My Husband (aka my “Kitchen Bitch”) means the world to me. He’s pretty damn cool too. Not only is he one of the nicest guys you will ever meet, he also has had a lengthy career in professional hockey. Not only winning two Stanley Cups with the Pittsburgh Penguins in the early ’90’s, but most recently winning the Calder Cup with the Charlotte Checkers, amongst many other accolades. If you live in Charlotte and play hockey, or have a family member who plays, be sure to contact him!
Our life has changed dramatically in the past few years with the passing of our two goldendoodles, Vegas and Viva. We were lucky enough to have Vegas for five years (totally wish it was longer). Most recently, losing our Viva to a brain tumor in July of 2020. We welcomed our mini goldendoodle 7, almost seven years ago. We just added the amazing Hazel! Of course, I am always posting tons and tons of photos! Be sure to check out my recipe for Pet Bone Broth! This broth is super rich in nutrients and will provide your pet with a multitude of health benefits!
In addition, I’m so very excited to announce I have published my first e-book and paperback, “Mastering Thanksgiving – A Guide to Perfecting Your Thanksgiving Dinner.” Your support would mean the world to me.
Let’s Get Social!
Be sure to follow me on social media! I’m always talking food, fashion, and family! I also love sharing some of my favorite Amazon Finds too. Click here to check out my Amazon page! Facebook, Instagram, TikTok, X, Pinterest and YouTube! Check out my LTK to find out what I’m wearing! THANK YOU!

No comment yet, add your voice below!